It’s been a while since I talked about the gardens here, so let’s take a peek at those. It’s been an odd season here with above normal rainfall and rather cool temperatures. It’s been good for some things, bad for others.
We aren’t sure what in the world happened to the dahlias this year. Those are the red flowers behind the cone flowers in the foreground. They just went absolutely crazy. I’ve never seen them get this big before, at least not around here. They’re 4 – 5 feet tall and so thick and lush that it looks like a jungle in there. The cone flowers seem ridiculously happy back there too as you can see. And the sunflowers — oh brother, they’re pushing 7 feet tall.
Handy hint – if you love birds, especially finches, put in some sun flowers. We’ve been putting a few sunflowers in back there for years. It’s right by the window above the kitchen sink and later in the season the finches swarm around that area going after both the cone flower seeds and the sunflowers. They’re great fun to watch, arguing with each other, dangling upside down like little acrobats as they go after the seeds.
The butternut and acorn squash have completely taken over the garden at the back of the garage. We’ve had issues back there because it gets shaded out quite a bit. We’re constantly dragging the vines out of the lawn, out of the raspberries, out of, well, out of everything. They seem to grow a foot or more every day. Absolutely loaded with squash now and still blossoming. We hauled a lot of compost into this bed also last year and it’s paying off now.
One of my issues with modern hybrid flowers is that they’re all show and no scent. I am a very scent oriented person, and it’s always disappointed me that so many flowers that I remember having amazing aromas when I was a child smell pretty much like nothing these days as the plant breeders have selected for ever more showy flowers, and sacrificed the scent, sort of like how they’ve selected vegetables for high yield and tougher fruit to make transport easier, and lost much of the flavor. The alyssum, though, make up for it. Tiny, tiny little flowers that put out an incredible amount of perfume. The scent is almost intoxicating.
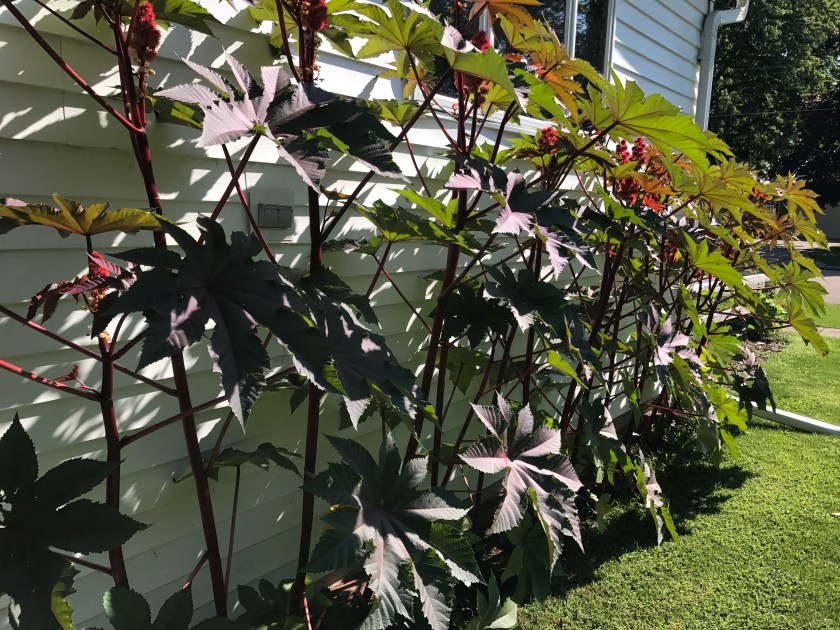
Then we have these guys. They sort of look like something from an alien planet or exotic jungle, these beans. The leaves are a foot across, a rich burgundy color when small, then changing to a reddish-green with red veins as they get bigger. They’re about 6 feet tall right now.
The hostas up front have been enjoying themselves too this year. I’ve always loved hostas and we turned this into a hosta garden a few years ago. It had been a mish-mash of odd bushes, grass that never grew properly, some very invasive bushes that someone decided looked pretty. It was a mess. We ripped everything out, tilled up the whole works, put in the cedar fence and started putting hostas in. And we also seem to have pots of plants all up the stairs, along the deck… good grief, where did all those plants come from?
Okay, this isn’t a plant. In the process of building a new gaming computer. My Razor Laptop died on me a couple of months ago and we’re building a new one. We’ve been working under the belief that anything that’s worth doing, is worth doing to excess, so this thing is fairly well loaded up with every goofy thing you can imagine. Interior lighting systems, the CPU cooler has a sort of vortex lighting effect built into it, the fans light up like multi-colored strobes, matching LED light strips inside, even the dopy RAM lights up.
It’s running a liquid cooled Kaby Lake Core i7 processor at 4.2 gigahertz overclocked to 4.7, a Samsung SSD, 8 USB3 ports, Thunderbolt ports, built in WiFi, bluetooth, 6 fans…
Unfortunately the Nvidia video card you see there was was DOA. It worked the first time we turned the computer on. Then we shut it down, did some work on the machine, turned it on, and the card was dead. Sigh… It works on the MBs built in Intel graphics, but that isn’t suitable for any kind of gaming. Grrr… So it’s going to be a while before we get it up and running the way it should be.
Still, dear lord that thing is fast. Eldest son was so impressed he’s thinking of building one for himself.
Stories you might have missed about food, agriculture, and the ever popular ‘stuff’, along with occasionally snarky commentary.
Coffee Linked To Not Dying!
Ooo, coffee — that delightful, delicious beverage that both pleasures the taste buds and enlivens the brain, oh I feel so sorry for those of you who drink tea. (Come on, you tea drinkers know what you’re drinking is lawn sweepings soaked in tepid water, right?)
Anyway, now that I’m done annoying the tea drinkers out there (you know who you are), let’s get on with this.
That headline up there is not clickbait. It’s true. According to a study published actual real live doctors from an actual research facility and published in an actual science journal (not the Flintstone’s Institute for Advanced Studies of Sciency Stuff and Flat Earth Society where most of the congress apparently gets its science information) you have almost a 20% less chance from dying from just about anything if you drink coffee. Well, probably not getting hit by an asteroid or something like that. They mean heart disease, stroke, cancer, that kind of thing. If you click the link it will take you to an article over on The Guardian and you can get the links to the actual study from there.
containing dicamba after it was learned that more than 200,000 acres of non-GM soybeans were allegedly damaged by the product. The Arkansas ban was approved by the Governor’s office and will go into effect on July 11, and is in effect for 120 days. The Missouri one doesn’t seem to have a specific time limit, but the agency involved in Missouri said it hoped the problems could be resolved and the ban lifted yet this growing season.
Dicamba has always been difficult to work with. It turns to vapor and can drift for extremely long distances. Non-GM soybeans are extremely sensitive to the product, and even a tiny amount can damage the crop, so any kind of drifting is a serious problem. Monsanto has claimed that it’s “VaporGrip” version of the product cured the problems when used properly. But it doesn’t seem to be working very well.
So, you ask, what dos Monsanto say about all of this? Glad you asked.
They’re blaming everyone else, of course. In an interview over at CropLife, a Monsanto spokesperson blamed everyone and everything except, of course, it’s product. Farmers spraying at the wrong time of day, having residue from other products in the sprayer’s tanks, not following proper procedures, using the wrong spray nozzles, spraying in windy conditions. And all, of course, without offering any proof that any of this actually happened.
More Chlorpyrifos Controversy
Five states (and I’ve heard several more are in line to do it too) are suing the EPA over it’s decision to permit the continued use of Chlorpyrifos, a very nasty pesticide that is known to cause serious health problems, especially in children.
I mentioned this before. Last year the EPA determined that chlorpyrifos was dangerous, and public health organizations, doctors and other health care professionals have been pushing for it to be banned for years. The EPA was going to ban the stuff at last.
But then along came Pruitt and he claimed the stuff is just fine and dandy and that they had real actual “meaningful data and meaningful science” to prove it. Associated Press, other media, and health officials have repeatedly requested the EPA provide them with the data, but the EPA has refused to respond to any of the requests.
I don’t like being a cynical old bastard, but I get the feeling the EPA hasn’t provided it yet because they have interns locked in a back room somewhere desperately trying to write something sciency enough to fool the average reader into believing this stuff is “safe”.
Oh, I should point out that DOW, which makes chlorpyrifos, contributed $1 million to Trump to fund his inauguration, its CEO is supposedly good friends with him, and it has spent over $13 million “lobbying” various politicians in the past year.
USDA came out with it’s crop status report, and it’s the worst that they’ve issued since the 2012 drought, with only 65% of the corn crop rated at “good” or better, and only 62% of the soybean crop rated “good” or better.
Now during the drought, corn and soybean prices skyrocketed, with corn pushing the $8/bushel range for a time. So you would naturally think that a report that bad would push the prices up, right?
Well, no. After the report came out, corn prices fell by about 5 cents a bushel, and soybeans dropped more than 12 cents.
Apparently what drove the morning price down was that the report wasn’t as bad as they thought it would be.
Bureaucratic Run Around
More on the dicamba front: BASF, which has partnered with Monsanto to produce the special dicamba blend that was just banned in Arkansas and Missouri after enormous numbers of complaints about crops damaged by the herbicide, is trying to pull a bureaucratic end run around the ban by applying for something known as a “special local need label”. This is a special permitting system that allows the use of a pesticide that normally cannot be used, because no other pesticide would be effective. Basically it was originally intended to help during emergency situations where there was an infestation of some pest that threatened to wipe out a crop, and only a non-registered pesticide would work. If you want, you can read the information about that whole process here.
Considering dicamba has damaged literally hundreds of thousands of acres of crops as it has drifted across the countryside, it seems that problem here is dicamba, not the weeds it’s supposed to control.
What The Hell Is Milk Anyway?
There is a lot of fighting these days over the definition of the term “milk” when it comes to products being sold to consumers, specifically over the use of the term in describing drinks made with various nuts and beans. I.e. “soy milk” and “almond milk” and that kind of thing. Even USDA isn’t sure, and is using the word “milk” in much of it’s literature when referring to these products.
I can certainly understand why the almond industry wants to use the term. It’s because calling “almond milk” what it really is, isn’t exactly appealing. If they labeled it accurately, they’d have to call it “97% water with a few ground up almonds, emulsifiers, stabilizers, gums, flavoring agents, coloring, added vitamins and minerals and preservatives and you’d get more nutrition from just eating five or six actual almonds than drinking this stuff beverage”.
Why won’t the ISPs connect rural customers? Cost, of course. It would take ages for them to make up the cost of connecting everyone outside of cities and towns. The same thing happened with electricity and telephone back in the day, the providers wouldn’t hook up rural areas until the government pretty much forced them to and paid a lot of the costs associated with it. And in this current political climate, well, a prominent Wisconsin politician (Sensenbrenner) is on record as saying that no one actually needs internet in the first place, thus illustrating that he hasn’t a clue as to what life is like out here in the real world.
The problem with most of these schemes is that they rely on some type of radio communication, either types of cellular networks, microwaves, or some kind of extended wifi system. And the fact of the matter is that we don’t really have the spectrum available to make these schemes work. The radio spectrum is so severely overcrowded now that cellular companies are paying billions of dollars for access to a few frequencies to expand their networks and improve their systems. So exactly where they’re going to squeeze in these new services is problematic.
The other problem is that some of these systems are already being tested or are even already in use in limited areas, and they don’t really work very well and they aren’t really all that fast. We have a kind of microwave system in use around here serving residents that live outside of the wired system, and it has some serious issues. Heavy rain and snow disrupts service, speeds slow to a crawl during ‘prime time’ when many people are trying to use the system, and most of these systems are very expensive, have some very serious data caps, and have lots of other issues associated with them.
Yet another problem is that what the feds are calling “broadband” isn’t really broadband by anyone’s definition. The US has some of the most abysmal internet speeds of any first world country. The ISPs here have been concentrating on throttling back usage, restricting bandwidth, charging utterly ridiculous amounts of money for going over artificially created caps so they can cram ever more paying users into an already overloaded system, and not investing any of that money in improving the infrastructure or in extending their coverage. The result is that US speeds are about half of what they are in the UK, the EU, Japan, Korea, and even the metro areas of China.
The feds definition for “broadband” internet for rural areas is even worse than what it is in urban areas, about 10 meg/second. So you can forget about making that conference call to work if your kid is playing WOW or your dear spouse is down in the basement watching PornHub.
Why is she wearing a mask? If you had to pose in a swimsuit with a bunch of cows, you’d probably wear a mask too.
manure from farming operations. I’ve mentioned before that we have had problems with well contamination from farm runoff, especially in Kewaunee County, were it’s estimated that 30% – 40% of the wells are contaminated. It hasn’t been widely reported, but the problem is so bad that local organizations, schools and others have been giving out drinking water to local families because of the widespread contamination of the wells up there.
The state is going to be issuing new rules that will finally put some restrictions on when, how and where farms can spread manure. Hopefully this will help.
Okay, okay — I know that photo has nothing to do with the story. But if I come across a photo of a person in a swimsuit, wearing a mask, standing with a bunch of cows, I’m going to put it up. I can’t help myself.
It was one of those nights. I managed to pick up a horrible cold, and whenever anything interferes with my breathing I wake up with horrible panic attacks and can’t get back to sleep, which is what happend at 3 this morning. So I started fiddling with the Raspberry Pi.
Neat little gadget, the RPi. I have two or three of the little stinkers now. One is sort of a development system with a breadboard attached, and the other is, hopefully, going to end up in an actually useful device.
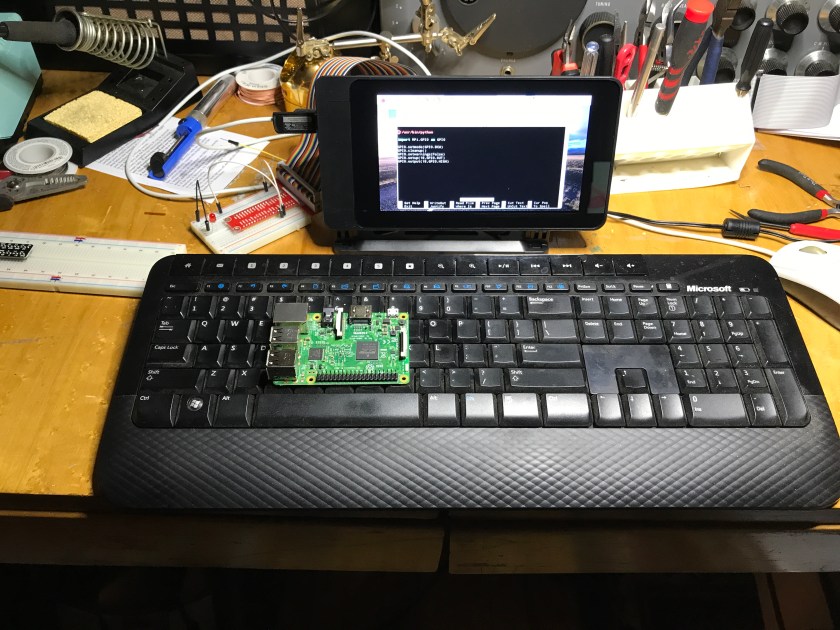
I wanted to have a separate display for it so I wouldn’t have to pull the monitor off my other computer all the time, so I picked up a couple of 7 inch touch screens for the RPi,
one with a tilt case that’s my development/testing system. These touchscreens are fairly inexpensive, about $70, and you can get smaller ones with lower resolution for considerably less. The 7 inch is big enough that I can easily read text.
Installing the screen is about as simple as it gets. On the model shown above a ribbon cable connects from the screen to the RPi, and two short jumpers go from the screen to the GPIO header on the Pi.
If you’re running the Raspberian (spelling?) version of Linux that a lot of versions of the RPi come with, and you have the latest updates to the OS installed, it should recognize the screen when it boots and begin using it without any intervention on your part.
The other RPi that I’m using as a development and testing system has the same touchscreen but in a slightly different configuration, and I stuck it in a nice tilt case I picked up off Amazon. The RPi itself fits into the case along with the screen making it a neat, tidy package. The case give full access to the I/O ports and the GPIL header. I added a Microsoft wireless keyboard and a mouse. The RPi 3 has WiFi on board so you don’t need a hard wired network connection any longer. You can see a small breadboard immediately to the left of the display. That’s attached to the RPi GPIO header by a ribbon cable. There’s a larger breadboard to the left of that. To give you an idea of the size of the RPi 3 I put one on the keyboard.
So, what in the world am I doing with it? Well, fiddling, mostly. As you might guess from the presence of the breadboards I’m experimenting and learning how to control external devices with the RPi. I have a box full of LEDs, digital displays, switches, relays, a wide variety of sensors that I’m learning to use with it. Great fun.
Eventually I’m hoping to build a remote weather station mounted on the roof that feeds weather conditions to the house network that I can monitor either with another RPi or one of the house computers.
My long range goal is to rig up a RPi as the control system for a stand alone PSK31 QRP transceiver. I want something not much bigger than a tablet computer that is a complete PSK mode transceiver, running off a battery. Just add an antenna and you’re on the air.
Don’t know how far I’ll get with either of the projects, but it’s fun fiddling with them.
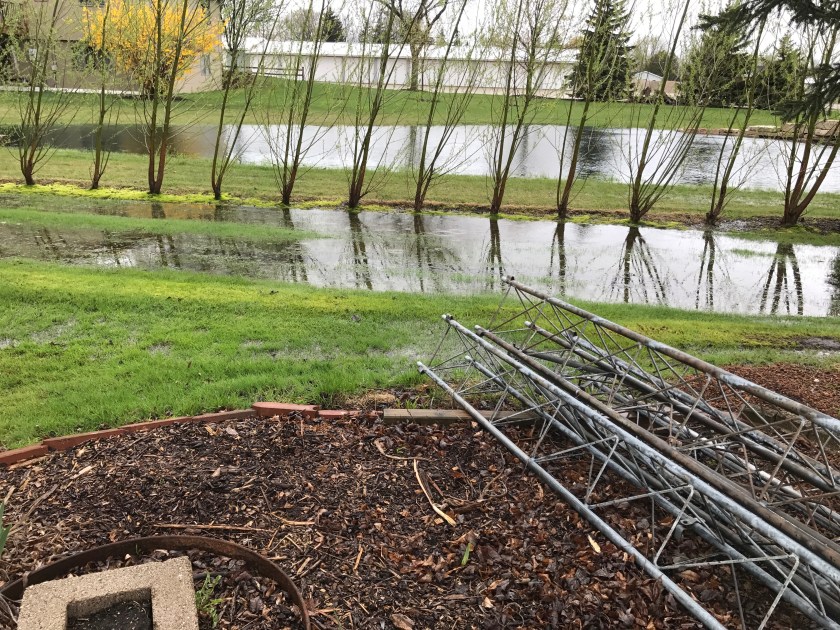
Wet is what describes the weather here. Wet and cold. We had almost 24 hours of rain and everything is completely saturated around here. The gauge indicated we had about 2 inches. And the temperatures plunged as well. High temp yesterday was around 45 degrees, a good 20 degrees colder than the day before. If anyone thought winter was over, this will disprove that. Up in the Bayfield area they actually had to cancel schools the other day because of ice and snow.
Jazz – Last Sunday I worked for the high school jazz band’s spring concert. The students did a great job but the turnout was disappointing. I don’t think we had more than 50 – 60 people showed up for it, even though it’s a free concert. Most of the parents showed up, but that was about it. I suppose the scheduling was part of the problem. Because of scheduling conflicts they could only do it at 4 in the afternoon which is a fairly awkward time for a lot of people.
My job at these events is basically to keep things running smoothly and deal with emergencies if they turn up. But they aren’t making it easy. I found out last weekend that they pulled the control computer that operates the HVAC systems at the high school. Now if I have to make changes to the heating/cooling settings, I have to make a 20 minute trip to the downtown building to get on the computer there, then drive back to the high school…
I imagine it saves them money. They probably have to pay a license fee for that software at the high school, plus the cost of the equipment itself, but come on, really? If something goes wrong, I have to drive 20 minutes one way to read the diagnostics, drive 20 minutes back to the HS to fix the hardware problem, then drive 20 minutes back to downtown to check the diagnostics again and reset the systems, then drive 20 minutes back to the high school…
Oh brother… This is not going to work out well for them, I can see that. If we have a HVAC problem at the high school during a special event and I can’t get it fixed quickly because I have to run downtown just to get at the control systems, there are going to be a lot of very angry people at the event. Last year I got a panic phone call on graduation day that the temperature in the gym was 97 degrees and climbing. If I hadn’t had the control computer at the high school itself at the time and would have had to run back and forth between the two buildings just to do diagnostics, I wouldn’t have gotten the problem fixed until after graduation had been over. Hmph….
I have a small railroad yard about a block away behind the house and this beastie is parked back here again. It turned up on a siding up by the old depot a few weeks ago, then disappeared, then reappeared at a siding down by Lunda Construction about two miles from here, and now it’s back up here again.
Speculation is that the former owner of Lunda bought it. He already has one fully restored caboose on his property just north of town, so we figure this one is destined for restoration as well.
I haven’t heard much about the meat scandal going on in Brazil on the main stream media but it’s been all over the ag press since the story first broke. According to reports, Brazil’s meat exporting companies have been involved in bribery scheme where government inspectors and auditors were bribed to permit the companies to ignore sanitary regulations and inspections, falsify medical records and certificates, and ignore tampering with products to disguise problems with the meat. It’s also alleged the producers used ascorbic acid and other chemicals to disguise rotten meat, injected water into meat to inflate the weights. It’s just nasty. The whole story sounds like something straight out of “The Jungle” by Upton Sinclair.
There are now reports of large numbers of arrests as the government tries to do damage control. Brazil is the largest exporter of beef and poultry in the world, and the scandal has decimated the industry. Many countries instituted outright bans on importing Brazilian meat and meat products or instituted much stricter inspection protocols. Things are slowly starting to get back to normal, but the Brazilian meat industry really took a hit on this one and it could take some time for it to recover.
The really scary part about this is that meat processing companies had allegedly been bribing the country’s federal meat inspectors for years before this was discovered.
Does No One Remember?
Does no one remember what things were like before the EPA came along and environmental laws were finally brought on-line? It seems not, judging from the stuff I’ve been hearing coming out of the “new” EPA and the new administration. If you read the laundry list of things the new administration is planning on doing when it comes to the environment, it seems none of them do.
And what’s up with this fixation on coal that this administration has? Pruitt just put on a staged event with coal miners in full gear standing around him to try to spin how the gutting of environmental regulations is going to somehow create massive “economic growth”. All things considered, coal is a very, very minor cog in the energy machine. For many years coal has been becoming increasingly irrelevant in the energy world, and not just for environmental reasons. It’s expensive, dangerous, dirty, inefficient, produces huge amounts of waste material when burned, it’s hard and dangerous to mine, and the coal industry doesn’t really employ all that many people.
When I remember what it was like back in the 1960s, and think that we might be going back to those days of cities being entombed in clouds of toxic smog, rivers that were so polluted they actually caught on fire, where if you fell into a river you’d probably die from poisoning before you drowned, and all just so a few politicians can pose for pictures with a handful of miners from an industry that was starting to fail even before they were born, it makes me wonder what the hell is going on.’
Rather than spending all this time, energy and government money propping up the coal industry allegedly to “protect” the jobs of a few thousand miners as the politicians claim they are doing, wouldn’t it make more sense to invest those resources in training the miners for other types of work, giving different types of businesses incentives to move into those areas, etc?
Canadian Dairy Fights Back
The Canadian dairy industry is pushing back against claims that it and the Canadian government are at fault in Grassland cutting off 75 dairy farms here in the state. As I pointed out previously, the story being pushed out by the company about why it abruptly cut off 75 farms, forcing them to scramble to try to find new processors to buy their milk, seems to be a bit disingenuous. Especially when Grassland is claiming it had to cut off those farms because it can’t sell the milk while the company itself is seeking permits to build it’s own 5,000 cow dairy farm.
The Canadians are pointing out that the real culprit is the US’s overproduction of milk. And they’re right. The market for dairy products is utterly saturated. Despite an increased demand for butter, the US domestic market has been flat for years, with some sectors, such as consumption of liquid milk, actually declining despite heavy marketing and various gimmicks. And while demand is shrinking, prices falling, the diary industry responds by drastically increasing production?
Even one of the farmers dropped by Grassland agrees as is noted in the story linked above.
One of the biggest problems with the whole dairy industry in the US is government intervention in the market. Political manipulation of the market has resulted in a maze of rules, regulations, laws, marketing schemes, surplus buys and I don’t know what all else, that has left us with a marketing system that is convoluted, irrational, and so outdated that parts of it go back 75 or even a hundred years.
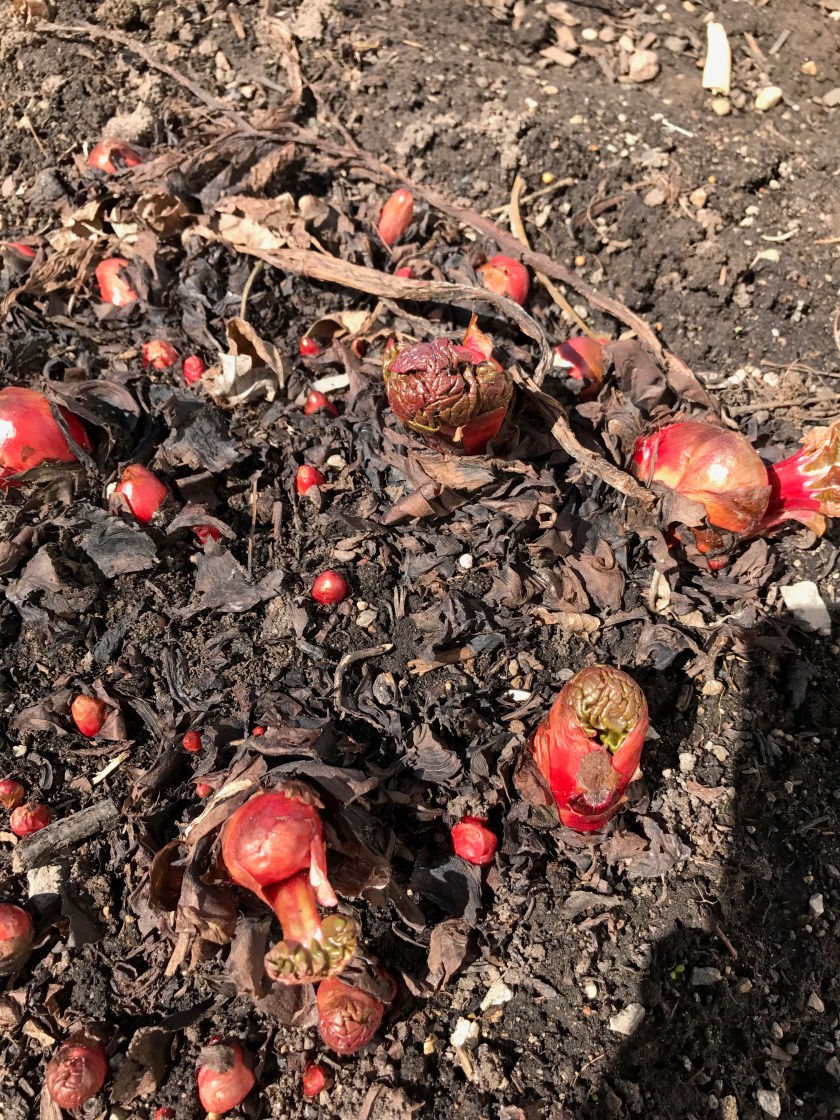
I dug the tiller out of the garage this morning and started doing some work in some of the beds here. That old tiller… It is literally almost as old as I am, probably dates to about the early 1960s. It’s exactly like one we owned when I was a little kid. The dopey thing is the most reliable piece of equipment we own here. It just plain works, and always has. Pull it out of the garage, fill it with gas, check the oil, and pull the starter a couple of times and it starts. It’s an ancient Briggs engine, the brand name, Gilson, is put on with stickers, but the thing is built like a tank.
I’m afraid I was a bit sneaky. Every year MrsGF agrees that we really, really need to work up some of the long established beds because the soil has deteriorated so badly. But when I finally get the tiller out and start to actually do it, ah, well… This flower is so neat and it will come back again this year, and the cone flowers are going to come up there, and this plant is in there and she doesn’t want to do that. And to be fair, there are some nice plants in there, but in order to save those few nice plants, it means the ground is so bad in those areas we can’t plant anything else but weeds.
So I got her to agree to do it yesterday, and while she’s at work this morning I got out there quick and worked everything up before she could change her mind.
This area here was first an herb garden, then we tried strawberries, which didn’t work that well because, well, the soil was so bad. So the oregano more or less took over everything except for one patch where the cone flowers had established themselves. It’s a fantastic spot, sheltered in the “L” of the house, with exposure to the south and west, so it’s warm, sunny, etc. But the soil… Oh dear lord it was bad in there. When we first put this bed in we hauled in a lot of compost and worked it in, but that was something like 20 years ago and nothing has been done in there since. The soil was so hard I had to go over it four times with the tiller.
We call this spot the Stump Garden because that’s what it was, originally. It was a big old stump when we bought the place about 20 years ago. We could have hired someone to come in and grind it out, but why pay good money for something like that? My solution was to build a retaining wall around it, fill it with dirt and compost, and plant stuff on top of it, my thinking being that sooner or later the stump will take care of itself by rotting away.
And it did, and in a remarkably short amount of time. Within about three years there was nothing left of it under the dirt. We decided we liked having a raised bed there, so we lowered the retaining wall a half foot or so and kept it in place. We’ve found this is an ideal place for growing lettuce. It’s well drained and in partial shade which helps keep the lettuce and greens from bolting. We re-seed it a couple of times during the summer so we have a constant supply of fresh salad greens well into the fall of the year.
The heart garden is called that because it’s sort of heart shaped. My only regret is that I didn’t make it bigger. Much bigger. Because I hate lawns. No excuse for lawns. None at all. I keep trying to kill mine off, but it keeps coming back no matter what. But I’m still working on it…
It’s not far from the herb garden area and I’m seriously considering linking the two up and turning it into the “Shapeless Blob” garden as an excuse to get rid of more grass.
This is another one that desperately needs work, but MrsGF was reluctant to let me work up because there were some plants in there she liked. Even though she told me to work it up last night, I suspect now that I’ve actually done it I’ll hear about it, especially if whatever I plant in there doesn’t work out well.
One year we put the entire thing in alyssum, a variety with an incredibly intense smell. When you’d walk out the back door of the garage the entire area was covered in this incredible scent. I’m tempted to do that again. Maybe. Not sure. The area is shaded from about noon on by our pear tree so whatever we put in there has to be able to deal with that.
Then there’s the garage garden, which is by the garage. Well, of course it would be, wouldn’t it. Garage. Garden… We really worked this one over last year. The soil was terrible in there. I covered the entire area with about six inches of compost and worked it in last year, and that has helped enormously. I have high hopes for this area this season.
So, if this works, there should be a slide show here of some photos I took at the Manitowoc quilt show yesterday.
This slideshow requires JavaScript.
The Manitowoc quilters put this show on every two years and going to it has become a bit of a ritual for us because these people do some absolutely amazing artwork. The photos don’t really do it justice.


 Ooo, coffee — that delightful, delicious beverage that both pleasures the taste buds and enlivens the brain, oh I feel so sorry for those of you who drink tea. (Come on, you tea drinkers know what you’re drinking is lawn sweepings soaked in tepid water, right?)
 There is a lot of fighting these days over the definition of the term “milk” when it comes to products being sold to consumers, specifically over the use of the term in describing drinks made with various nuts and beans. I.e. “soy milk” and “almond milk” and that kind of thing.


 touchscreen but in a slightly different configuration, and I stuck it in a nice tilt case I picked up off Amazon. The RPi itself fits into the case along with the screen making it a neat, tidy package. The case give full access to the I/O ports and the GPIL header. I added a Microsoft wireless keyboard and a mouse. The RPi 3 has WiFi on board so you don’t need a hard wired network connection any longer. You can see a small breadboard immediately to the left of the display. That’s attached to the RPi GPIO header by a ribbon cable. There’s a larger breadboard to the left of that. To give you an idea of the size of the RPi 3 I put one on the keyboard.
 and everything is completely saturated around here. The gauge indicated we had about 2 inches. And the temperatures plunged as well. High temp yesterday was around 45 degrees, a good 20 degrees colder than the day before. If anyone thought winter was over, this will disprove that. Up in the Bayfield area they actually had to cancel schools the other day because of ice and snow.
 I don’t think we had more than 50 – 60 people showed up for it, even though it’s a free concert. Most of the parents showed up, but that was about it. I suppose the scheduling was part of the problem. Because of scheduling conflicts they could only do it at 4 in the afternoon which is a fairly awkward time for a lot of people.
 the beds here. That old tiller… It is literally almost as old as I am, probably dates to about the early 1960s. It’s exactly like one we owned when I was a little kid. The dopey thing is the most reliable piece of equipment we own here. It just plain works, and always has. Pull it out of the garage, fill it with gas, check the oil, and pull the starter a couple of times and it starts. It’s an ancient Briggs engine, the brand name, Gilson, is put on with stickers, but the thing is built like a tank.
 mp when we bought the place about 20 years ago. We could have hired someone to come in and grind it out, but why pay good money for something like that? My solution was to build a retaining wall around it, fill it with dirt and compost, and plant stuff on top of it, my thinking being that sooner or later the stump will take care of itself by rotting away.
 The heart garden is called that because it’s sort of heart shaped. My only regret is that I didn’t make it bigger. Much bigger. Because I hate lawns. No excuse for lawns. None at all. I keep trying to kill mine off, but it keeps coming back no matter what. But I’m still working on it…
 wouldn’t it. Garage. Garden… We really worked this one over last year. The soil was terrible in there. I covered the entire area with about six inches of compost and worked it in last year, and that has helped enormously. I have high hopes for this area this season.