If you’ve been following this blog for a while you know that I’m an amateur radio operator. And one thing all amateur radio operators (Or hams, as they call us.) need to deal with is antennas. And the one up there in that photo just went up here at grouchyfarmer.com’s headquarters and is what I want to talk about.
(Sidenote: Why do they call amateur radio operators hams? No one seems to know for sure. My personal theory is that the founder of the ARRL, Hiram Percy Maxim, was using his neighbor’s fence as a makeshift antenna back in 1912 when he was experimenting with an early spark gap transmitter and crossed up his wires somehow and accidentally electrocuted his neighbor’s entire herd of pigs, and since he had to pay off the neighbor for the pigs, he started up a side gig selling pork products.)
For a lot of people, including, unfortunately, a lot of amateur radio operators, antennas are a strange and arcane mixture of magic, sorcery, science and blind luck. That’s not true, of course. How antennas work is hard science. We’ve been using antennas for well over a hundred years and how they work is well established. But because the effectiveness of antennas is affected by a wide variety of external factors and operating practices, the experiences of individual hams with exactly the same antenna can vary wildly. This, along with a lack of understanding of exactly how antennas work and a strong aversion to mathematics has resulted in a lot of… I hate to use the term nonsense, but that’s an accurate way of describing a lot of what I see turning up on Youtube and various amateur radio oriented forums.
And of all the antennas out there that hams commonly use, the one that is surrounded with the most nonsense is probably the magnetic loop antenna. According to the self appointed experts, magloop antennas are either the best things ever and deliver absolutely magical results, mediocre at best, or they don’t work at all and you’re better off wiring the rain gutter on your house to your radio. I’ve been playing with magloop antennas for years, both commercially made ones and ones I’ve cobbled together myself. I reviewed one back in 2019 if you want to click the link there and go back and look at the one I own that I use for portable operations. And I’ve had good results with both the Alpha I bought and my home brew copies.
Ultimately it isn’t a matter of which is the best antenna. There is no such thing as a perfect antenna. it’s a matter of which one will do what you need in the situation you are in. The big advantage of magloop antennas is that they are small, relatively unobtrusive and work pretty well, even indoors in some circumstances. This makes them attractive for people who don’t have the space to put up something like my 135 ft long OCFD or a huge beam antenna, or who live in an area where local zoning ordinances or home owners associations restrict the size and placement of antennas or even prohibit them entirely. Something like a magloop antenna may be the only option some people have.
How do they work? I’m not going to launch into a pages long lecture on that. There are very good resources out there available for free on the internet so I’ll leave it to you to do your own research. I’m going to restrict my comments to the HGR-QRO-A MLA .
And before I start in I should point out that I have no relationship with PreciseRF except as a customer. I receive no compensation from them in any way whatsoever. The antenna was purchased through their website and was paid for out of my own pocket. I don’t get free stuff or make any money off these reviews. And considering the conclusions I come to at the end of this review, PreciseRF is never, ever, going to send me free anything. This antenna… It works very, very well as an antenna but there are some serious issues with it that are very troubling. But I’ll come to that later.
If you read CQ magazine or QST, you’ve probably seen this ad:

This is what I’m talking about, the HG series of MLAs from PreciseRF. Specifically the one of the far right. The HGR QRO-A MLA antenna. And yes, this thing really costs $3,000. Let me repeat that. Three. Thousand. Dollars. For an antenna. And yeah, I bought one.
Well, it seemed like a good idea at the time…..
So why is this antenna worth three grand? It’s because of that “QRO” bit they stuck on the name. QRO is one of the “Q-codes” that amateur radio operators used as abbreviations back in the days when morse code was pretty much the only way you could send information long distances. Originally it was one ham telling another to increase the power of their transmitter so they could hear them better. But it has also come to mean someone operating a transmitter at full legal power allowed by the FCC, up to 1,500 watts. That’s why this thing is so expensive, the full power bit.
It is hard to make a magloop antenna that can handle more than a few watts of transmitter power. My Alpha MLA can handle up to 100W using SSB or CW on some bands, but I use digital modes and it can only handle up to about 20W using digital. The reason why, well, it’s complicated. MLA antennas can generate some pretty serious voltages internally when they are in operation, and the commonly available variable capacitors used in the less expensive ones can’t handle those kinds of voltages without arcing and causing damage. If you want to use higher transmitter power to reach out farther with your signal, you need to resort to using electronics, circuits and a vacuum variable capacitor that can handle those voltages. And that takes money. A lot of money.
The HGR QRO can handle up to 1,500 watts SSB or CW, and up to around 400 watts with digital modes. I know of only two MLA antennas that can handle that kind of power, this one and one that’s even more expensive than the HGR.
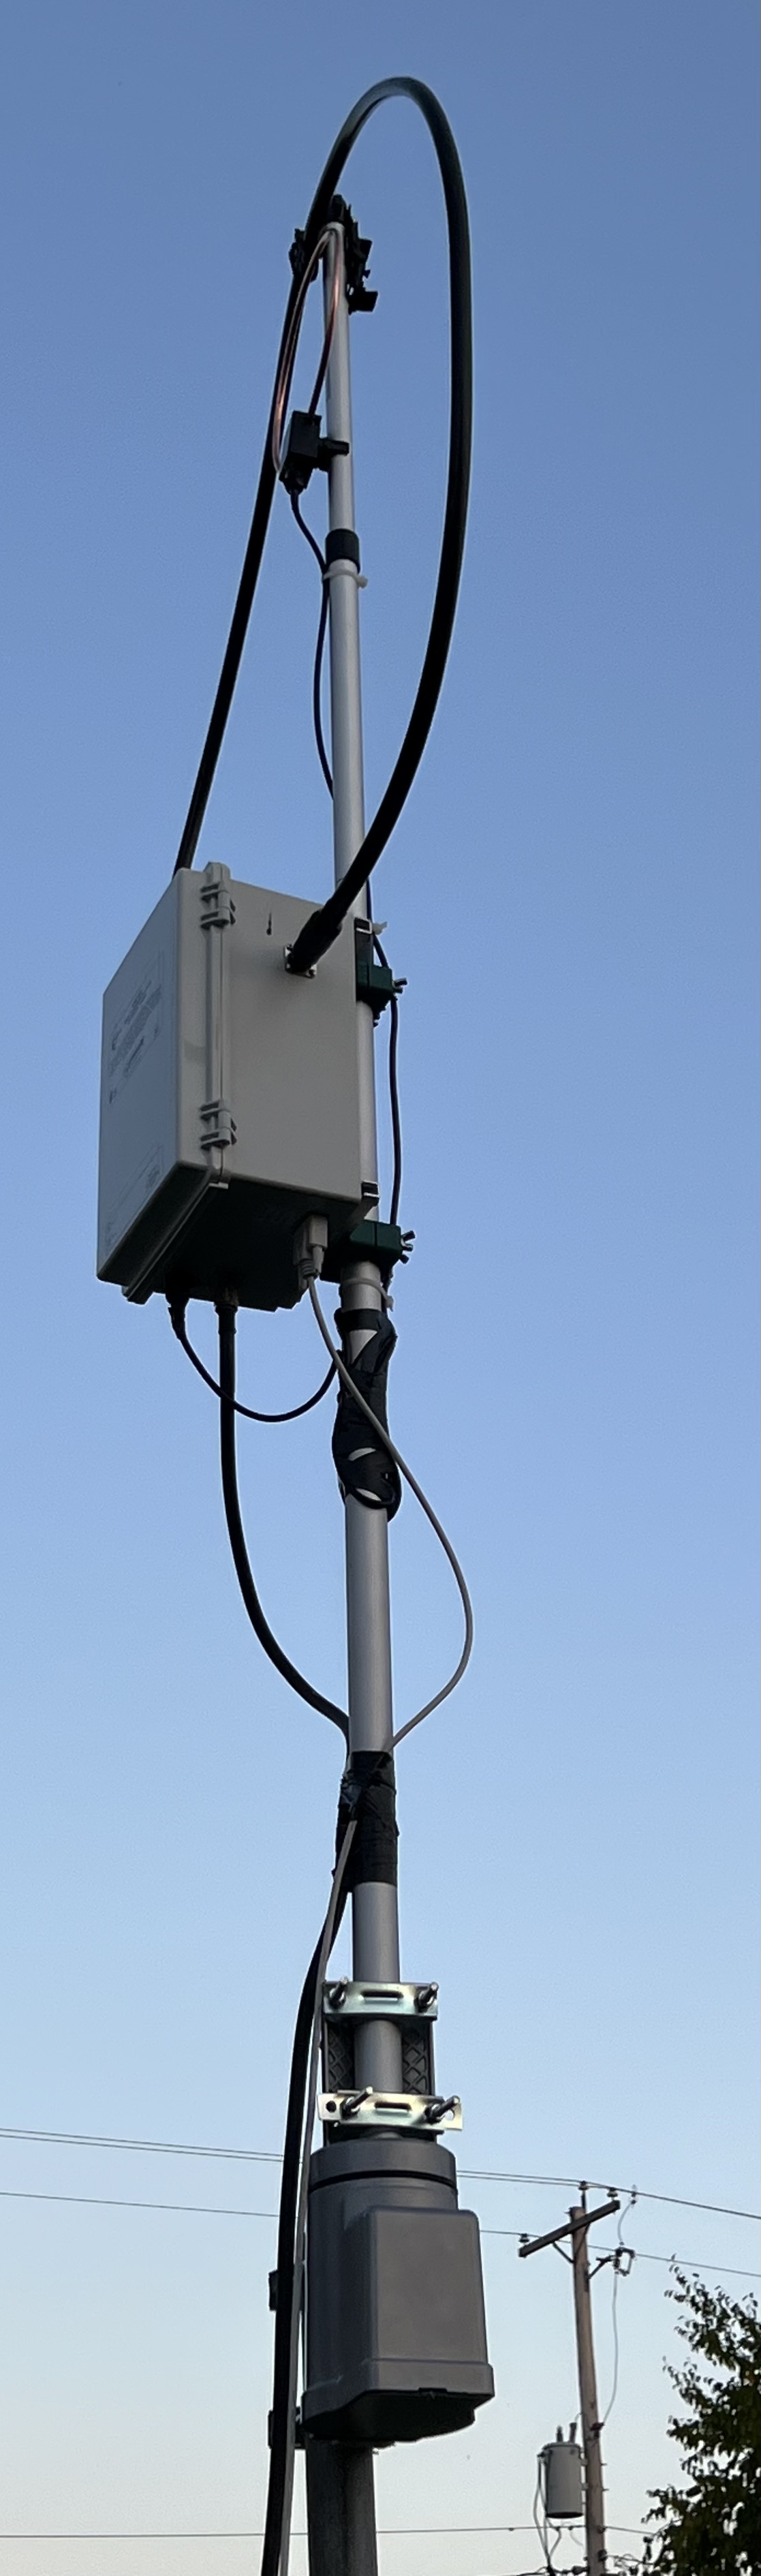
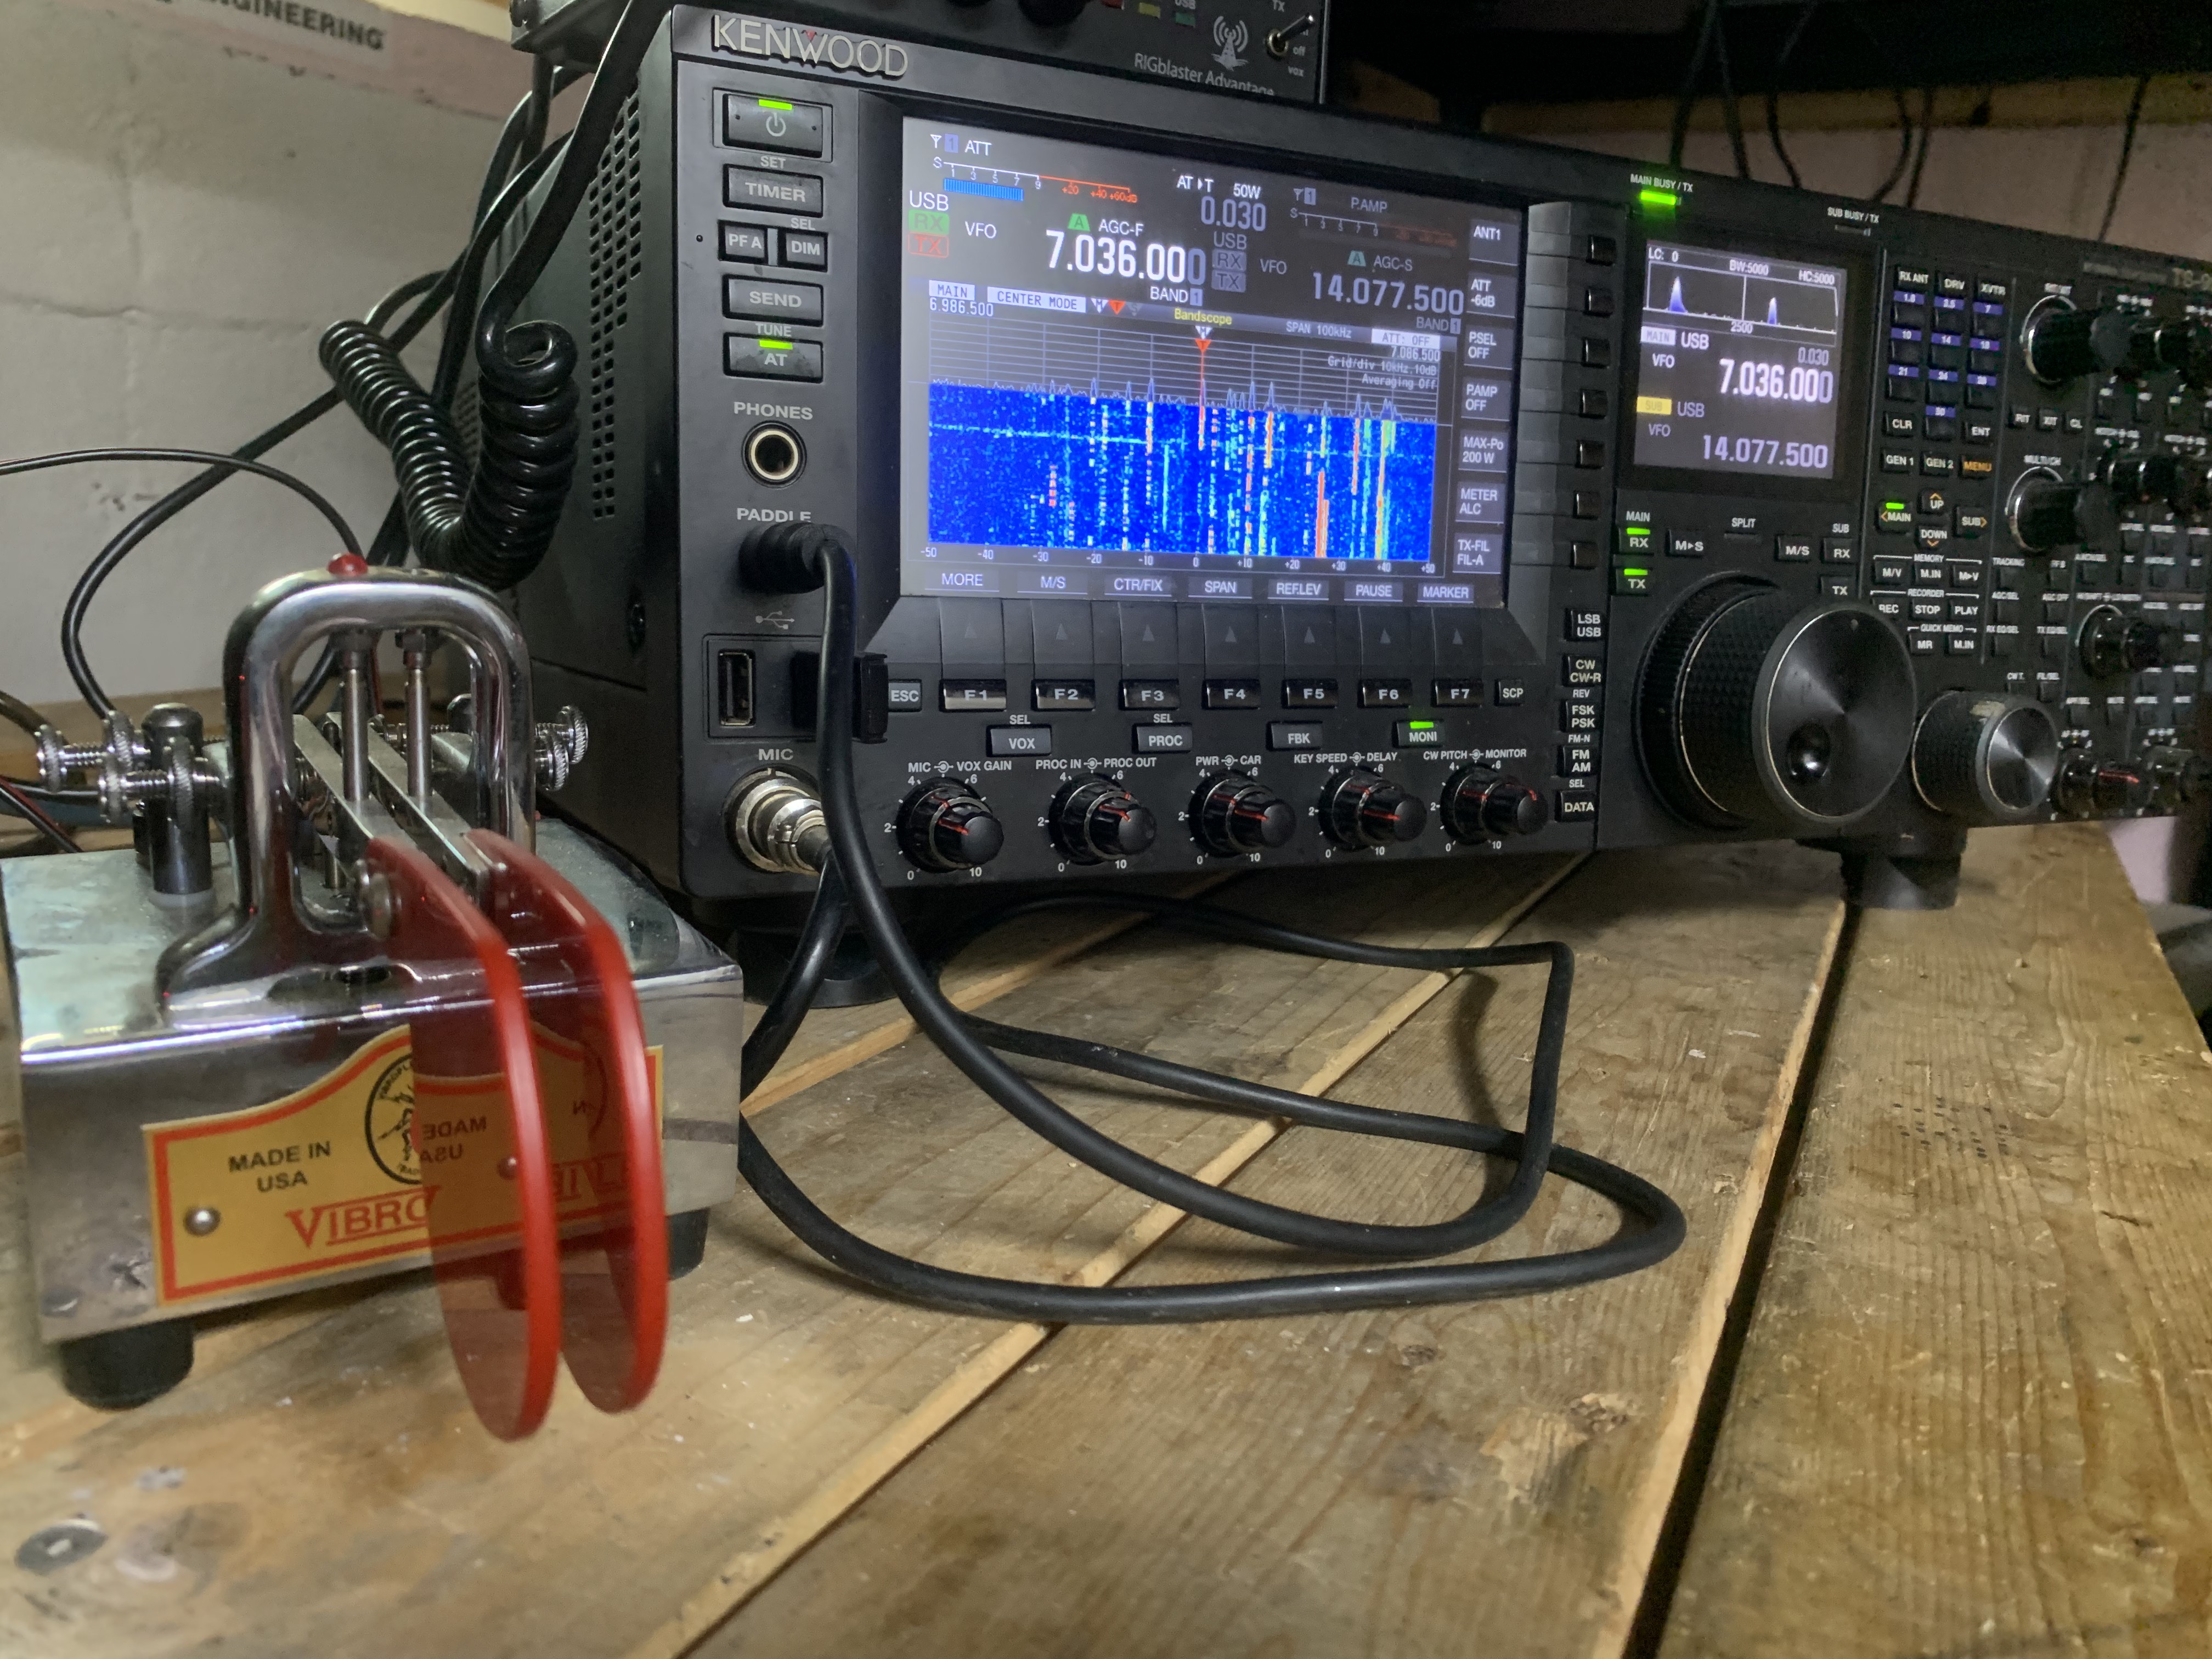
But let’s get back to this specific antenna. I don’t do “unboxing” or assembly reviews, especially for something as easy to put together as the HGR is. Took me all of twenty minutes to assemble it. There is a collapsable ‘twist ‘n lock’ mast that everything clips or bolts to, a cable that goes from the copper loop to the big gray “box o’ gubbins” which contains the vacuum capacitor, stepper motor that adjusts it and the electronics that controls the system, which also bolts to the mast, and then the DB9 control cable and your coax hooks to the bottom of the box with standard connectors. And that’s it for assembling the antenna itself. I stuck it up on top of a cheap RCA rotator, and all of that is bolted to a 4×4 pressure treated post set in concrete and about 6 ft tall.

There is also the control box. That goes next to your transceiver. The DB9 cable from the antenna connects to the controller. The coax from the antenna goes into the control box, and a short jumper connects from the box to your transceiver. Oh, and you need a 12V power supply to operate the control box. Putting the whole thing together only takes a few minutes. Running the cables and mounting it is going to take longer than assembly does.
Oh, and you’re going to need an SWR meter because the one in the HGR QRO’s control box isn’t even close to accurate, something PreciseRF warns you about in the owner’s manual. And it can only handle about 5 watts of transmitter power. It’s useful only for the auto-tune function. I use the one built into my Kenwood TS-990S transceiver in normal usage.
The control box is what controls the tuning of the antenna. Unlike my Alpha that requires me to be right next to the antenna so I can adjust the variable capacitor by hand whenever I change frequency, the HGR has remote tuning controlled by that box there in the photo on the right up there. And it is very, very nice to be able to sit in my comfy chair in the basement and re-tune the antenna by just pushing a couple of buttons or turning that knob.
The first thing necessary when turning on the antenna is something called indexing. The stepper motor in that big box o’ gubbins out there on the mast starts to sort of recalibrate itself, turning the variable capacitor from its minimum to maximum to recalibrate itself so it doesn’t end up trying to crank the capacitor past its max and minimum range. And it takes a while to do this so be patient. Once it’s done that you generally don’t need to do it again and just bypass the indexing option when turning it on.
MLAs have a very narrow bandwidth so the antenna needs to be re-tuned whenever you change frequency. That’s easily done with the buttons on the front panel. When changing bands it will automatically re-tune the variable capacitor out there on the antenna to something reasonably close to where it needs to be for that band. After that you transmit a carrier at less than 10 watts, watch your SWR levels on your meter, and tune for the lowest SWR. Doing this manually can be a bit fiddly and time consuming.
This version of the HGR has auto-tune, though, and a built in SWR meter. So just press the AUTO button. It will prompt you to transmit a 5 watt carrier. Press OK and transmit, and the controller will re-tune the antenna relatively quickly. It works pretty well too. After some experimenting I never bothered to try to tune it manually. The auto-tune function almost always resulted in the lowest SWR readings all by itself.
I need to tell you right up front that this antenna doesn’t like the lower bands, at least on the digital portions of the band where I operate. On 17, 15, 12 and 10 meters it will easily tune down to an SWR of about 1.1 to 1.4. But on 20 meters the best I could get is 1.8, and on 40 the best was around 2.0. On 20 and 40 meters, after I tune the antenna for the best match, I switch on the transceiver’s internal antenna tuner. And before you start to complain about that yes, it works just fine and even PreciseRF’s documentation tells you to do that if you can’t get a good match and you feel it’s necessary.
Once the antenna is tuned, that’s all you need to do. Just operate as you normally would. All things considered, it’s as easy to use as it was to assemble.
The ultimate test is how well the thing works as an antenna, and my results there have exceeded my expectations.
The first thing I noticed was the background noise level. There is a lot of background noise out there in the radio spectrum. Most of it is caused by electronic devices in our homes and neighborhoods, and the background noise level can be so high sometimes that it makes receiving weak and even moderately strong radio signals almost impossible. Here my noise level is pretty high, usually running around S5 to S7 or even higher.
When I first hooked up the HGR and turned on my transceiver on 40 meters my S meter read zero. No noise at all. None. WTF? I thought the coax cable was bad or a connector was bad. But then I changed frequency to the FT8 part of the band and instantly the radio started chirping with that annoying FT8 chorus and the display on the radio lighted up full of signals. But still no background noise? None? Yeah, none. Between FT8 transmissions the noise level was zero.
This is what my display showed on 40M with my OCFD antenna.

Those yellow and orange lines are FT8 transmissions. The gray fuzzy stuff is the random background noise I normally see.
This picture below is the display when I switched over to the HGR antenna a few minutes later, on the same frequency.
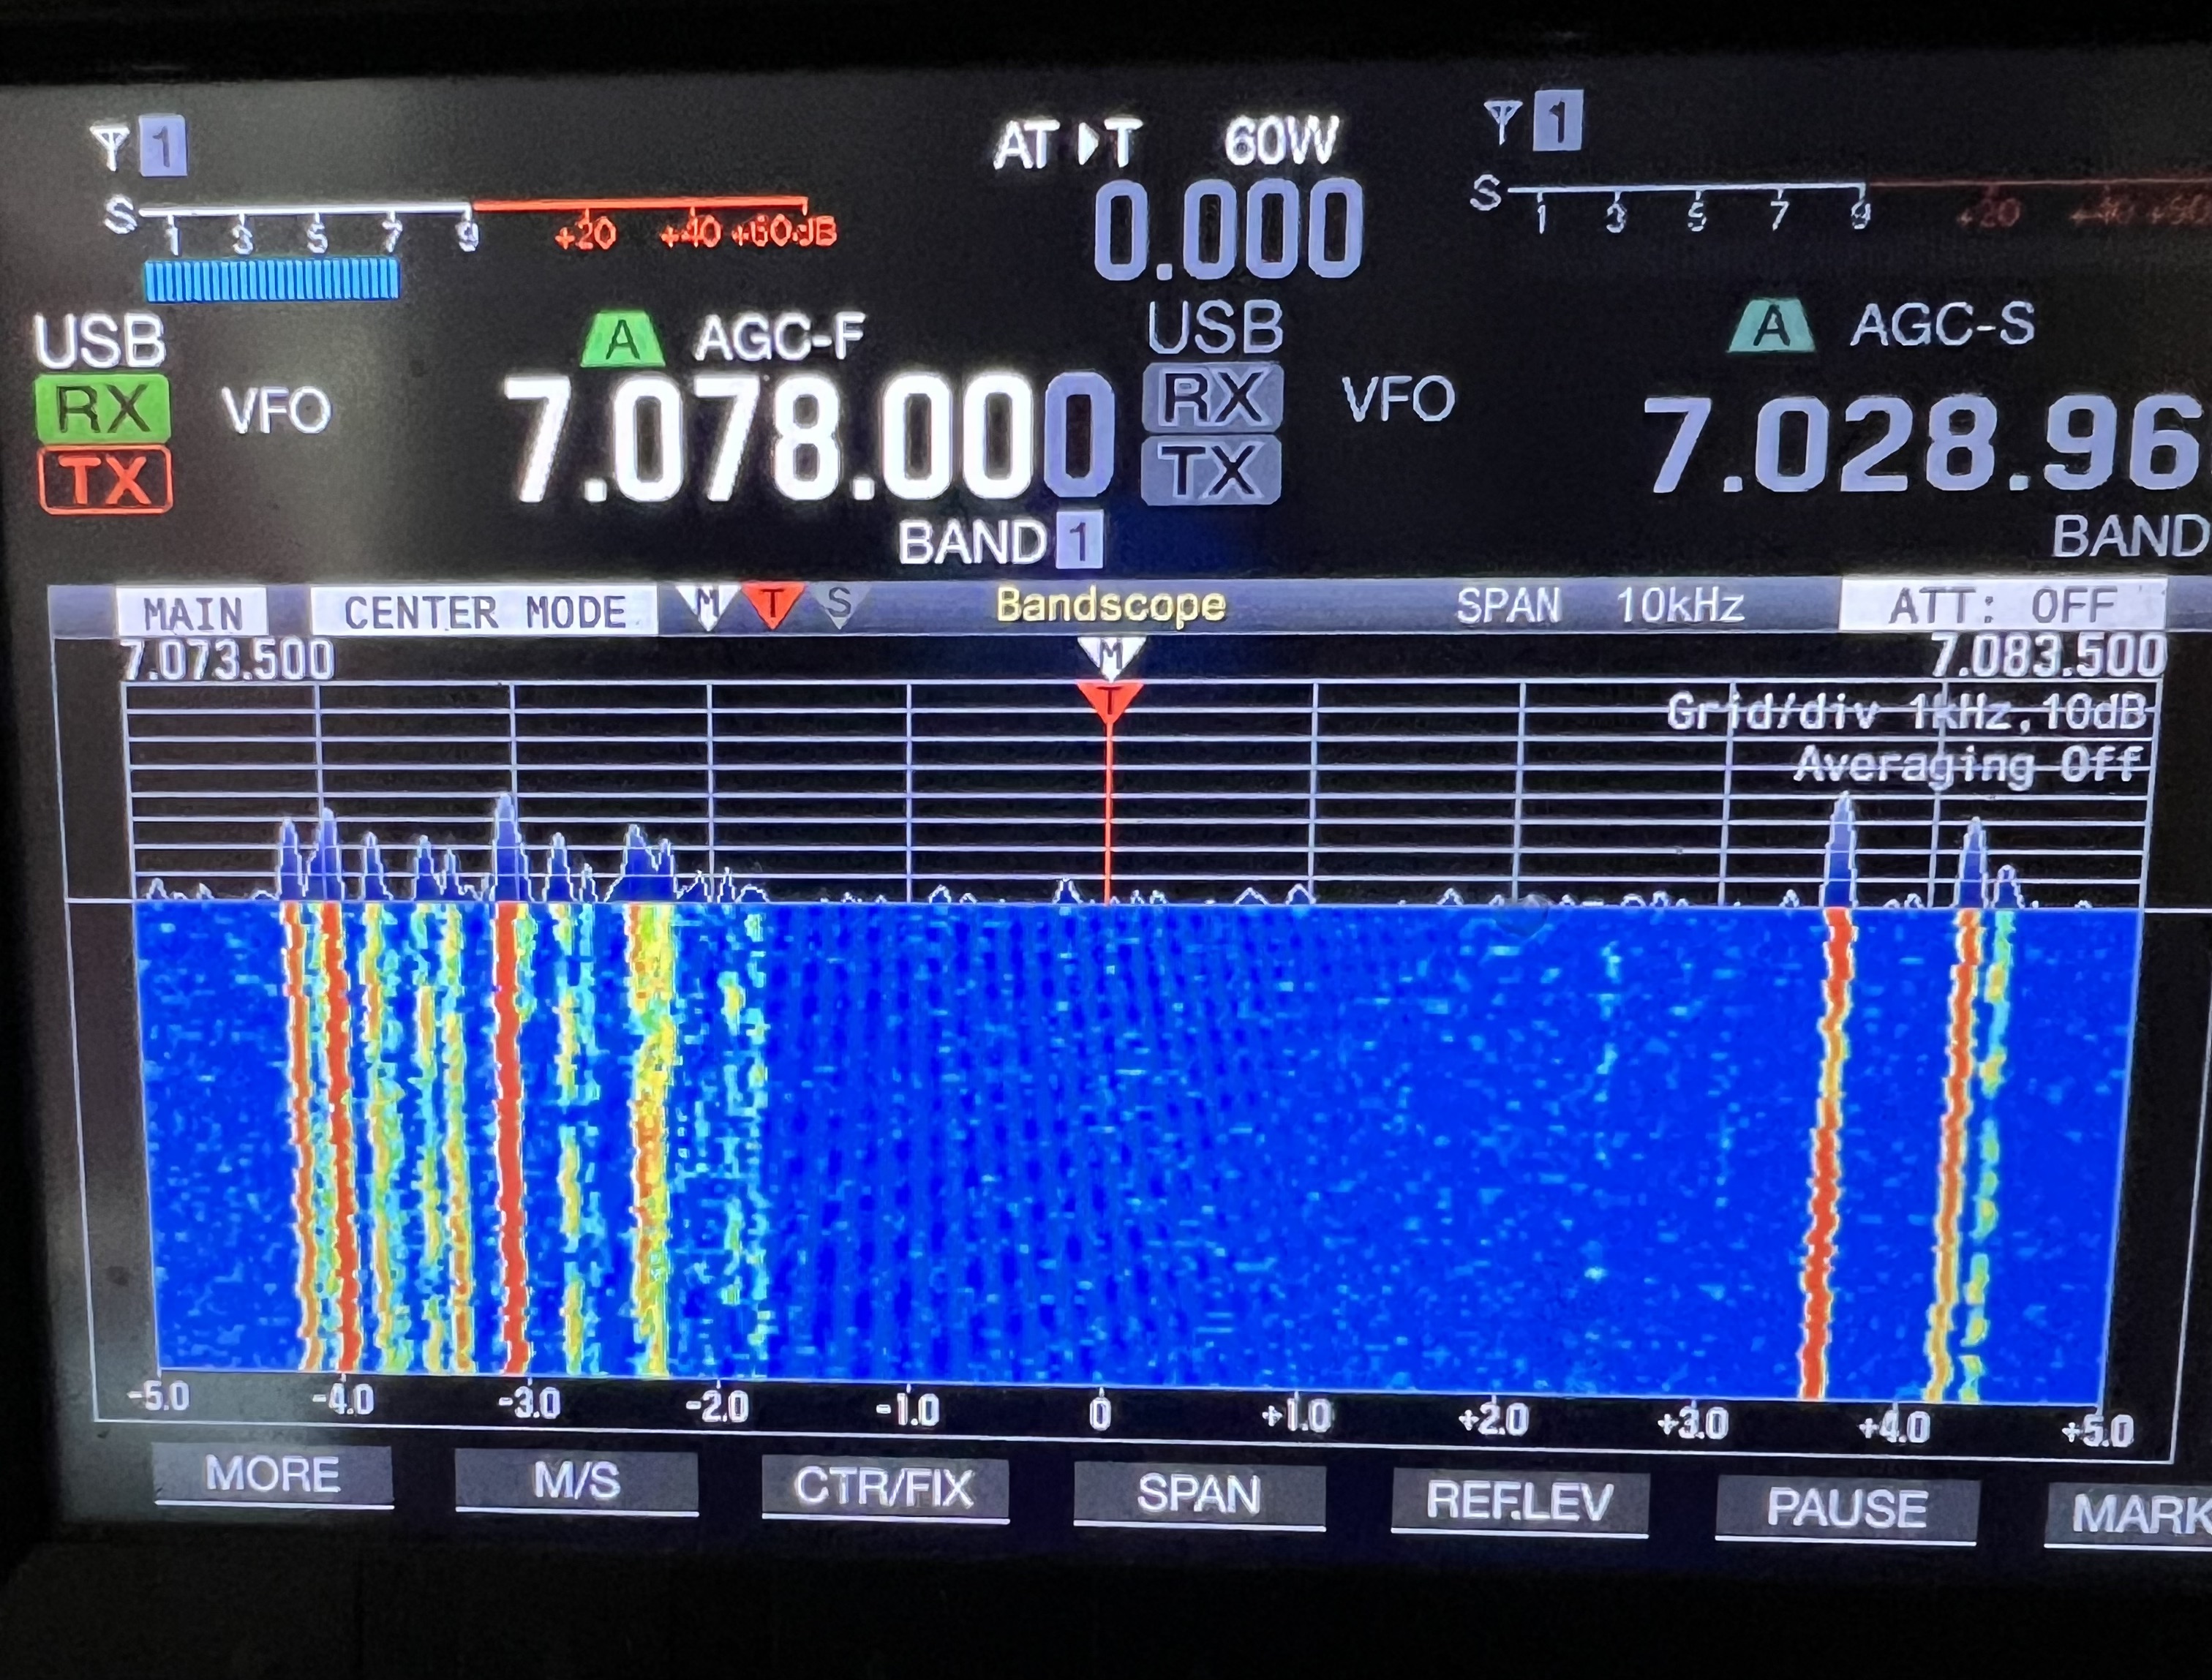
The signals are a full 2 S units stronger. I’m seeing many more actual radio signals than I did using the dipole. And all that annoying hiss from the background noise? There was almost none. Stronger signals, no noise. Wow… I mean seriously, wow. How does it even do that? i am impressed.
Reception results weren’t always this good of course, but generally speaking the HGR was eliminating almost all of the background noise that I picked up on both my dipole and vertical antenna. And actual radio signals were coming through much stronger than on the other two antennas.
So that’s on the reception side of things. What about transmitting? I tuned up to the FT8 area on 15 meters, turned the transmitter up to 50 watts of power and started calling CQ and in about 5 minutes I’d worked Iceland, Japan, the Netherlands, France, Spain and a half dozen different US stations scattered all around the country. Well here’s a screen shot from PSK Reporter down below showing all of the amateur radio stations that were hearing me at that time down below. I was lighting up the entire continental US, Canada, Alaska, Japan, the EU, using 50 watts and a three foot loop antenna sitting about 6 feet off the ground?
As I said before, wow.

Overall my results using FT8 and JS8Call at 50 watts of power or less have been astonishing when compared to what I get with my OCFD or the GAP Titan vertical. And I’ve gotten similar results on all the bands from 40M up to 10M.
Of course as I pointed out at the beginning the results you see from a specific antenna are highly variable and depend on your local conditions, the weather, solar conditions and a lot of other factors.
So the antenna is small, easy to put together, easy to operate, and gives excellent results. Looked at only from the point of view of the results I’ve been getting the HGR-QRO is, frankly, amazing.
So you’re all waiting for the “But…” aren’t you? You know there’s one coming. In fact there are several.
Some of the “buts” are due to the nature of the beast and I knew they were going to be there. Magloop antennas are fiddly. They have very narrow bandwidth so that means if you change your operating frequency even slightly you’re probably going to have to retune the antenna. Also the SWR changes during the course of the day. I suspect that’s being caused by heating and cooling and the main antenna element, the LMR 600 loop, expanding and contracting as it heats up from the sun and then cools down in the evening. That means you have to check the SWR from time to time and may need to periodically retune the antenna.
No, the real problem with the HGR has nothing to do with how it works as an antenna. The biggest and most serious problem is that while the electronics in the box hanging under the antenna seem to be of high quality, the rest of the antenna isn’t. I’m sorry, but it just isn’t. Everything else uses the cheapest parts they could get away with.
The mast that supports the loops and the box with the vacuum capacitor? It is, frankly, a piece of junk. it’s a thin walled aluminum and plastic “twist n lock” adjustable pole that looks like it came off a bargain basement camera tripod from Amazon. Will it survive the Wisconsin weather for long? I highly doubt it and I’m already scouting around for something to replace it with.
The BNC cable that connects the copper loop to the top of the box? It’s a cheap piece of junk too with ill fitting connectors that don’t even properly lock into place. I had to tape them in place or they would have fallen off all by themselves. That’s going to get replaced ASAP.
The 50 foot RS-232 communications cable? Same as above. Cheap, cheap, cheap… Nasty connectors that were almost impossible to fit into the sockets. The screws that are supposed to hold the connectors in place had bad threads on them so they wouldn’t screw in. After trying to test fit them, I tossed it in the trash and bought a decent 75 ft cable.
Then we come to the control box. The controller works reasonably well and isn’t difficult to use but… The controller is housed in what looks like a cheap, off the shelf project box straight out of a 1980s era Radio Shack. The 4 line monochrome LCD display is like something right out of the 1980s as well, crude looking, difficult to read unless looking at it from the right angle and it’s just, well, nasty.
Am I being too critical? I don’t think so. Remember, this is a $3,000 antenna. Three. Thousand Dollars! Considering I can get a state of the art transceiver, even a decent amplifier for that kind of money, this thing should be top of the line all the way around. For that kind of money you’d think they could afford to give you a mast that wasn’t a repurposed selfie stick and a controller that didn’t look like an antique project that some ham threw together back in 1985. You can get a full color 5 inch touch screen for less than $50 these days for pete’s sake. There’s no excuse for a display like that on a $3K piece of equipment.
And if they cut corners that much on the basic quality there, I find myself wondering what other corners they may have cut when it comes to the electronics in that “big box o’ gubbins” hanging under the antenna out there in the weather.
I’m definitely going to keep using it. There’s no doubt at all that it performs very well indeed as an antenna. But I have serious questions about how long this thing is going to hold up. If they cut corners by providing the cheapest mounting hardware they could find, the cheapest cables they could find, the cheapest everything they could find, how can I be sure that they didn’t cut corners elsewhere in places where it really counts, like the vacuum capacitor, stepper motor and its driver circuits, the electronics inside the controller, etc.?
PreciseRF claims that box mounted up on that mast is weather proof, and while it seems reasonably well made, when I look at how poorly made other components are, i have to wonder about that too.
What it boils down to is that nothing about this antenna instills confidence in its ability to survive in real world conditions. Nothing about it says “Yes, this is a $3,000 antenna and it’s damn well worth it”. It might work very, very well as an antenna, but I have no real confidence that this thing will hold up long. So I simply cannot recommend it. At this price, it should be much, much better than this.