Way back in October we had a nasty thunderstorm roll through here that did some damage here. My much patched and cobbled together OCFD (off center fed dipole) antenna had come down again, my Gap Titan vertical had some minor damage to some of the vertical elements. All of my radio equipment was just fine but the storm did take out my primary computer down in the office/shop/radio shack/mad scientist lab. It’s power supply couldn’t deal with the rapidly fluctuating voltage fluctuations that included brown outs, surges and complete blackouts. We had a dozen or more of those in the space of just a few minutes. It didn’t actually start on fire but it sure did smell funny. And I lost two large capacity external hard drives as well. Fortunately all that data was backed up.
That computer was already giving some odd errors that seemed to indicate that the SSD was having problems and that the main memory might be going bad, so I already had a new replacement computer set up on the other workbench ready to go. I set up the new computer, started replacing all of the software that had been installed on the old one, got two new 10 TB external hard drives to replace the ones that had been lost, copied all my data back to those from the RAID array on the iMac up in the main office, recovered all of my photos from “the cloud” where they are backed up (they’re also backed up to two small, portable 1TB hard drives that are only connected to the system for backups. I don’t want to risk losing thousands of photos so I have a triple backup system, the cloud, plus two separate external hard drives. That may be paranoid but I know one person who lost all of her family photos and videos, all of the images of her kids, her late parents, everything. Ever since that happened to her I’ve been paranoid about backing up everything.).
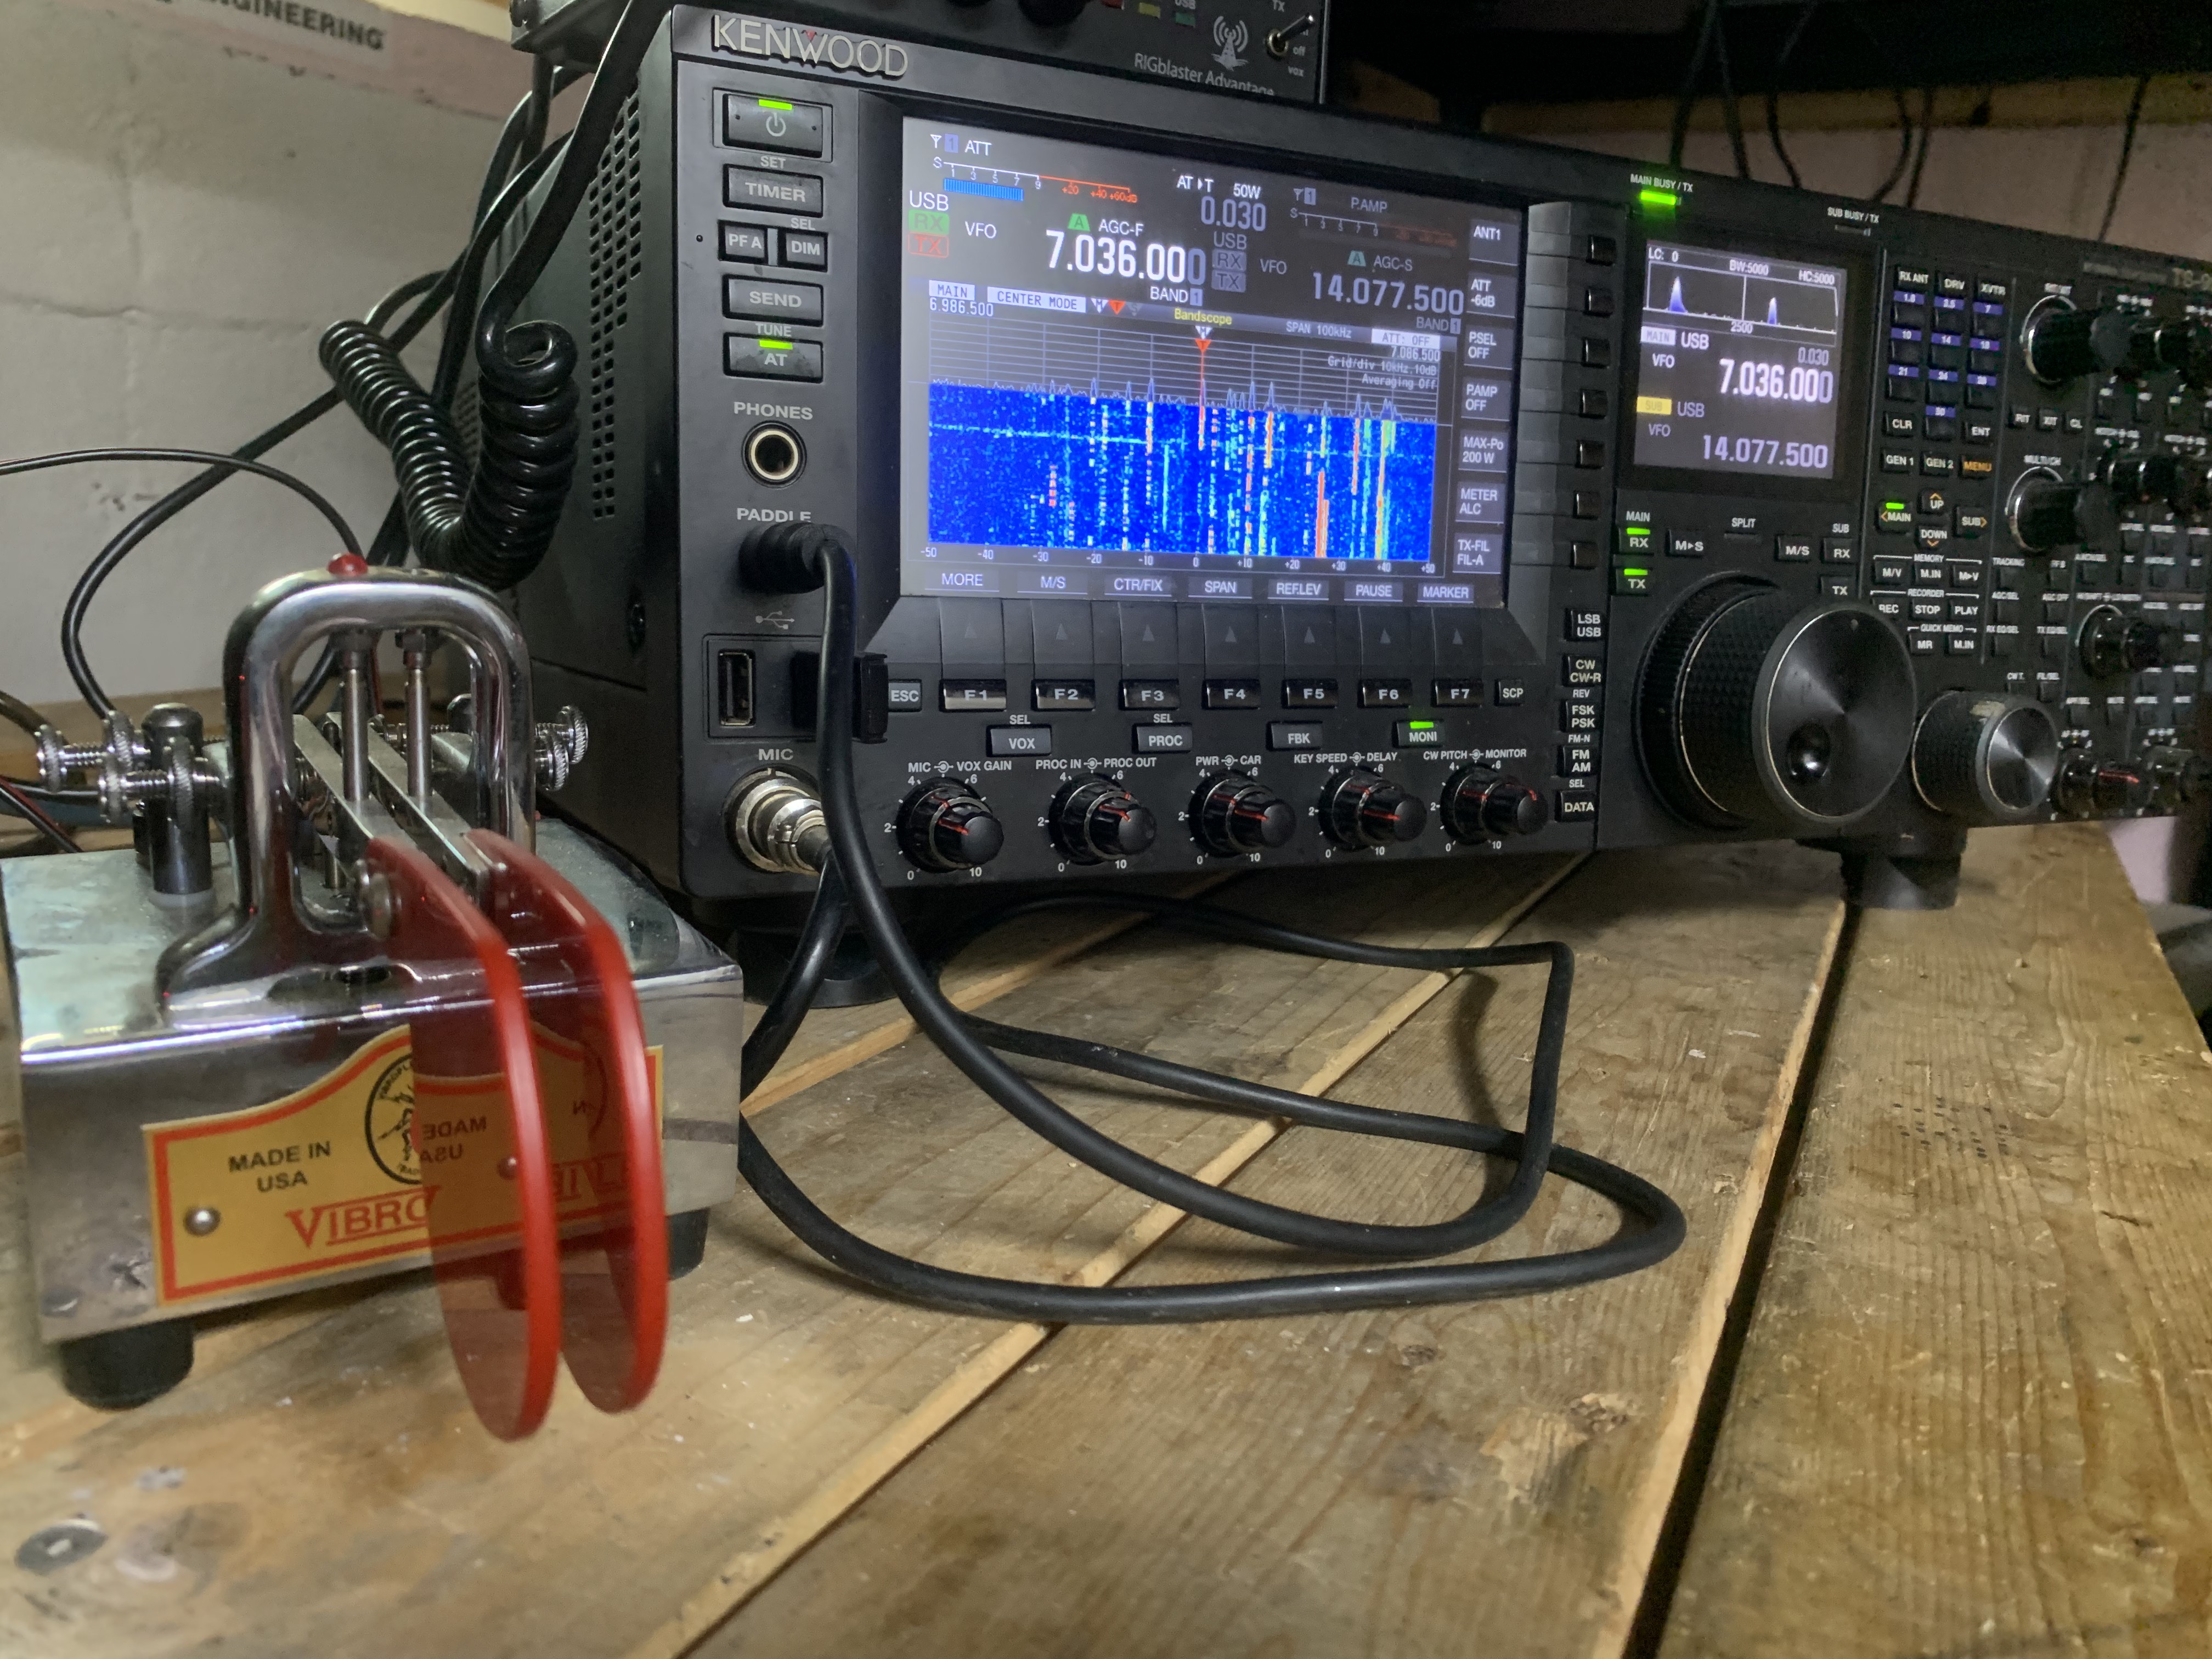
Then I looked at my radio gear and, well, dear lord, what a mess. Everything was hooked up in haphazard fashion, cables were running everywhere, most of them unlabeled, it was almost impossible to reach the physical controls of the transceiver or anything else. I decided all of it needed to be torn down and set up to make it neater and easier to work with. So I took everything apart, cleared off the space on the bench where I was going to set it all back up and…
Well, thanks to procrastination, sheer laziness, and getting involved in other things for a time, it’s only just now, months later, that I have everything back up. A week ago we had some really nice weather with temps up around 60 so I spent the entire day outside fiddling with antennas. I got the vertical straightened out, mostly. I took down what was left of my old OCFD antenna and spent a large part of the afternoon climbing about 20 feet up two different trees to anchor the end points of the new OCFD (A Buckmaster that I picked up somewhere.) Then was up the ladder at the end of the garage to hang the massive balun that’s used to feed the antenna. That’s up at the peak of the garage roof. Good thing MrsGF wasn’t around that day or she’d have freaked seeing me up those trees and that ladder…
To make a long story a bit less long, here’s what the new setup looks like.
The wiring has been straightened out, I can actually reach all of the controls I need to reach. I finally have space to put my iambic paddle, that’s the chrome thing in front of the speaker with the red paddle like things on it. It’s used for sending morse code (CW). I have the Palstar tuner sitting up on an old monitor stand bolted to the bench, the amplifier is perched on a stand above the transceiver where I can reach it easily. Everything is now arranged so I can operate everything easily.
Then there was the software… These days it seems computers are everywhere and amateur radio is no different. A lot of what we do in amateur radio is now intimately linked to computers of one type or another.
The most important bit of software for me is Ham Radio Deluxe. Yes, I know, once upon a time I was not pleased with HRD and I made that fact known in posts here in the past. There was even a nasty scandal involving a one or more persons in customer support that I will not get into. That’s all changed. In the last few years HRD has worked very, very hard to fix the problems with the software and to improve customer support and HRD has become my primary piece of software not only for running the transceiver but also for logging contacts and operating in digital modes like PSK.
Downloading, installing and setting up HRD only took a few minutes. But then there was the question of the log of the contacts I’d made in the past. I lost the contact log I’d been keeping in HRD when the computer blew and, of course, I had neglected to make a backup. QRZ to the rescue. I’d had HRD set up to send all of my contact information to my log on QRZ.com. Downloading my log from QRZ and importing it into HRD only took a few minutes.
Getting some of the other software working was considerably more difficult but eventually I got all that working as well and I was back on the air.
I still have one issue I need to deal with and that’s Logbook of the World, LOTW. That’s the ARRL’s system of confirming contacts with other amateur radio operators. I log all of my contacts to QRZ.COM, eQSL, and LOTW. Those are ways of confirming to other amateur radio operators that a contact has actually been made. Personally I don’t care if I get a confirmation or not. But some people do because they’re trying to get certificates for specific achievements like having made contacts in all 50 states, or for various contests and things like that, and those contacts are confirmed by some service like LOTW or EQSL. One of the neat things HRD does is it will automatically upload contacts I make to all three services without me having to mess around with it. EQSL and QRZ both work just fine, but LOTW is a different story. It just doesn’t work and the error messages I’ve been getting don’t tell me exactly what the problem is. Until I can figure that out logging to LOTW is not going to be used. And since I don’t use it personally and don’t really like it in the first place, getting it working is going to be a low priority item.
Anyway, the system is back up and running and working. I even made a couple of contacts in North Carolina as soon as I had the antennas finished.
If you’re waiting for food prices to start to come down, I have some bad news for you. The way conditions look right now food prices are probably going to keep going up for a while, and it isn’t just the Ukraine crisis that’s driving it. It’s the drought.
Unless you’re directly affected by water shortages out west you may not even know it, but the US is in the middle of one of the worst droughts in memory, with about 65% of the country experiencing drought conditions. Look at that map up there, just about the entire western half of the country is under drought conditions.
In the last few weeks the commodities market price for wheat has almost doubled, jumping from a bit over $7 up to $13.40 a bushel as of this morning.
Part of this is due to the situation in Ukraine of course, but much of it is because of weather issues. Corn and soybeans haven’t been hit quite as hard but they are up as well.
The drought situation is going to hit the cattle markets as well. With everything as dry as it is out west that means that grass for grazing cattle is in short supply and feed costs are going to be going up.
If you’ve followed this blog over the years you already know that I’m not a big fan of biofuels in general, and ethanol specifically. Since the ethanol blending mandates were first instituted, big agriculture, the government and the proponents of ethanol haven’t exactly been honest with us. Diverting a source of food for both people and animals, corn, into the production of fuel was never a good idea for anyone except, of course, the ag industry, its lobbyists, and the politicians they’ve bribed (cough cough, excuse me, slip of the fingers there) influenced to push ethanol fuel mandates. Ars Technica, of all places, has an interesting summary of the findings of a study just published last Tuesday in Proceedings of the National Academy of the Sciences.
The corn industry and ethanol industry, of course, immediately struck back by simply claiming that the whole study is, basically, a lie. And Monte Shaw, the head of the Iowa Renewable Fuels Association said he is “not interested in spending time on silly stuff like this“. So basically he is condemning the entire report without having even read the thing.
What the study discovered was that the biofuels industry is nowhere near as “green” as they’ve been claiming it is for decades. What the study showed is what a lot of people have been claiming for years now, that when all of the factors involved in the production of the corn used to make ethanol are added into the equation, ethanol is, at best, no better than using gasoline, it’s actually worse in some areas.
What’s ironic about the whole thing is that the whole ethanol fuel industry is doomed in the first place as we transition to EVs. Whether we like it or not the internal combustion engine is on it’s way out and is being replaced by electric vehicles. The ethanol industry can rant and rave all it wants, push for higher and higher percentages to be added to gasoline, and it all isn’t going to matter in the slightest because the market for the stuff is simply going to vanish along with the internal combustion engine.
GlyphosateShortages
Glyphosate, the generic name for the active ingredient in the herbicide RoundUp, is suffering from severe shortages, to the point where a lot of farmers aren’t sure if they’re going to be able to get any or not for the upcoming growing season. The manufacturer of a key ingredient has had a mechanical failure that’s shut down production. The product was already in short supply for several other reasons, most of them not related to the virus, I should add. The biggest problem was Hurricane Ida shutting down Bayer’s primary glyphosate production facility for an extended period of time.
Perfect Storm
There has been a sort of ‘perfect storm’ of garbage being dumped on farmers in the past few months and it looks like that isn’t going to ease up any time soon. It isn’t just glyphosate. There are shortages of fertilizers like potash and anhydrous ammonia causing prices to sky rocket. The craziness between Russia and Ukraine is causing fuel prices to increase, and putting pressure on the commodities markets because Ukraine is a major producer of wheat, sunflower seed, and rapeseed for canola oil. Prices on corn and soybeans are going up and up, which is great for the people who grow the stuff. But for dairy and beef farmers, it is causing serious problems.
What it all amounts to for us consumers is don’t look for food prices in the grocery stores to come down any time soon.
Meat Monopoly Rakes In Record Profits
If you wanted to have a nice ribeye or T-bone steak for your Superbowl party, you probably looked at the prices and once you got your heart restarted you settled for grilled cheese. Prices of meat, especially beef and chicken, have skyrocketed over the last two years, and it’s all being blamed on, of course, the virus. Or is the virus only being used as a scapegoat by the meat industry as an excuse to bring in record breaking profits?
Tyson, JBS and Nation Beef more than tripled their profits during the pandemic, despite claims that price increases were due to increased expenses caused by worker shortages and supply chain disruptions. They had a 120% increase in gross profits, and a 500% increase in net profits. And profit margins, the amount of money companies make over and above their expenses, have skyrocketed as well, with margins climbing to up to over 300% in some cases. If the price increases were indeed due to an increase in expenses, profit margins would remain flat because increases in profit would be offset by increases in expenses.
The entire beef processing system in the US is a monopoly, controlled almost entirely by four companies, Cargill, Tyson, JBS and National Beef. Chicken is controlled by Tyson, Pilgrim’s Pride, Perdue, Sanderson and Koch Foods. The situation is pretty much the same with Pork, with the biggest player there, Smithfield Foods (owned by, drum roll please, China) being the major player there, along with a couple of others. For all intents and purposes, the entire US meat production system is controlled by just a handful of multinational companies.
A Convenient Scapegoat
While I’m on the subject of the pandemic, let’s look at some other areas where it is being used as a convenient scapegoat to try to explain away problems and/or massive price increases.
Trucking – You’ve probably heard that there is a massive shortage of truck drivers due to the pandemic. That claim is only partly true. There is a driver shortage, yes, but it isn’t because of the pandemic. In fact, right now we have more registered CDL holders than at any time since trucking started. The fact is that trucking companies have never been able to hire enough truck drivers, and driver turnover rates are sky high. The problem is that driving truck is hard, frustrating work, laden with sometimes utterly ridiculous regulations in some areas and not enough regulations in others, and drivers are often abused, short changed and treated like garbage by their employers, and they don’t get paid very well either. I know one company out of Green Bay that keeps teams of drivers on standby to do nothing but fly out to pick up trucks abandoned by drivers who got so fed up that they couldn’t take it anymore and just left the trucks and walked away. I would imagine that most of the bigger companies have to do the same.
Ports – The ports in the US are really the main choke point here. The US has some of the worst ports in the industrialized world thanks to years of neglect and a failure to upgrade port facilities because that would cut into their profits. Like the trucking business, this issue with US ports actually goes back decades. While ports in Europe and Asia have been upgrading their facilities and making major investments in them, in the US little or nothing has been done to upgrade materials handling capabilities or to streamline operations. Even before the pandemic the US ports were just barely functional and were already causing disruptions in shipping. The pandemic just made an already existing problem worse and showed just how bad the situation was.
Drought
If you look at the drought map up there from https://droughtmonitor.unl.edu/ you can see that things look a bit, well, scary, really. Right now more than half of the country is under drought conditions that range from mild to extreme. For a while there it seemed the West might see some relief from what is, according to some climate researchers, the worst drought they’ve had out there in 1,500 years. But that situation seems to be changing and things are starting to get worse again. Water use restrictions are already in place in many places out there and more are almost certainly going to be instituted unless they get significant precipitation. Even here in Wisconsin we’re well behind normal for precipitation. Last I heard our snowfall amounts here were running 16 – 25 inches behind normal. I’ve only had to use the snowblower once so far this winter. Most of the snowfalls we’ve had, and we haven’t had many, have been a light dusting that we’ve dealt with using electric leaf blowers.
Of course weather is, well, weather, and things can change rather quickly, but I haven’t seen conditions this bad in a long time. The drought is one reason why commodities prices have been pushing up over the last few months.
Farmland Prices Climbing
Here in Wisconsin farmland prices have always been less volatile than in other parts of the country. Prices here haven’t gone up much since I sold the farm. But that’s changing. Here prices haven’t shifted a lot, but they’ve been moving up gradually. In other parts of the country, though, prices have gone a bit, well, bonkers, really. I’ve seen some sales where prime farmland was going for as much as $20,000 per acre, an amount that seems completely crazy to me.
One trend that I find extremely troubling is the entry of investment companies into the farmland market. This has been going on for a while now but they have been becoming much more active now and there seem to be new ones starting up every year. They buy up farmland, often outbidding actual real farmers for the land, then turn around and rent it back to the farmers. Not only is this pushing the sale price of farmland up and up, making buying land unaffordable for a lot of farmers, it is pushing land rental prices up as well as these companies will gleefully gouge farmers for every penny they can get, even if it means putting real farmers in financial jeopardy.
That’s it for this time.
Stuff Coming Up
I have all kinds of things that might end up in the pipeline that feeds this blog, whether any of it actually gets in here is something else again. One thing that will be coming up is a look at a bowl hollowing system for wood turners that I’ve been using of late. It’s been on the market for some time now but it’s new to me and I like it rather a lot.
It’s February and snowing outside as I write this so this seems like an odd time to be planning gardens and buying seed but that’s exactly what we’ve been doing here. We’re thinking of expanding the garden areas yet again, perhaps adding another raised bed or two, and making one of the in-ground gardens considerably larger. We’ll see how ambitious we get once spring gets here.
A note about seeds – if you haven’t already laid in your stock of seed for spring planting, you might be out of luck. I’ve been hearing of serious seed shortages, not just for home gardeners but also for nurseries which produce seedlings and bedding plants for the home gardening market.
I’ve been seeing a lot of ads popping up over the last few months for what are being called household emergency power systems that use batteries instead of the traditional gasoline, natural gas or diesel engine powered generators. Some of them are being called “solar generators”, even though they aren’t. A lot of the ads are wildly misleading, even outright lies. There are problems with all of these systems, whether you go with batteries or the more common gasoline or other fuel powered systems. So if I can work up enough ambition you might see a piece about that in the future.
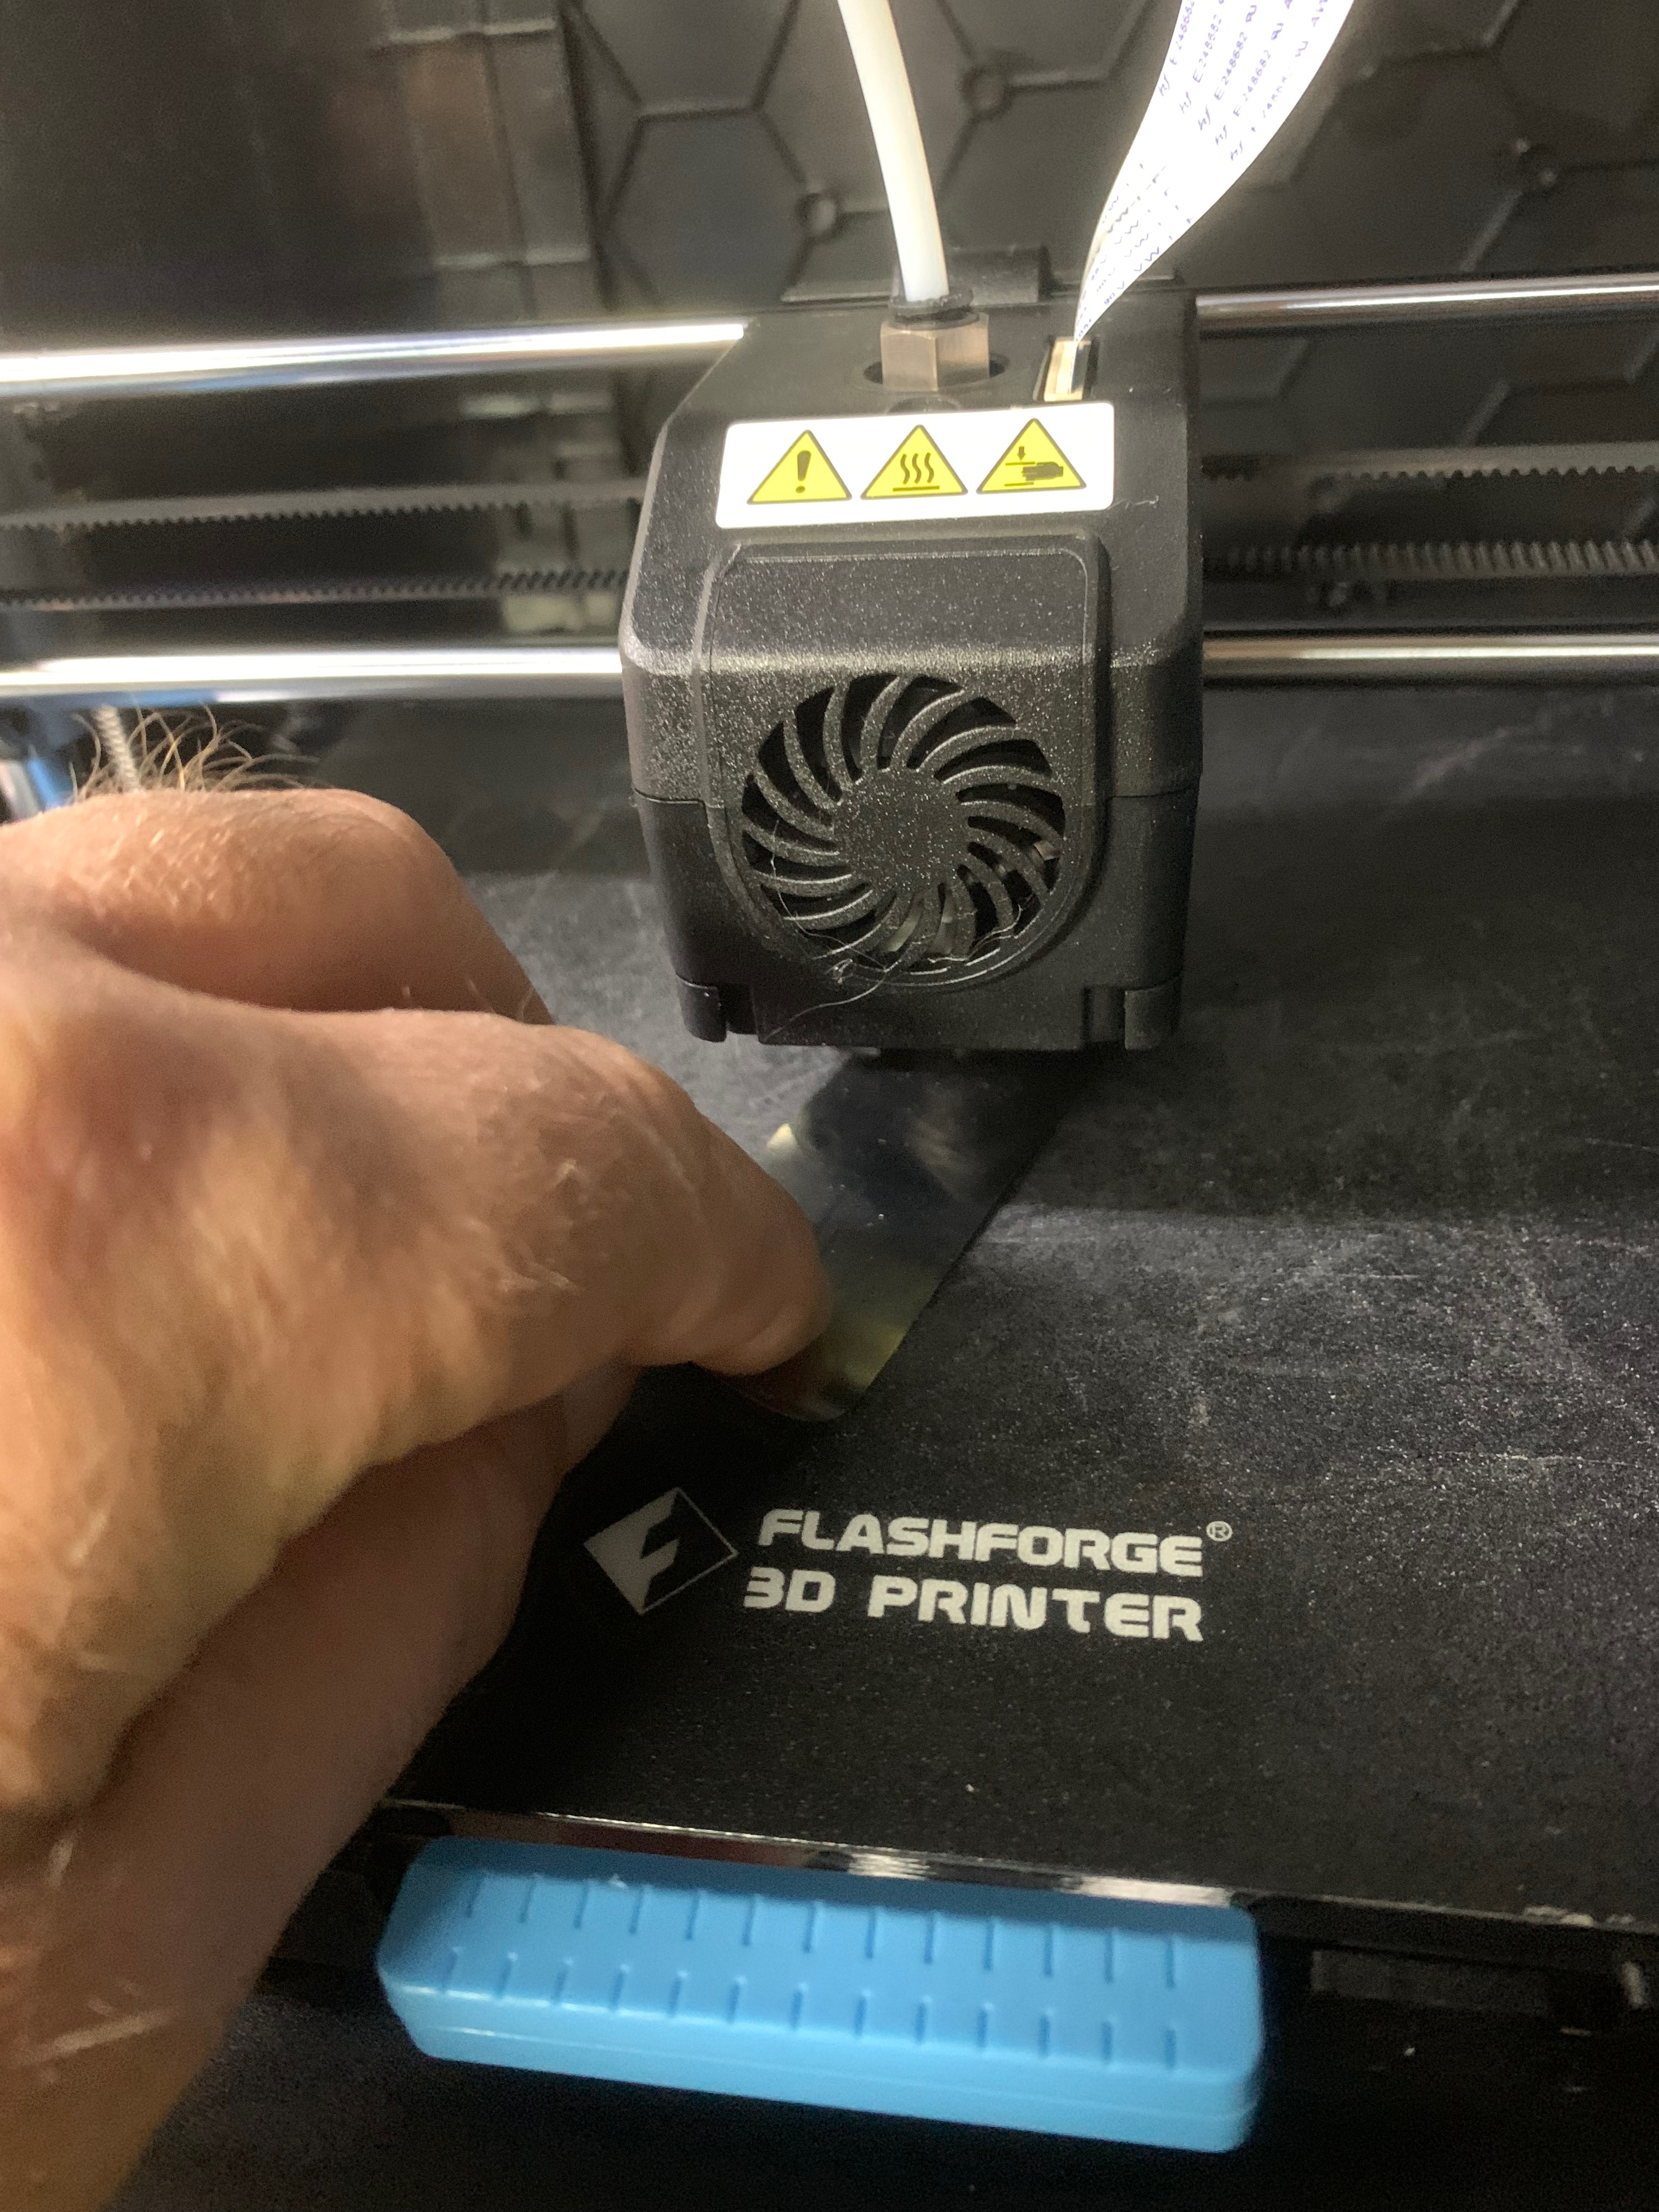
Well the problem with the LP’s autofocusing stand has been solved and it is now working properly. It turned out that the problem was the power cable going from the power pack to the stand. I’d tried several different power supplies thinking that the one that came with the LP couldn’t handle the increased load from trying to run both the LP and the stand at the same time. And as a last resort I put in a different cable and, well, bang, away it went.
So the autofocusing stand is now working just fine and has actually become rather handy. But to be perfectly honest I still don’t recommend you get it. I just don’t think it’s worth the $200 they’re asking for it. The standard version with the tripod will do the same job as the “pro” version that comes with the autofocus stand. All you need to do is adjust the tripod so the LP is about 200mm away from the object being engraved. Easy and takes almost no time at all.
my Gangou laser from a pic off amazon because I can’t be bothered trying to go through my whole media library trying to find one of my own pics
I’ve been working the LP hard for the last couple of weeks, and I mean seriously hard, probably far harder than most users would. It’s been going almost nonstop (alongside my Gangou) doing a production run of customized artwork for a brewpub down near Milwaukee. All told the Laserpecker has had well over 100 hours of use now and it’s still going strong. It’s performed flawlessly.
The LP was supposed to replace the Gangou which had some problems, but I got the Gangou fixed, which was a good thing because laser engravers in this price range are slow. I had both of them up on the bench working side by side for this project.
Comparing the two of them side by side was interesting. The LP is just so much more sophisticated and easy to use, and does such a good job that the Gangou is probably going to get sold or given away.
The biggest drawback to the LP remains the software. I won’t get into that because nothing has changed since I did the review.
So, if you’re a craftsperson working with wood, paper, fabric, leather and the like, and you think a laser engraver would be useful, should you consider the Laserpecker 1? Yeah, I think you should. You’re restricted to engravings about 100mm by 100mm (about 4 inches square) but it’s rare that you’ll ever need to make engravings larger than that. It’s well made, it’s fairly simple to use, despite the wonky software, and it has been a real workhorse for me so far. It’s been doing back to back engravings for me for a couple of weeks now. And even at $300 the price isn’t too bad. Yes, there are cheaper ones out there. The Gangou in the picture up there is about $250, but it is clunky, awkward, noisy, takes up a large amount of workspace, and is at least 30% or more slower than the LP1. Oh, and the Gangou’s software utterly and totally sucks. If you can get it to work at all.
Welcome to a new feature of grouchyfarmer.com which, I hope, will never be repeated but probably will because every time I look at the news it seems the human race is well on its way to stupiding itself into extinction. It’s called How Stupid Are We. And I’ll warn you right now this article got way, way longer than I intended. But let’s look at NFTs.
The acronym NFT has been popping up all over the place recently. I read a lot of articles in which they are mentioned, usually by people who seem to have absolutely no idea what the hell they are or how the whole system works. All they know is that they think they can make money off them. Somehow. Maybe.
As the headline up there asks, just what the hell is an NFT anyway?
Sidenote: Well, as a former writer and editor my first question was really “Is it ‘a’ NFT, or ‘an’ NFT’?”. Personally I think “an” should be used because the rule of thumb is that ‘an’ is used when the following word starts with a vowel sound, in this case ‘en’. But if you want to use ‘a’ yourself, hey, I’m not going to complain. Go for it. Just to mess with any grammar police out there, I’m going to use both.
A NFT is a non-fungible token. There you go. That clears that up, right? So let’s talk about wood or cows or photography or something really interesting…
Hm? No? It doesn’t clear that up? Yeah, I suppose it doesn’t. Let’s see if we can dig into this.
The dictionary meaning of non-fungible is that it is a thing that is unique. There is only one of them and there is no other thing that can replace it. The dining room chair I’m sitting on right now is fungible. It is not unique. There are five others just like it sitting around the table and I’m sure there are hundreds of others floating around out there.
However my van Gogh painting depicting a tiny mouse wearing antlers romping in the woods with drunken unicorns while a certain politician who shall not be named stoically suffers from severe constipation off in a corner behind a bush is, however, unique. It is non-fungible because, well, van Gogh is dead and can never make another one (thank God).
Side note: No, no, no! Not thatvan Gogh. I mean my old neighbor Coriolanus van Gogh. No relation to that van Gogh at all. Give Coriolanus a box of crayons and a case of beer and it would keep him busy for hours, but the less said about that, the better.
So when you buy an NFT you are buying a unique object that no one else can ever have?
No. A lot of people seem to have that impression, but you aren’t. You’re forgetting the “token” part of the term. A token is a thing that serves as a representation of another, entirely different thing. Let’s say we go out to the local bar and I buy you a drink but you’ve already had two (Well, this is Wisconsin so most likely you’ll have had six or eight) and don’t want another. The bartender at some places will give you a plastic or wooden coin that you can use later to exchange for a drink when you do want one. That’s a token.
When someone buys an NFT of a GIF, JPEG or video or something like that, they aren’t buying an actual thing, they’re buying a token that represents that thing and which, hopefully, maybe, ‘points’ to the actual digital representation of that thing so you can go and look at it or something. I guess. In this case the token is an entry in a kind of special database called a blockchain.
So wait, Gf, you say. You mean not only are these people are paying literally millions of dollars for a stupid GIF file of a cat horking up a hairball that’s been floating around the internet for the last 20 years, they don’t actually get, well, anything at all for their money, just an entry in a database somewhere that says they own a thing?
Well, sort of, yeah.
If it will make you feel better, please feel free to join me in banging your head against a wall to get rid of the headache this has possibly given you. It won’t make you feel any better, but it does help pass the time…
But before you start banging your head on the wall and begin to suspect that the human race is going to be the first species ever to stupid itself into extinction (it probably will but that’s fodder for a different article), remember these are special gifs and jpg and mp3 files. And these are special databases. We know they’re special because they call them blockchains and not databases.
Let me see if I can make this more clear. I probably can’t because all of this makes my head hurt, but let’s try anyway.
I wanted to call it “Harvesting Pickles in October While Being Attacked by Wild Chickens” but I was overruled for some reason
Now look at that image over there on the right. That is a digital representation of a painting I did many years ago called “The Dancer”. And I want to sell you the NFT of that painting for, oh, let’s say a hundred bucks
Come on, just play along here.
So, you say, GF if I buy that NFT you send me the painting…
No.
Well, what, you ask, do I actually get for my hundred bucks then?
You get a token entered into a database that says I sold you an NFT of that painting. Period. I still have the actual painting, I still have the copyrights. What you own is an entry in a database somewhere that says I sold you the NFT of that JPG image up there, which I have stored on a flash drive laying on my desk. Unless the cat ate it, in which case it’s, well, in the cat but that’s the cat’s problem, not mine.
You’re free to sell the NFT, the token I just sold you, but the image itself? It’s still on that flash drive, in the cat. (Well, unless the cat pooped but I’m not about to go look. Ick. I’m not going to fish it out of the litter box.) I still hold all rights to that so you can’t do things like, oh, reproduce it in a book or something without paying royalty fees. To me. And the royalty fees are going to be steep because I want to buy a Cat D10 bulldozer and those puppies aren’t cheap.
But wait, you say, it’s a picture in this blog. Anyone can just do a screen shot of it and have a copy.
Ah, but only you own the NFT which says you own, well, the NFT which is, well, something, I suppose? Maybe? Kinda?
These NFTs we’re talking about here are all, oh, digital assets, let’s call them. They are GIFs of dogs trying to take a dump behind a bush, or alleged artwork in JPEG form or sound files or video files. Someone even bought a NFT of the very first Tweet for something like three million bucks, for God’s sake. Or what they were told is the very first Tweet. And ultimately what they own is, to be completely honest, nothing. Nothing except an entry in a blockchain that says they somehow “own” that particular asset.
I have no problem with buying and selling digital artwork or other digital assets. I personally do it all the time. I’m in Second Life where I spend time building environments. At the moment I’m building a sort of cyber/diesel/steam punk city with surreal elements like bits of kawaii culture, exploding penguins (seriously, exploding penguins. they’re great fun.) and other goodies. I do create my own stuff in SL but there’s no way I can build enough props, buildings, and exploding penguins in my lifetime in order to finish an entire city, so I buy stuff from other in-world builders. I sell stuff in SL as well, and some of my paintings and photos, (well, digital representations of them), are hanging on virtual walls or are on display in a few places in SL.
But when I buy something in SL, it is something I can at least use in that environment. It’s a bit of art. or a prop for a scene I’m creating, or a building that fits into the environment I’m making. When I buy something there I am buying the right to use the creator’s intellectual property in my own environment. With an NFT I’m not even getting that. All I get with an NFT is an entry in a database somewhere that claims I own that NFT. Period.
Now if you’re starting to think this all sounds like some kind of scam designed to separate people from their money, you aren’t the only one. Personally I agree, and there are a lot of people out there who feel the same way.
Supposedly you are buying the original “thing”, whatever it is. But if you stop and think about it for a moment, there literally is no such thing as an “original” object when it comes to a digital asset. It isn’t like a painting where there is only that one, single physical object. In the digital world everything is a copy. Everything. That’s how computers work. Look at this letter “T”. Within milliseconds of my typing that letter it ceased to exist and became a copy as the pattern of bits that represent that letter were copied from the keyboard’s buffer memory into the computer’s cache memory to be stored in main memory and and the “original” pattern of bits in the keyboard’s buffer was destroyed. Then a video system looked at that copy and saw that pattern meant it needed to put a “T” in that location on the screen and made another copy of it, and then the system realized I’m writing an article so it made a backup copy just in case, and some of that data was then stored on the SSD drive in this computer, which was then backed up, and then it realized the section of the SSD where it was storing that “T” was getting full so it made a new copy of that “T” in a new location and erased the old one to recover the space… You get the idea.
The person who bought the “original Tweet” bought no such thing because there is no original. By the time the sender of that original Tweet hit the send button, it was already a copy of a copy of a copy of a copy of a… You get the idea.
Here in the real, tangible, physical world, there are “original” objects, there are non-fungible objects. They have a physical reality. In the digital world, in the “metaverse” (dear lord I hate that term), in the “virtual world”, there is no such thing as an original copy of anything. The very nature of how computers work make the concept of an ‘original’ impossible because in the act of creating something even the artist or creator of that thing is always working with a copy and the ‘original’ is destroyed in the process of creation as patterns of bits are moved around in computer memory and data storage spaces.
The whole concept behind these NFTs is fundamentally flawed from the beginning.
And then we come to blockchains. What makes the whole NFT thing possible is, of course, the blockchain, a mysterious and astonishingly complex bit of code that creates a supposedly immutable, permanent transaction record of every movement of an asset in the system. If you start to look into the technical details behind a blockchain you will find yourself quickly wandering off to watch cute cat videos on YouTube out of sheer boredom. Now I know, sort of, how blockchains work, but if I started to try to explain it completely it would take me about, oh, five days just to write down the basics before I even got to things like decentralization, the different types of forks, genesis blocks, orphaned blocks, nodes, wallets, signatures, encryption, hashing… Sorry, I just can’t be bothered. Far better writers than I have tried explaining it to non-tech people, so I’ll leave it up to you to do your own digging.
But to get back to NFTs, what can I say? Let’s just say George C. Parker would have been proud if he’d come up with this scam.
I’ve heard NFTs being called a reimagining of the old “pump and dump” stock scam. Some NFT owners are selling their own NFTs to themselves in the hopes that the transactions being generated will make people think they are valuable so they can dump them on someone else. I’ve heard others claim that when following the “chain” to try to find the actual digital object the NFT is linked to, most of them don’t actually exist at all. Someone else said that nfts are only valuable as tools for money laundering, tax evasion and fraud. Scammers are outright stealing artwork from legitimate artists and selling them as NFTs. From one end to another, the whole NFT system is little more than a great, steaming pile of sh*t.
So, hopefully this has taken a confusing subject and helped to make it even more confusing.
Laserpecker Pro set up and ready to go, without the protective shields in place
So it was time to replace my old laser engraver. That’s it over there on the right. And what’s replacing it is the one in the lead photo, the Laserpecker. The one over on the right is a more or less generic style engraver made in China that hit the consumer market a few years ago, often at ridiculously cheap prices. They were complicated machines, usually based on cheap CNC machines with the cutter replaced with a laser. There were rails and stepper motors and drive belts and complicated mechanical systems in addition to the controls needed to run the laser itself. As you can tell from looking at the two photos, the Laserpecker is much, much different. It doesn’t ride on rails, there are no stepper motors or belts. In fact it doesn’t move at all. It is entirely motionless during the entire engraving process. The only thing that moves is the laser. Here’s a quick video review I found on Youtube that will show you exactly how it works.
Now everything he says in that video is true, but needs to be taken with a grain of salt. He’s going through this so fast that he has no time to tell you about some of the issues you have to deal with if you get one of these. And there is some misleading information floating around out there about the LP that needs to be cleared up as well
Let’s look at the hardware first, and start with different models and prices. What the reviewer up there is showing is the standard Laserpecker which is selling for around $250 or so right now. It includes the LP itself, the tripod, a ruler to measure distance, a small power supply, and a pair of safety glasses. There are apparently three other versions. The only difference between them is that they come with more accessories, the most expensive of which is the focusing stand like the one shown in my photo at the start of this review.
The first ‘step up’ so to speak includes that stand, and more than doubles the price from around $250 to about $530. Why so much for a stand? It isn’t just a stand. In addition to getting rid of the awkward tripod that stand has some nifty electronics in it. It connects to the LP and when combined with the laser it eliminates the need to carefully measure the distance between the LP and the object being engraved. Just touch a button and it raises or lowers itself to the proper height to focus the laser.
The next option up adds a set of glass shields, edged in magnets, that clip together to form a folding safety screen to protect your eyes from the laser. Those are the panels over there on the left. You can also get just the safety shield from LP. Should you? Yeah, probably you should. Lasers and eyes don’t get along very well. You need some kind of eye protection when using any laser device. The panels are convenient, easy to set up, fold up flat for storage, and can be configured to work around just about any shaped object. And you can leave one corner open for a fume extractor, something you also absolutely need. I’ll talk about that a bit later.
The next level up only adds a storage case to hold all of the various parts which, of course, you don’t need at all.
The “pro deluxe” model that I got came with these 3 boxes
I got what was labeled the “pro deluxe” model in the ad when I bought it, which includes the same laser head as shown in that video up there, the automatic focusing stand and the shields. Also included were the power supply, which is a tiny power pack with a USB connector in it and a cable with a USB C connector on the other end to go to the stand. The stand then connects to the LP itself with a short cord. There was also a set of safety glasses, simple instructions and some bits a paper that apparently you’re supposed to engrave for some reason.
Let’s talk about specifications. The LP uses a 405nm, 5 watt, blue violet laser with a specified lifetime of 10,000 hours. So the laser is fairly typical of laser engravers in this category. You aren’t going to be using this to burn through metal or anything else for that matter except paper and thin cardboard. It isn’t made for that. It’s an engraver. Period.
The included power supply is tiny, hardly the size of a small phone charger. It puts out 5 volts and is rated for 2 amps which, well, it isn’t a lot, really. I was rather surprised to find a laser engraver that ran at that low of an amperage. In some of the ads I’ve seen them running this thing from one of those little “power bank” battery packages that lets you recharge a cell phone.
The LP does handle fine details better than my old laser did.
The LP can do an engraving of up to 100 x 100 mm in size, or about 4 x 4 inches. Now that is smaller than the area that can be covered by some other engravers, but the size really isn’t an issue here. The LP is aimed at hobbyists, crafters and woodworkers who are probably working on small projects. Basically people like me who need to do the occasional company logo or piece of artwork to embellish a project. That 4×4 size isn’t going to be a problem for people like us. Most of the engravings I do are half that size or less. And you’ll want to keep engraving size small because larger ones take a long, long time. Almost all of the videos I’ve seen promoting the LP (and to be fair other laser engravers as well) drastically speed up the video and make it look like an engraving that really took an hour or more only took a few seconds.
The LP itself is a very simple looking little round box. That’s it in the photo over there on the right. That’s the entire thing, except for the stand. There are no moving parts, no rails, no motors, no drive belts. That’s it. Unlike my old engraver, the LP has no moving parts at all. The only thing that moves is the laser beam itself. It either attaches to the tripod with a screw or it sits in a cutout on the top of the stand if you opt for that. It’s about as simple as it gets, really.
Lasers are, of course, light, and in order to get the sharpest beam possible they need to be focused just like you need to focus the lens of your camera to get the sharpest image. With my old engraver this was done by adjusting a lens. But there is no lens with the LP, it is fixed focus. The LP has to be around 8″ away from the object being engraved or the laser won’t be properly focused. They include a ruler to make it easier to measure. If you’re working with the tripod you need to adjust the feet and use the ruler to get the measurement right. It can be a bit fiddly but working with just the tripod isn’t really a problem.
If the LP seems like something you are interested in, I strongly recommend you get the bare bones version that comes with just the laser head, tripod, power supply and safety glasses. You absolutely do not need the autofocusing stand. Now that I have the thing I wish I hadn’t bought the stand. Yes, it makes it a bit easier to set the height properly and it is pretty slick. But I’ve had some problems with the auto focusing stand that I’ll come to in just a bit. And in any case, it adds $200 to the price of the Laserpecker. I really don’t think it’s worth the money. Fiddling with the tripod is a minor nuisance, but once you do it a few times and have some practice with setting it up and getting the distance right it’s not that hard to do.
The other optional accessory that comes with the Laserpecker Pro Deluxe version that I got is the safety shield. That’s it below.
This shield is really slick. It’s made up of 4 glass panels made of a material designed to protect your eyes from the laser. Those metal strips along the edges are magnets. The whole thing just clips together. You can move the panels around, adjust the shape, leave one corner open for venting, etc. It is very, very handy and I like it a lot. Those 4 panels are available separately and sell for $90 at the moment. Now that may sound like a lot of money but actually it isn’t that bad. Protective glass panels for lasers are expensive if you want to build your own. At least the good ones are. When compared to high quality protective shielding panels available elsewhere, these are actually pretty inexpensive. You could get along without these, but remember that the LP is designed to be easily carried around and used anywhere. Quite possibly with other people present. Do you have protective glasses for everyone in the room when you’re using the thing? If not you need some kind of shielding, and these do the job. IMO the $90 price is worth it.
Now let’s look at the auto focusing stand. At first I liked it a lot, but as I’ve used it more I’ve come to think that going for the “Pro” package that included it was a waste of $200.
That’s it up there, and it is very, very nice. (Or so I thought at first.) Well it had better be nice considering it costs almost as much as the Laserpecker itself. It is undeniably very well made. But the more I worked with it the less I liked it and now I think it isn’t worth the money.
As I said it is very well made. Fit and finish is absolutely flawless. Obviously a lot of very high end engineering went into designing and building this thing.
Instead of plugging the power pack into the Laserpecker, the power pack is plugged into a connector on the stand, and a short cable then goes from the stand to the LP itself. Up on the top are 3 buttons. The two left buttons move it up and down. The right button starts the autofocusing sequence. It activates the LP’s laser to put a spot on an object below and then moves up or down automatically until it is properly focused. And it works pretty well.
No, let me correct that. It works pretty well when it wants to. Here’s the biggest problem I’ve run into with this thing. Sometimes it just – just stops when I engage the autofocus mode. It will begin the process, start to move the stand up or down, and then everything, the stand, the laser, all of it, shuts down completely and won’t restart unless I unplug it, wait about 10 seconds and then plug it in again. Here’s a video showing it doing just that.
It starts doing the focus routine, begins to lower into position, and then just shuts down completely. All the lights turn off, fan turns off, it and the Laserpecker itself shuts down. All of it is completely dead until I unplug it and plug it back in again. I have no idea why. It doesn’t do it all the time. Shortly before this happened in the video I used autofocus on a variety of different sized objects and it worked every time. Then I unplugged the unit, moved it to the other workbench, started making the video and bam, it died again. I suspected the problem might be that the power supply is too wimpy to handle the load of running both the laser and the motors of the focusing mechanism at the same time. One of the advantages of being a packrat like me is that I have all kinds of stuff laying around so I found a 5V 3A power supply and tried that. And it did exactly the same thing. A bit later I tried it again and guess what? Autofocus worked just fine. Then the next day it went through the shutdown thing again. Sigh…
The other problem is that fan up there next to the buttons. It shouldn’t be there at all. It serves no useful purpose except to blow the smoke generated by the laser all over your house. Smoke and fumes are a serious issue with these things. They can produce a lot of it depending on the material being engraved. Lasers work, after all, by burning. Smoke of any kind is not healthy to breathe. And when burning and melting various plastics and other materials some of the fumes given off can be downright toxic. Plus there is the significant risk of setting off the smoke detectors in your house, apartment or workshop. You absolutely, positively must have some kind of smoke/fume extraction system when you’re working with these things. That’s mine below. It’s home made and may look a bit crude but it works quite well.
There is a 4 inch flexible dryer vent pipe going to a piece of scrap plywood cut to fit the window opening just above my workbench. The pipe is caulked to that hole. At the other end is a ducted fan I picked up off Amazon for $27. I’ve been using it for some time and it works very well for things like smoke from lasers, fumes from soldering, etc. But that stupid and utterly useless fan on the top of the LP’s stand makes things more difficult. My extractor is trying to draw smoke across horizontally while that fan up top is trying to blow it up towards the ceiling so unless I get my pipe right up close to the object being engraved it doesn’t work very well. If I keep using the stand I’m going to cut the power going to that fan and possibly build some kind of container for it to make extracting the smoke easier.
They want $135 for this. A box with a 5V fan in it. $135! Seriously.
So why is that fan there at all? Cooling? Nope. The laser doesn’t need cooling. The bare bones LP works just fine without any fan at all. And the fan’s in the wrong place to cool anything in any case. From what I’ve been able to discover, once upon a time LP was going to offer some kind of filter that would sit on top of the stand and the fan was going to pull smoke from the laser up through there. Only there doesn’t seem to actually be any such filtration system for sale on the LP website. At least not one that works with that dopey fan. There is a sort of an attempt at some kind of filtration system, but that’s an entirely different system that is a complete enclosure that won’t work with the stand at all. And while there’s a fan in that little box over there, there don’t seem to be any actual filters in it. It seems to just suck the smoke up and blow it out a vent in the side.
Here it is making one of the discs make with my shop logo that get attached to bowls and other projects that roll out of here.
Let’s get to the important part, though. Is it any good as a laser engraver?
The answer is that it is quite good. It does exactly what it’s supposed to do, engrave stuff, and it does it well. That’s the disc the machine was engraving in the video and it turned out pretty well. It takes about 4 minutes to do one of those with is actual a bit faster than my old engraver was. And the resolution is better.
I’ve done quite a few engravings with it, mostly on wood, and all of them have turned out very well once I got the settings dialed in properly. Most of these lasers have setting to adjust the power the laser uses expressed as a percentage, from 100% being full power, to lower power settings. Also a ‘depth’ setting which actually is how long (I think) the laser remains in one spot before moving on. The ‘deeper’ the setting the slower the laser goes. Sometimes it takes some fiddling with the settings before you get the settings right for the material you’re working with.
People are always asking if you can engrave curved surfaces and the answer to that is sort of? It depends on how severe the curve is because a laser has to be properly focused in order to work well. But as you can see from the logo engraved on the bowl over on the left it handles curved surfaces reasonably well.
It does fine detail well also. I haven’t experimented to see just how small I can shrink down an image before it loses definition, but I suspect the LP will handle that pretty well also.
So that covers the hardware. Now we come to the software that drives the whole system.
The Laserpecker runs on proprietary software available only for Android and iOS devices. In other words it runs only on cell phones and tablets. There is no software for the Laserpecker 1 for PCs of any flavor. There is software for PCs to control the Laserpecker 2 but that is an entirely different machine that doesn’t seem to be available yet. It is not compatible with any other software.
The program can be rather clumsy and awkward to use at times and I don’t like the user interface at all, but that’s personal preference. The software does work well to control the LP but there is certainly room for improvement.
You download it from whichever app store you use (Apple or Google) and then you have to go through a registration process in order to get an unlock code that will let you actually use the LP. This took longer than it should have. I spent half an hour fiddling around with this thing. It took at least six or seven attempts before it finally sent me the the unlock code via email. Why does it need to be “unlocked” in the first place? I bought the thing, the software will only work with the Laserpecker hardware, what the hell do you need to unlock it for?
You then need to enter a pin number (they call it a password) which the software will ask you for repeatedly. Now I can understand needing a pin number because you wouldn’t want your eight year old to start messing around with this so it does need some security.
Then you can get ready to start lasering stuff. First you need to turn the LP on and connect the software to it via Bluetooth. That was painless and fast.
The Examples takes you to a library of a few dozen cutesy little black and white drawings you can engrave.
The Creation option takes you to a very simplistic editor that lets you enter text to engrave or do some doodling on the screen with your fingertip. Photoshop it ain’t. The text option is useful, but the drawing app is, IMO, completely useless for producing anything useful. Even a professional artist would have trouble using that thing to make something that didn’t look like a child’s bad doodle.
And if you look at that screen shot over there you’ll see the software has given it a name, filename8.bmp. This implies that the software is going to be saving that drawing somewhere and you’ll be able to use it again. Don’t worry about someone ever seeing your alleged attempt at artwork and causing your family to disown you in shame or anything like that. It doesn’t. Save it, I mean. As far as I can tell that file goes absolutely nowhere. At least nowhere I could find. It doesn’t save it on my phone, doesn’t save it to my iCould, doesn’t save it to my photo library. It just vanishes after the engraving is done.
That brings me to the two biggest problems with the software.
The ads for the LP imply that you can import .jpg, .bmp, .png and other graphics files into the software. It also implies that you can even import gcode files. Only you can’t. The only thing the software has access to for import options is the photo library on your phone or tablet. You can import an existing photo from your phone’s photo library, and that is it. Nothing else. If you want to use an image you found somewhere, use artwork you’ve created yourself, etc. the only way you can import it into the software is to take a picture of it with your phone and then import that photo from your photo library and use the programs bare bones editor to crop it and adjust some visual parameters before you engrave it.
And once you’ve done the engraving, all the work you did importing that photo, cropping it, etc. just vanishes into thin air because the software has no provision for saving any of it. So when I do something like create a logo for a business or just some artwork I’ve done in Photoshop, the only way I can get it into the LP software is to take a photo of my computer screen and import that from my photo library, fiddle around cropping it and adjusting the few parameters the software lets me change, and then do the engraving. And then the next time I want to do that same engraving, I have to start all over again. Grrrrr….
The rest of the software is pretty basic but it gets the job done. Once you’re ready to engrave something you go to a screen that lets you select power level, depth of burn, the number of repeats necessary, the usual stuff associated with using a laser engraver. And then send it to the Laserpecker to actually do the engraving.
There is an option to select various materials that are being engraved which then sets the power levels, etc. automatically based on the material. Those presets generally aren’t very useful. The single best way to set the various parameters is to take a piece of scrap material and try that first and adjust the parameters manually to get the best look.
So let’s sum this all up.
The Laserpecker itself, that little round box, is a great piece of equipment that works quite well. The relatively small size of the engraving it can do, 100mm x 100mm isn’t going to be much of an issue for most of us. It just does a good job all the way around.
The software isn’t the best and has some serious drawbacks, but it does work and you can work around the drawbacks.
Considering the bare bones version of the Laserpecker sells for $250 or so, the price is pretty darned good for this thing.
The accessories that come with the “Pro” version, well, that’s a different story. The autofocusing stand is neat, but it costs darn near as much as the Laserpecker itself and I don’t think it’s worth the money. And as I noted earlier I had problems with it just shutting down and making me reboot the whole thing when trying to use it.
The clip together shields are neat and genuinely useful, but you don’t need to go for the “pro” version to get them. You can buy them separately for $90 if you want to get them.
The device is completely portable. You can set it up anywhere. The laser head can be adjusted on the tripod so it can engrave vertical surfaces or things at an angle if you get it adjusted properly. It can even run off one of those power banks that are used to recharge phones as long as it can provide 5V at 2 amps.
It isn’t the fastest thing in the world but none of the laser engravers in this price range are. Doing that 2 inch disc with the shop’s logo on it takes about 4 minutes, which is pretty reasonable. But some of the test engravings I’ve done took half an hour or more. It depends on the size of the engraving and the settings of the laser. It’s at least as fast as my old engraver.
Smoke and fumes can be a serious issue, but that’s true for all laser engravers. Using this thing for extended periods of time without proper venting will set off smoke detectors and possibly give off dangerous fumes. But that’s true of all laser engravers.
Remember this thing is not a toy! It is a potentially dangerous device that can cause some serious problems if it is not used properly.
Now, the most important question of all. Can it engrave a banana?
Yes, it can.
If you’re in the market for an inexpensive laser engraver, definitely give the Laserpecker a look. But stick with the $250 bare bones version. You definitely do not need the over priced autofocusing stand. The glass shields at $90 are something you should consider as well.
Now you’ll see promotions for the Laserpecker 2 floating around out there, and it looks really, really nice. But it doesn’t actually seem to exist yet. At least not for the average consumer. If you want to buy one you’re looking at a delivery date of at least December of 2022, almost a year away. But that being said the LP2 looks really interesting. Interesting enough and possibly useful enough that in a year or so I might look into getting one of those. But for the time being I like my little LP1 and I’m quite satisfied with it.
Considering how fond I am of gadgets, technology and all that stuff, you might be surprised to learn that I also hate having things change. I develop ways of doing things and I dislike having to change. But sometimes there’s no way changes can be avoided, and I’m dealing with that right now.
For something like 10 or 12 years a MacBook pro has lived in our kitchen, mostly on the kitchen table, dealing with day to day chores like handling my email, reading the news, sorting my photos and writing this blog. But after more than a decade of flawless service the MacBook is showing signs it isn’t long for this world and it is going to need to be replaced. But new MacBooks, especially the Pro version, are most definitely not cheap. I was looking at the MacBook Air which is very, very nice. But…
But then I saw my new(ish) iPad sitting there and started wondering why I needed a laptop in the kitchen at all. Why couldn’t I use the iPad for the same things I used the MB for? It’s the new generation iPad so it certainly has the processing power and memory to deal with 99.9% of the stuff I used the laptop for. I decided I didn’t need a laptop, all I needed was a keyboard for the iPad.
And here we are, the first post written and edited entirely on an iPad instead of the elderly MacBook.
The keyboard is – interesting? It you look at a newer iPad you’ll find 3 little gold dots along one edge. That’s how it connects to the optional keyboard. Magnets hold it in place. The keyboard folds up to cover the screen, and folds out to form a stand to hold it in place while typing. It’s a really slick design. There’s no physical connection at all except the magnets so the iPad can be pulled away to use by itself.
But do I like it? Not really. The keyboard isn’t exactly comfortable to use. It’s tiny, the keys are too close together, it is uncomfortable for someone with big hands, like me. Still, it isn’t horrible and it does work and I’ll probably get used to it. Biggest problem so far is trying to use a touch screen instead of a mouse and trackpad. I’m still trying to adapt to that.
It seems that the iPad can do pretty much everything I need it to do in order to replace the Macbook, but it’s going to be awkward for a while until I get used to this setup. It’s easy to copy and paste photos. It can even do some photo editing. So far I’ve been adapting. I don’t have my email switched over yet but that’s coming next.
So Let’s Talk About Toyota…
Toyota managed to p*** off just about all of its customers this past month by announcing that people who owned 2018 or newer vehicles were going to have to start paying a $8 a month subscription fee for a premium audio service they probably don’t want if they wanted to maintain the remote start capabilities of their key fobs. Now the whole story gets complicated and confusing and seems to be changing all the time as Toyota tries to do damage control. Basically here’s what Toyota claims is going on.
Sidenote: I should point out that leaving your vehicle running unattended, even if it’s locked, is illegal in a lot of jurisdictions and can you can get a citation for doing so.
According to the company the key fobs are going to lose the ability to remote start the vehicle because of something to do with the 3G cellular system is shutting down soon. Maybe? But this makes no sense at all because the key fob has absolutely nothing to do with the cellular system. The key fob works by a short range radio transceiver built into the fob, communicating via coded signals with another short range transceiver built into the car. The cellular network has nothing to do with it. And in any case why would key fob functionality be tied to the car’s stereo system to begin with? The explanations I’ve seen so far make absolutely no sense at all.
This is a software problem. Either accidentally or deliberately Toyota tied the remote start function to the premium audio system. If you don’t subscribe to the premium audio features, it is shut off, and the remote start is shut off with it. So rather than fixing the bug and rolling out a software update, Toyota is telling the owners of these cars they’re going to have to pay $8 a month for a service they don’t want in order to keep using a feature they already paid for.
While I’m complaining about stuff let’s move on to Tesla. The company has announced it is going to now cost you $12,000 if you want the self driving functions of the car to be enabled. Twelve. Thousand. Dollars. For a piece of software that, judging from the videos I’ve seen, doesn’t actually work very will and is quite possibly actually dangerous to use. And which now enables activities which are actually illegal, like performing rolling stops at stop signs. And even Tesla calls it a beta version of the software. That means it is still very much in the testing stage of development and is still being modified frequently and still has bugs in it.
And they want you to pay $12,000 to be able to use it.
Do I need to say any more about this? No? Good.
Let’s look at what’s coming up.
I’ve finally had a chance to work with a new bowl hollowing system from Simple Wood Turning Tools. I’ve been using some of their carbide turning tools for some time and really like them, and I’ve had their hollowing system sitting on the shelf and finally had a chance to use it. I liked it so much I want to take a closer look at it here. It just works really, really well. So keep an eye out for that in the future.
I’ve had some ”issues”, as they say, with my old laser engrave and have a new one on the way that is supposed to be coming yet today. Maybe. I hope. It has the rather unfortunate name of Laserpecker, but there’s nothing I can do about that. If it works half as well as the demo videos it should be interesting. It does have some problems that make me a bit nervous, like the fact that a lot of the accessories they advertise for it like the roller and traveling systems don’t actually seem to exist. But we’ll see. Hopefully.
Oh, and I promised you a dog! Here you go:
This is Dash. MrsGF’s sister just got this guy a few weeks ago. His hobbies include slobbering on people, trying to sit on laps, chasing toys and smelling things. Oh, and staring at you when you’re eating because you aren’t sharing with him.
That shiny black box up there (Oooo, shiny…) is the new Flashforge Adventurer 4 3D printer. As best as I can determine it became available for sale in early September of this year, and it’s the big brother to the Adventurer 3 which received more or less rave reviews when it came out. Flashforge has been making 3D printers for quite some time, and has a good reputation, and this printer is only going to enhance that reputation. I’ve had the A4 for almost two months and it’s been running almost nonstop since the day it arrived and I have been very impressed with it. It is currently selling for around $800 and considering how well equipped the A4 is, how well it works, and how easy it is to work with, that price is a bargain.
The A4 is a fused deposition modeling 3D printer, or FDM for short. This means it uses a solid plastic provided in the form of a thin filament which is heated to melting point and then extruded into a thin stream of liquid plastic to deposit many layers of plastic to build up the actual object. If you want a quick introduction to 3D printing in general you can take a peek at my earlier posting about how consumer grade 3D printers work and the different types here.
The A4 is big. This isn’t something you’re going to just plop down on your desk. At least not if you still want to use your desk as an actual desk. It’s basically about two feet tall and about 20 inches square. This printer is fully enclosed, so you’ll need even more space in order to get the doors to the build chamber and the filament chamber open. Plan on needing an area at least 32″ by 32″. And as for weight, it hits the scales at about 57 lbs. Print capacity is equally large, though. Print sizes can be up to 8.67″ X 7.87″ X 9.84″. And it can handle temperature ranges large enough to work with just about any kind of plastic filament on the market.
Overall appearance of the printer is excellent. A lot of 3D printers, especially the less expensive ones, look like they were cobbled together out of bits and pieces someone scrounged out of a box of parts left over from a different project. The A4 is one sleek, slick looking piece of equipment. They obviously put a great deal of thought into the overall design and appearance. Build quality is excellent as well. Everything fits together flawlessly. No creaks, groans or rattles from loose parts flopping around. It just plain looks good. I wouldn’t object to having this thing sitting in my living room. I’ve had fully enclosed printers before but they all looked like they were made out of bits of scrap metal or plastic they had laying around the factory already.
I do have one concern, though, and that’s how the heck am I going to fix it when it breaks? (Yes, it will eventually break.) How am I going to get at the filament feed motor? Or the motors that drive the screws that control vertical height? Or the motors that move the bed? How easy or hard is it going to be to disassemble this thing when I have to make repairs? Hopefully it will be a long time before I need to do that but my experience is that sooner rather than later I’ll have to replace something.
The A4 came with 3 different print nozzles with different size openings and different temperature ratings designed for specific types of plastics.
I’ve worked with several different 3D printers over the years and without a doubt the A4 was theeasiest to get set up and running. The hardest part was getting it out of the massive, waist high box. Then it was just a matter of removing the packing from the inside that kept everything from rattling around, plugging (yes, plug in, no tools needed) in the appropriate extruder nozzle for the temperature range desired, doing the automated (not automatic) bed leveling procedure, loading in filament, and starting to print. Literally within about 20 minutes of getting it out of the box I was printing. This printer is about as close to “plug and play” as I’ve come across.
A word about the print nozzles for the A4. Some people have been complaining about the fact that the A4 nozzles are proprietary and cost $25 – $35 each. Nozzles for other printers are little more than brass nozzles of various sizes and cost very little. But the A4 nozzles are not just the extruder openings, they are also the heating element that melts the plastic. There are advantages to having the heating element included in the nozzle itself that I won’t get into here. And all things considered $25 to replace a nozzle that will work for hundreds of hours before it needs to be replaced isn’t that bad.
The entire printer is controlled from rather nice, color LCD touch panel located on the front of the machine. It’s is crisp and clear and easy to read. I wish it were larger, but it’s big enough to read and the touch controls work well even with my big stubby fingers.
The first thing you’ll want to do with the A4 is connect it to your WiFi system. Yes, you can use it without WiFi, but I use it exclusively because the WiFi system has been working so well and has been so convenient to use. I haven’t bothered to explore the other options. Note that early reviews back in September indicated there were some problems with the WiFi system but I haven’t noticed any of those problems except for one minor glitch that is easily solved.
Once connected to your WiFi network the printer handles firmware updates pretty much automatically. Within a minute or two of connecting it to WiFi the printer told me that there was a firmware update available and did I want to install it. I did, and it downloaded and installed the update in a couple of minutes. It’s done 3 firmware updates since I got the printer and all three were done quickly and easily.
The panel gives access to all of the printer’s functions, settings and maintenance options, as well as a handy little help screen to give you info about many of the printer’s functions and how to perform various maintenance tasks.
Thanks in large part to the design of the built in software and that little touch screen this is the easiest to use 3D printer I’ve ever worked with.
I have big fingers and often when working with small touch screens like a cell phone or other device I’ll end up with the device not responding properly. I’ve had no such problems with the A4 doing such things. The built in software is simply excellent, easy to understand, clearly worded, and easy to use.
As noted earlier the A4 is completely enclosed, as is the chamber where the filament is loaded. A door on the right side opens to give access to the filament holder and feeder. The spool is held in place on a simple spindle. The door is held shut with magnets. It will accept any standard sized spool.
Loading filament into the machine is simple, and the whole process is automated. Just select the ‘change filament’ option on the menu. The printer heats the extruder to about 240C to melt any filament in the extruder and permit it to be withdrawn. The feed motor runs in reverse, pulling the filament out of the feeder and back into the spool holding area.
After the filament is withdrawn, remove the old spool and mount the new one, and then insert the new filament into the feeder and press the “continue” button on the display. The feeder will push the new filament into the machine and once it gets into the extruder it will pause a moment to let the plastic melt and then start forcing material through the nozzle to ensure that any remaining old filament is forced out and only the new material is being extruded. Then press a button to stop, and you’re ready to start a new print.
Occasionally I would hear a sort of clunking noise when doing a print, caused by the feed mechanism slipping. I discovered that this is caused by the feed mechanism trying to push filament into the extruder faster than it could be pumped through the nozzle. Increasing the extruder temperature by 5 – 10 degrees caused the problem to go away so I’m assuming that the optimum temperature for the filament I was using was a few degrees higher than was listed. Every batch of filament is slightly different so this didn’t surprise me much.
The bed or build plate of any 3D printer has to be absolutely level in relationship to the extruder nozzle and set to the proper distance. The first thing you need to do with any 3D printer is make sure the bed is level and set to the proper distance before you start printing. I’ve seen ads for the A4 indicating that it has automatic bed leveling. This is misleading. Automatic would tend to indicate that it does it by itself. It doesn’t. But the process is automated and far easier to do than other 3D printers I’ve used.
With the last one I owned leveling the bed with a pain in the neck. It involved moving the nozzle all over the bed, sliding a bit of card between the nozzle and the bed, and then fiddling with thumb screws under the bed. I’d do this at several points all over the bed. And then do the whole thing all over again because moving one thumb screw would change the angle of the bed and screw up the distances at other points on the bed. It was basically a time consuming, fiddly and annoying job.
The A4 gets rid of the thumbscrews entirely, and the whole process is painless. It’s all done through software via the control panel.
You start the leveling process from the touch screen. The A4 places the bed in the proper position and then lowers the extruder down to what it thinks is the right height over the bed. A strip of what looks like thin, flexible stainless steel is provided to use as a thickness gauge.
You slide the gauge in between the build plate and the nozzle. The ideal distance is when you feel just barely a bit of resistance when the gauge is slid between the plate and the nozzle so the nozzle is just barely touching it. If it moves too freely, the nozzle needs to be lowered. If you can’t get the gauge between them at all or it feels too tight, you need to raise the nozzle. And that’s also done on the control panel. This process is repeated at nine different points across the surface of the build plate. It takes only a couple of minutes, there’s no fumbling around with screws to adjust the plate, it’s about as easy as it gets.
Some minor changes in the positioning of the height as the printer is used is to be expected. The surface of the plate wears over time, temperature changes can cause things to move, and just the stresses and mechanical movement of the parts of the printer can cause slight changes in dimensions so it’s a good idea to level the bed occasionally even if you don’t see problems with the printing process. The A4 is better than most printers in this regard. I’ve only done the leveling process three times in the two months or so that I’ve had it. I’ve seen 3D printers where the bed had to be leveled after almost every print.
Note that the plate can be seriously hot immediately after a print is finished. Depending on the type of material being used, the plate can be heated to over 100C, or 212F. Always use caution when removing the plate after a print.
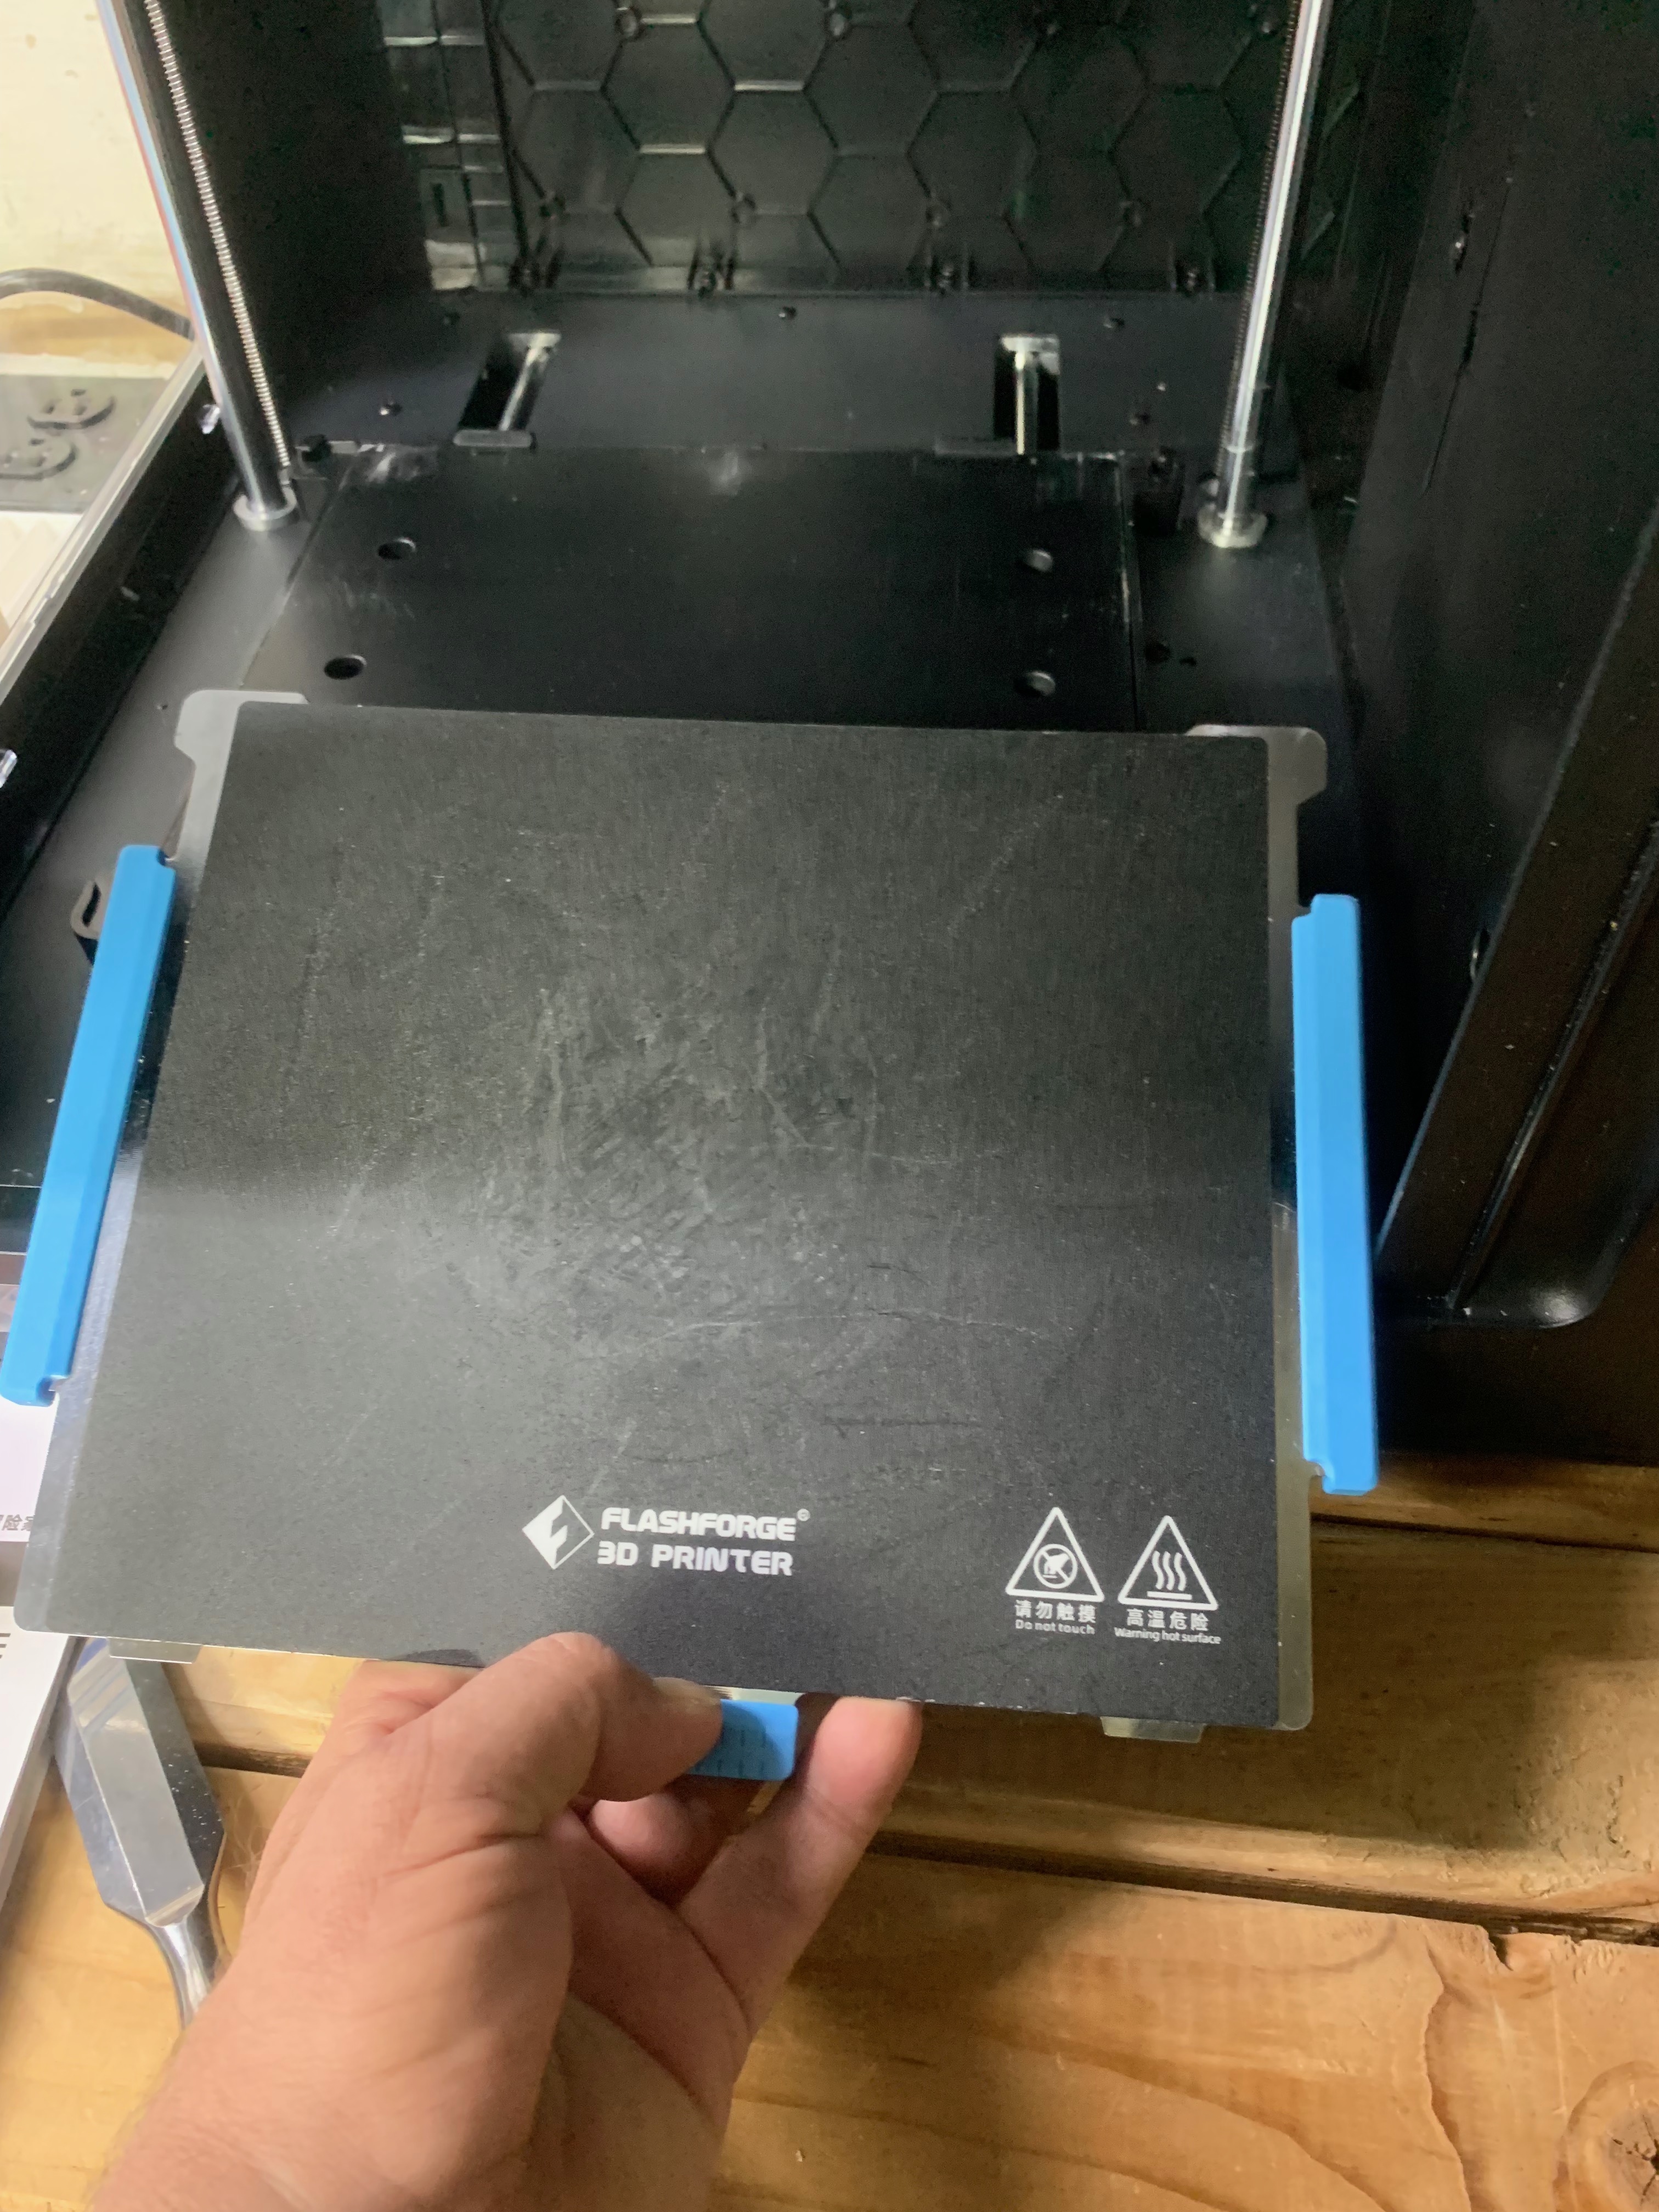
While I’m on the subject of the bed I should point out that the A4 has a removable print bed or plate. The two back corners of the removable plate slide into slots at the back of the carrier, and the bed itself is held down by powerful magnets. The plate is also flexible allowing you to bend it to help break a printed object free of the plate. I really, really like this system. When a print is done I can take the whole thing out of the printer to make it easier to get the object off the plate.
The plate carrier without the build plate in place.
You do have to be careful to get the plate firmly and fully slid into the slots at the back of the platform, and make sure there is no debris, bits of plastic, etc. laying on top of the carrier before you insert the plate.
Two plates were provided with the A4. The plate itself is very sturdy and covered with some kind of coating that is supposed to allow plastic to adhere to it during the printing process, but still let you get a completed print off it without having to resort to a hammer and chisel. As you can see from the photo of the plate itself (the one with the blue handles) mine is quite worn. I’ve been running this printer almost 24/7 since I got it and I’ve built dozens of objects on that plate. Despite the wear it is still holding up well.
The coating on the plate is tough but it can be damaged. I managed to scratch one badly when using a steel tool to try to get a print off it. But in normal use these plates should last for a long long time. Replacements are available. I ordered three spares at $18 each from Flashforge’s website and they arrived (shipped directly from China) in about two weeks.
The A4 also comes with other goodies. As noted, it is completely inclosed. This not only provides a more stable temperature environment that should improve the quality of the printed object, it permits the addition of a ventilation system with HEPA and charcoal filtration to reduce fumes and microplastics getting into the air in your work area. It isn’t going to do much to reduce toxic fumes from some types of plastics. That would need far better filtration than just a charcoal and HEPA combination. But it will help to reduce smell and plastic particles getting into the atmosphere. Replacement filters are available from the company.
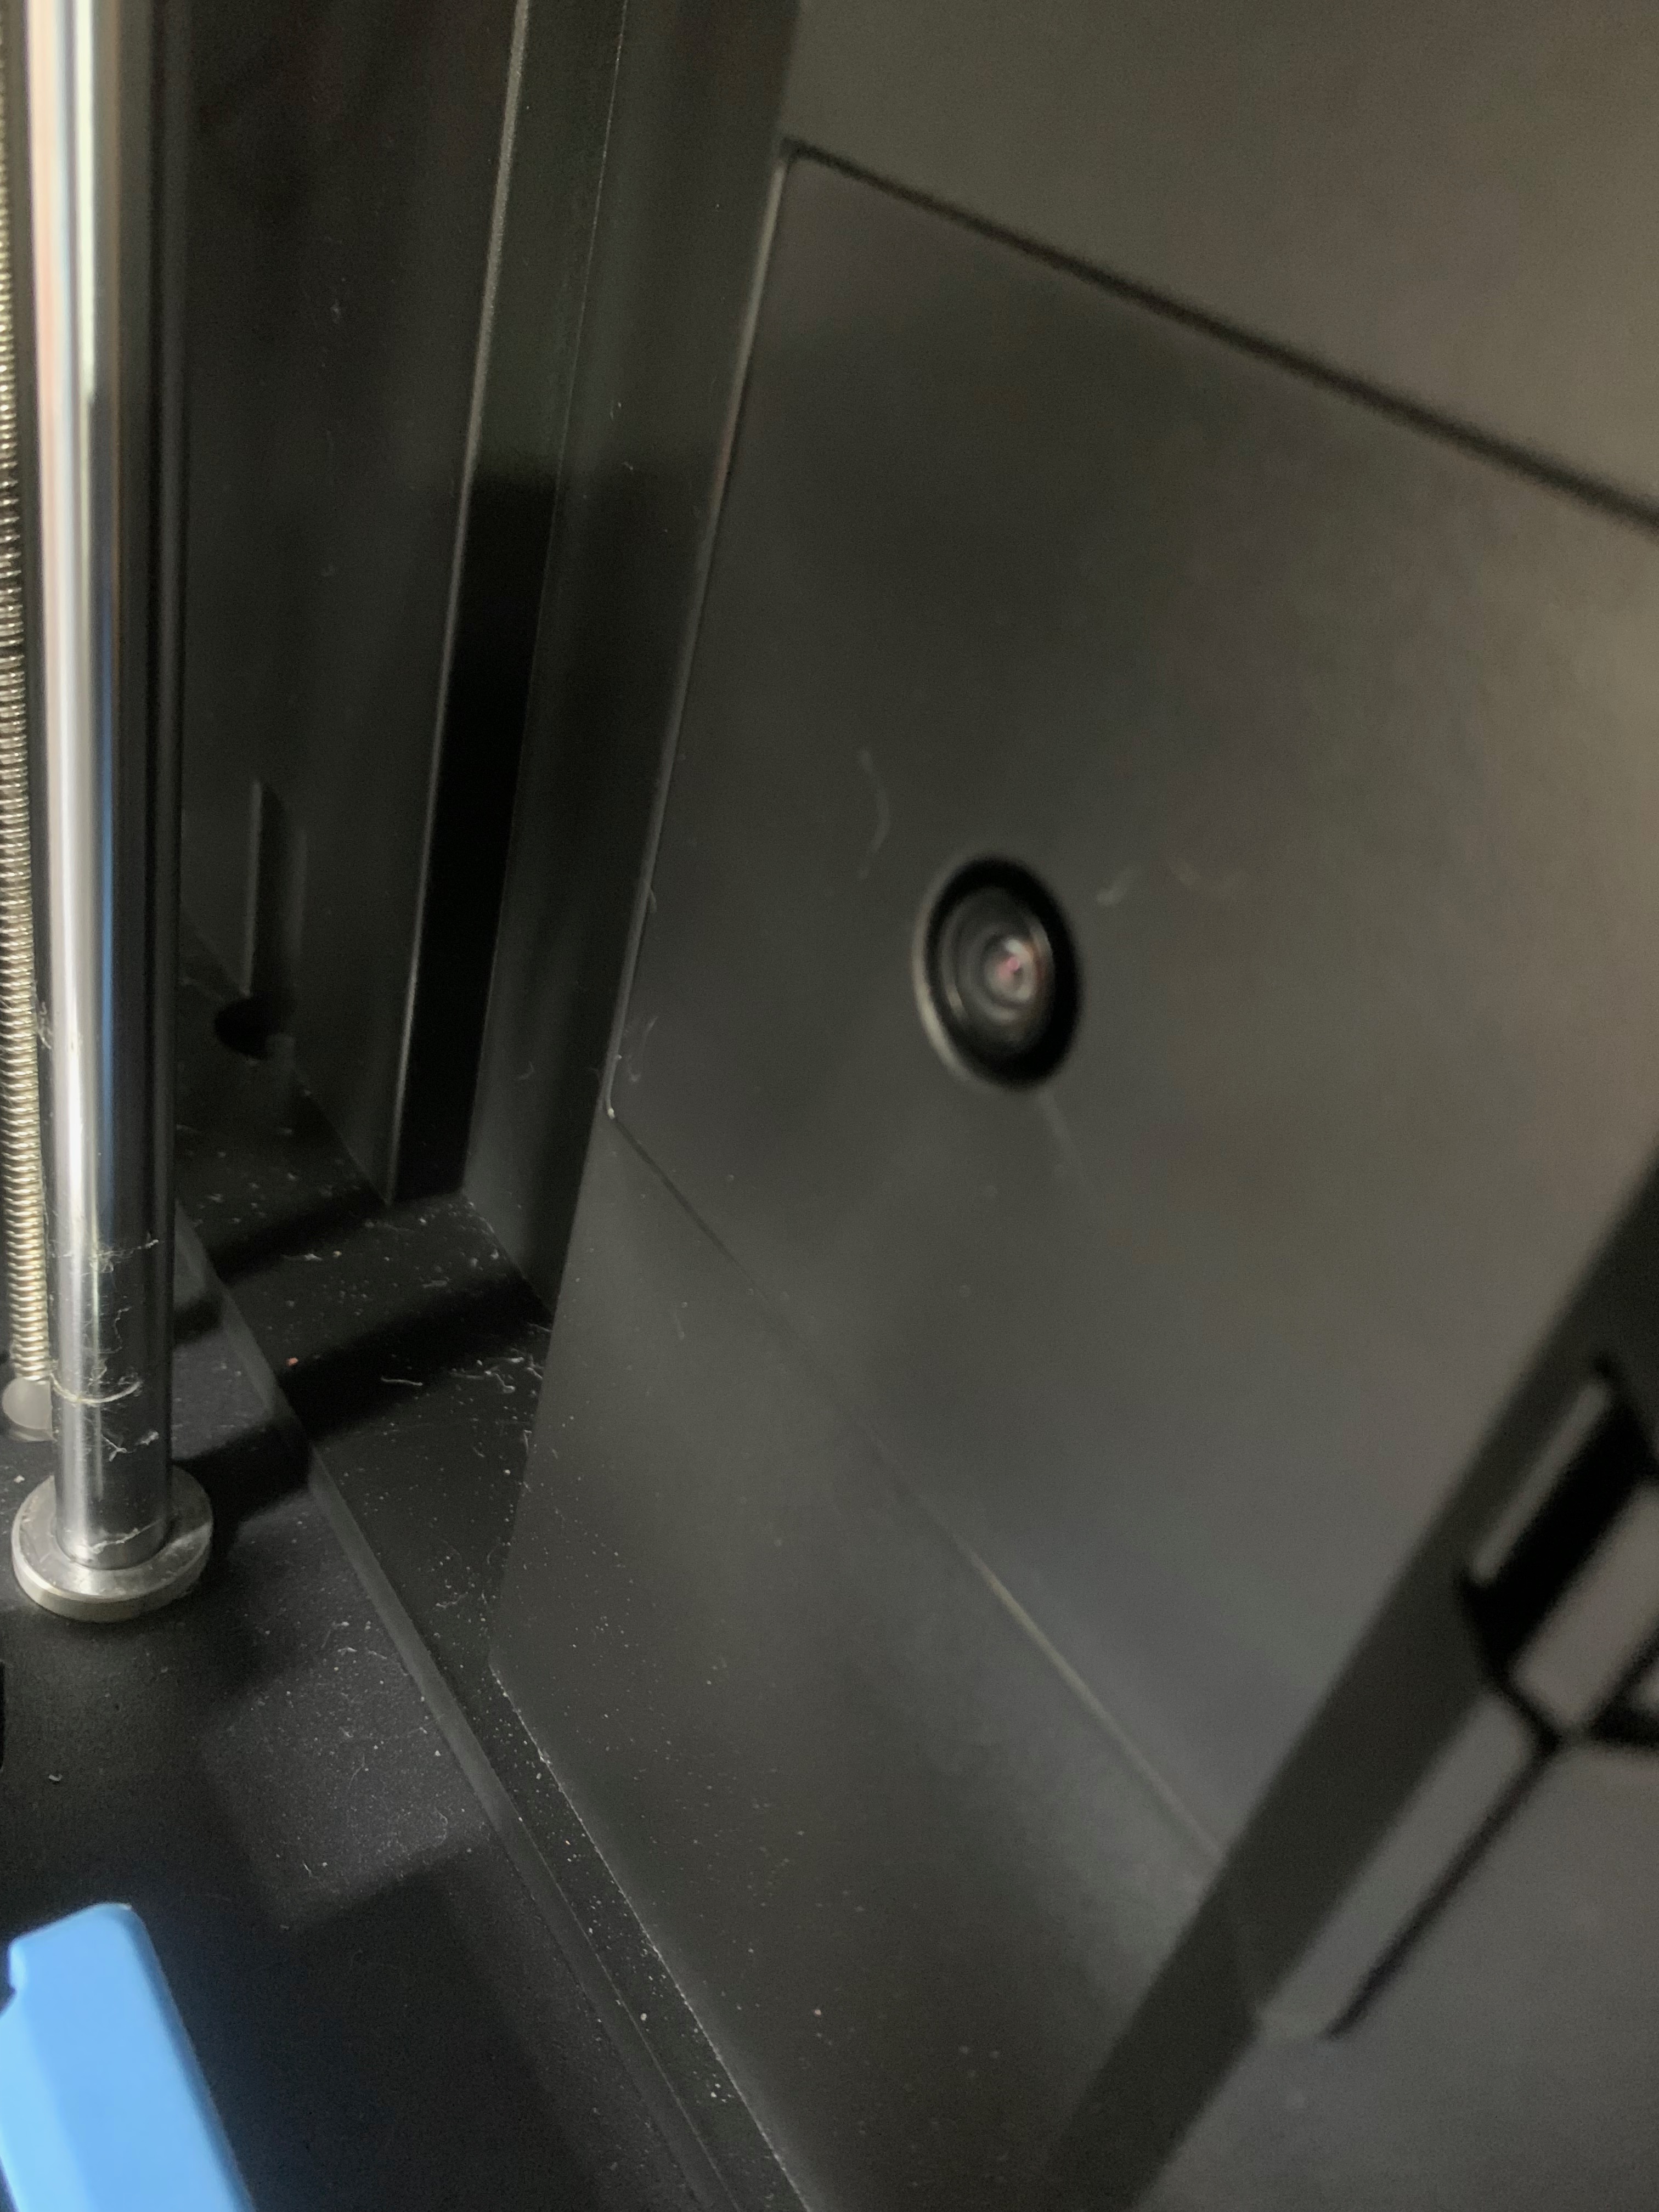
It also has a built in camera which, while kind of a fun thing to have, isn’t really all that useful. The camera can be accessed from the FlashPrint software or supposedly the video can be streamed to “the cloud” so you can watch your printer chugging away while you’re on vacation or something I guess.
IMO the camera is little more than an interesting novelty. The video quality is, frankly, terrible. I have a $60 “action camera” sitting on the shelf that makes better videos and still images than this thing does.
Having the print bed and the extruder at the proper temperatures during the printing process is essential. I used a Fluke 62 infrared temperature gun to check the temps of both the extruder and plate during printing and found the temperatures were within +/- 1.5 degrees of what the printer was set to in the software. That’s pretty much spot on, so no complaints there either.
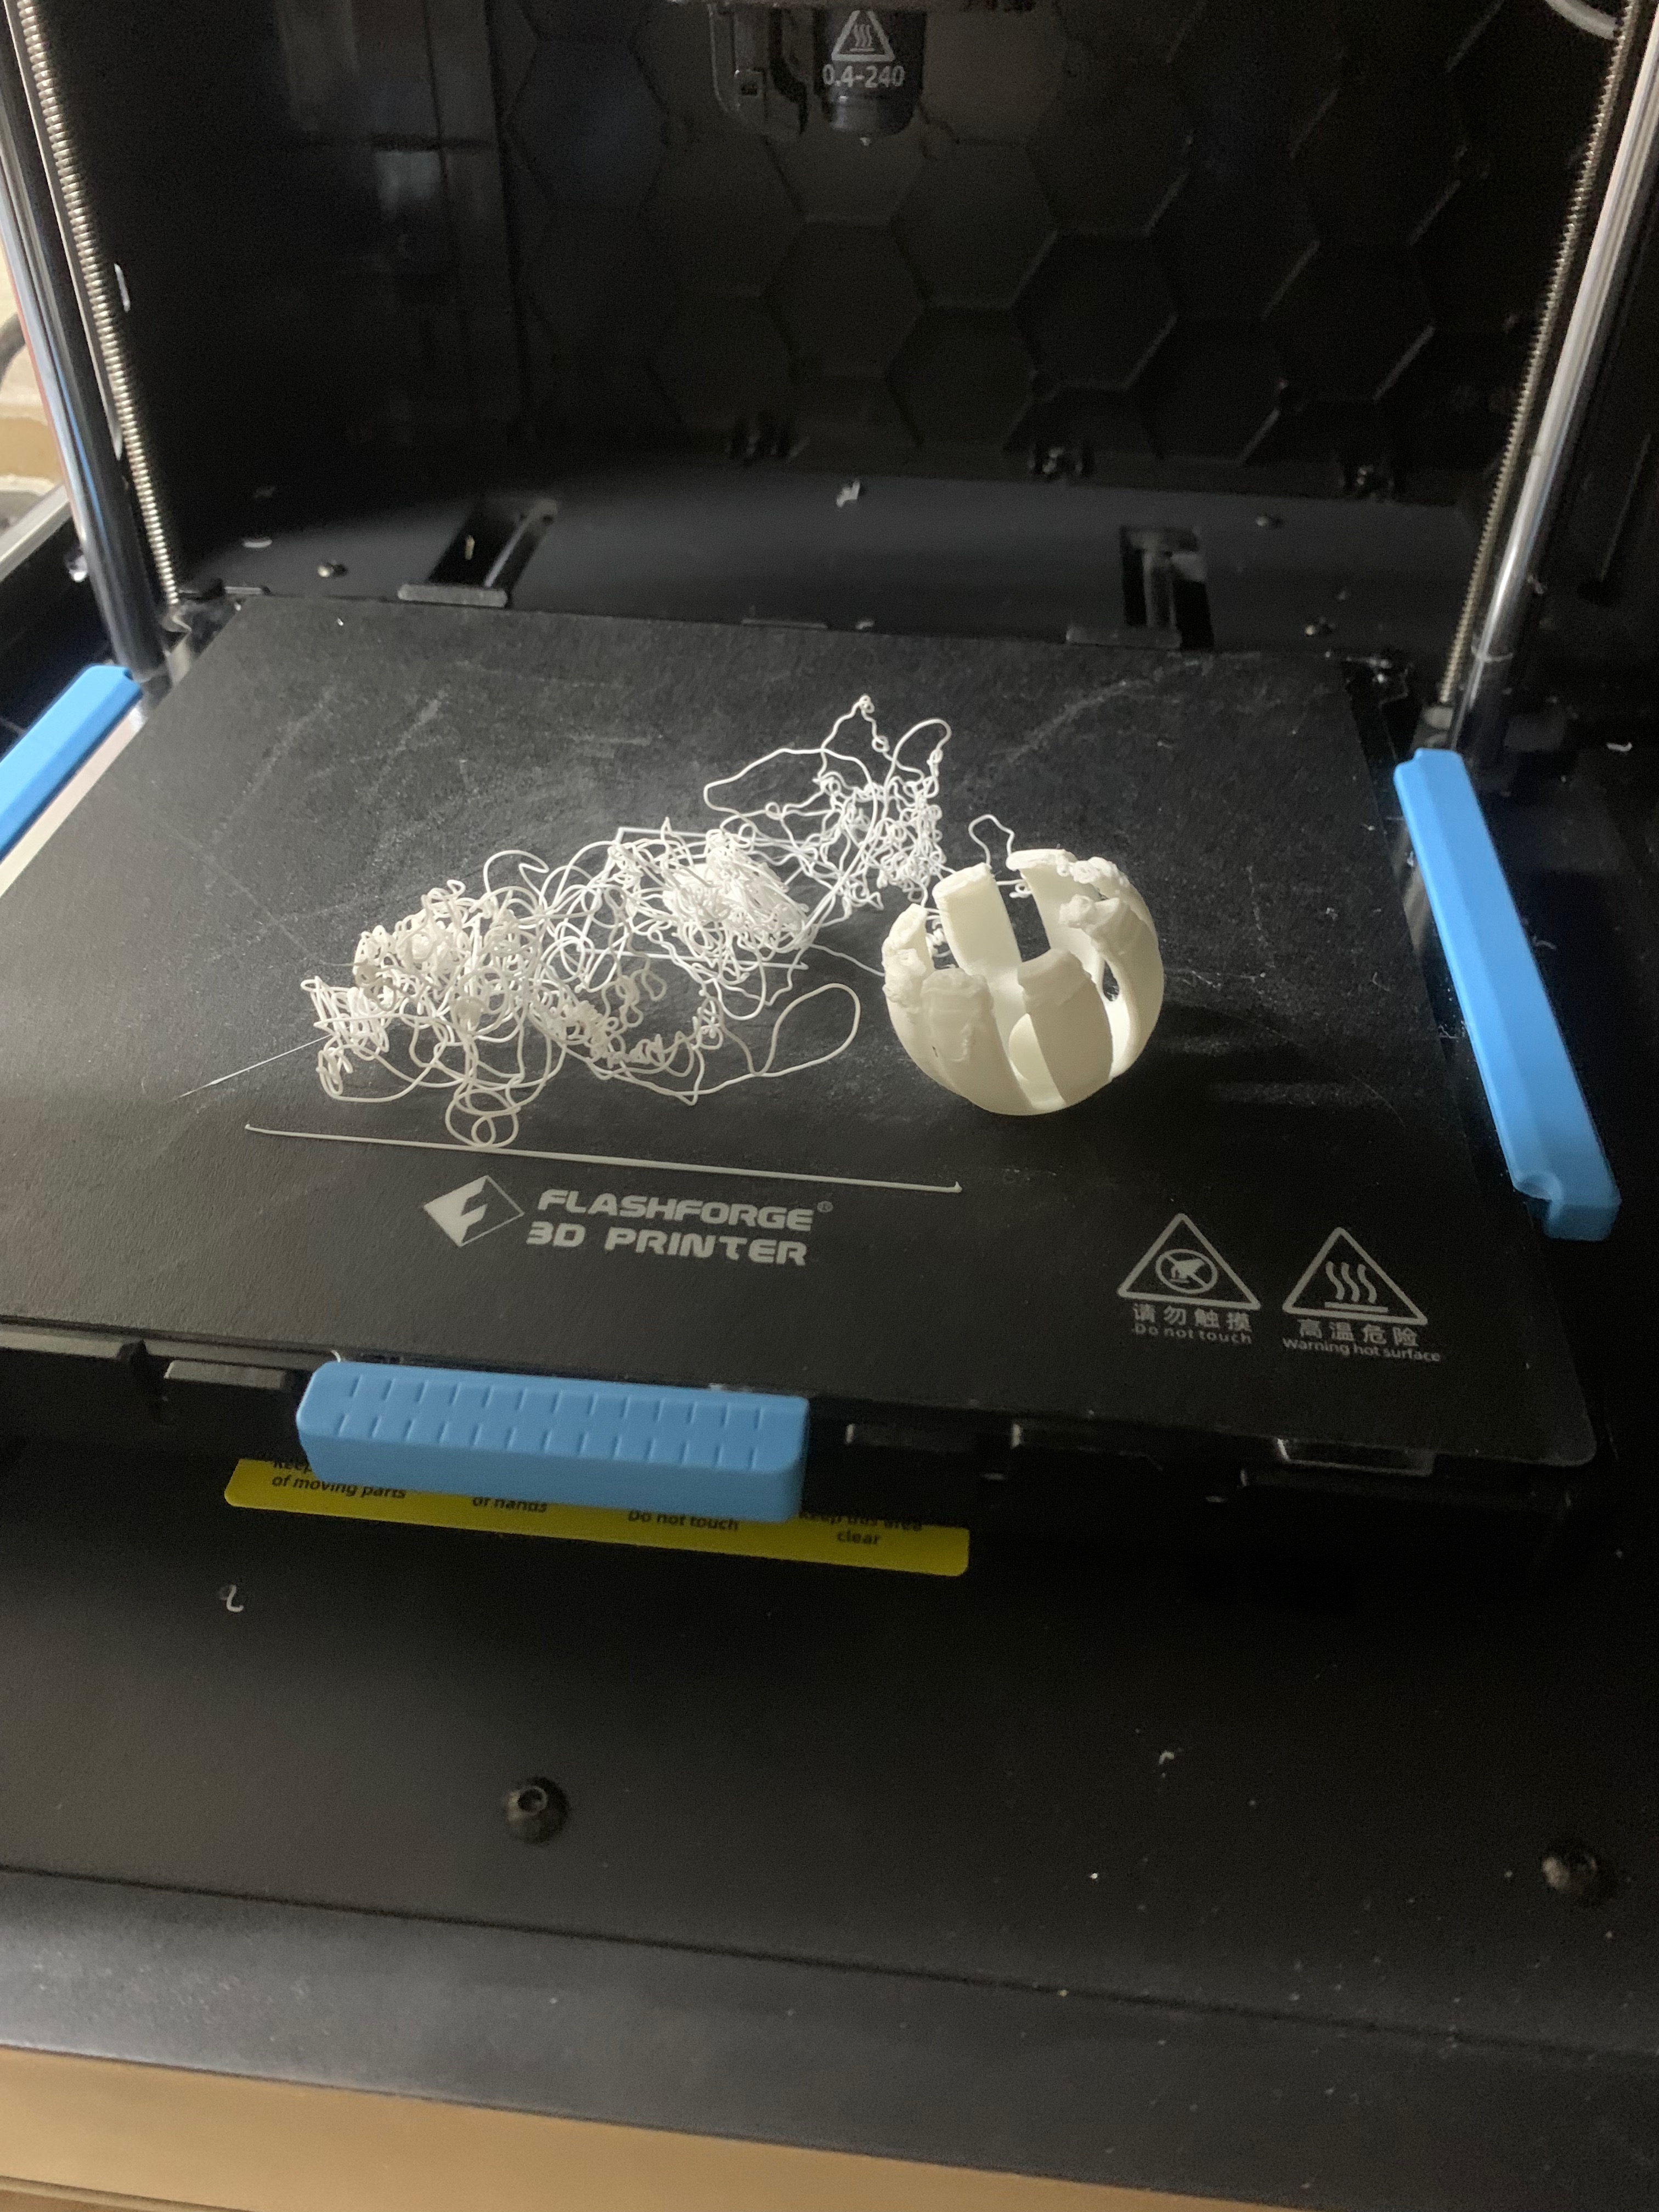
What really matters, of course, is how good does it print? The slick appearance and fancy user interface and all of that doesn’t mean anything if the print quality isn’t up to snuff. Fortunately the A4 excels there as well.
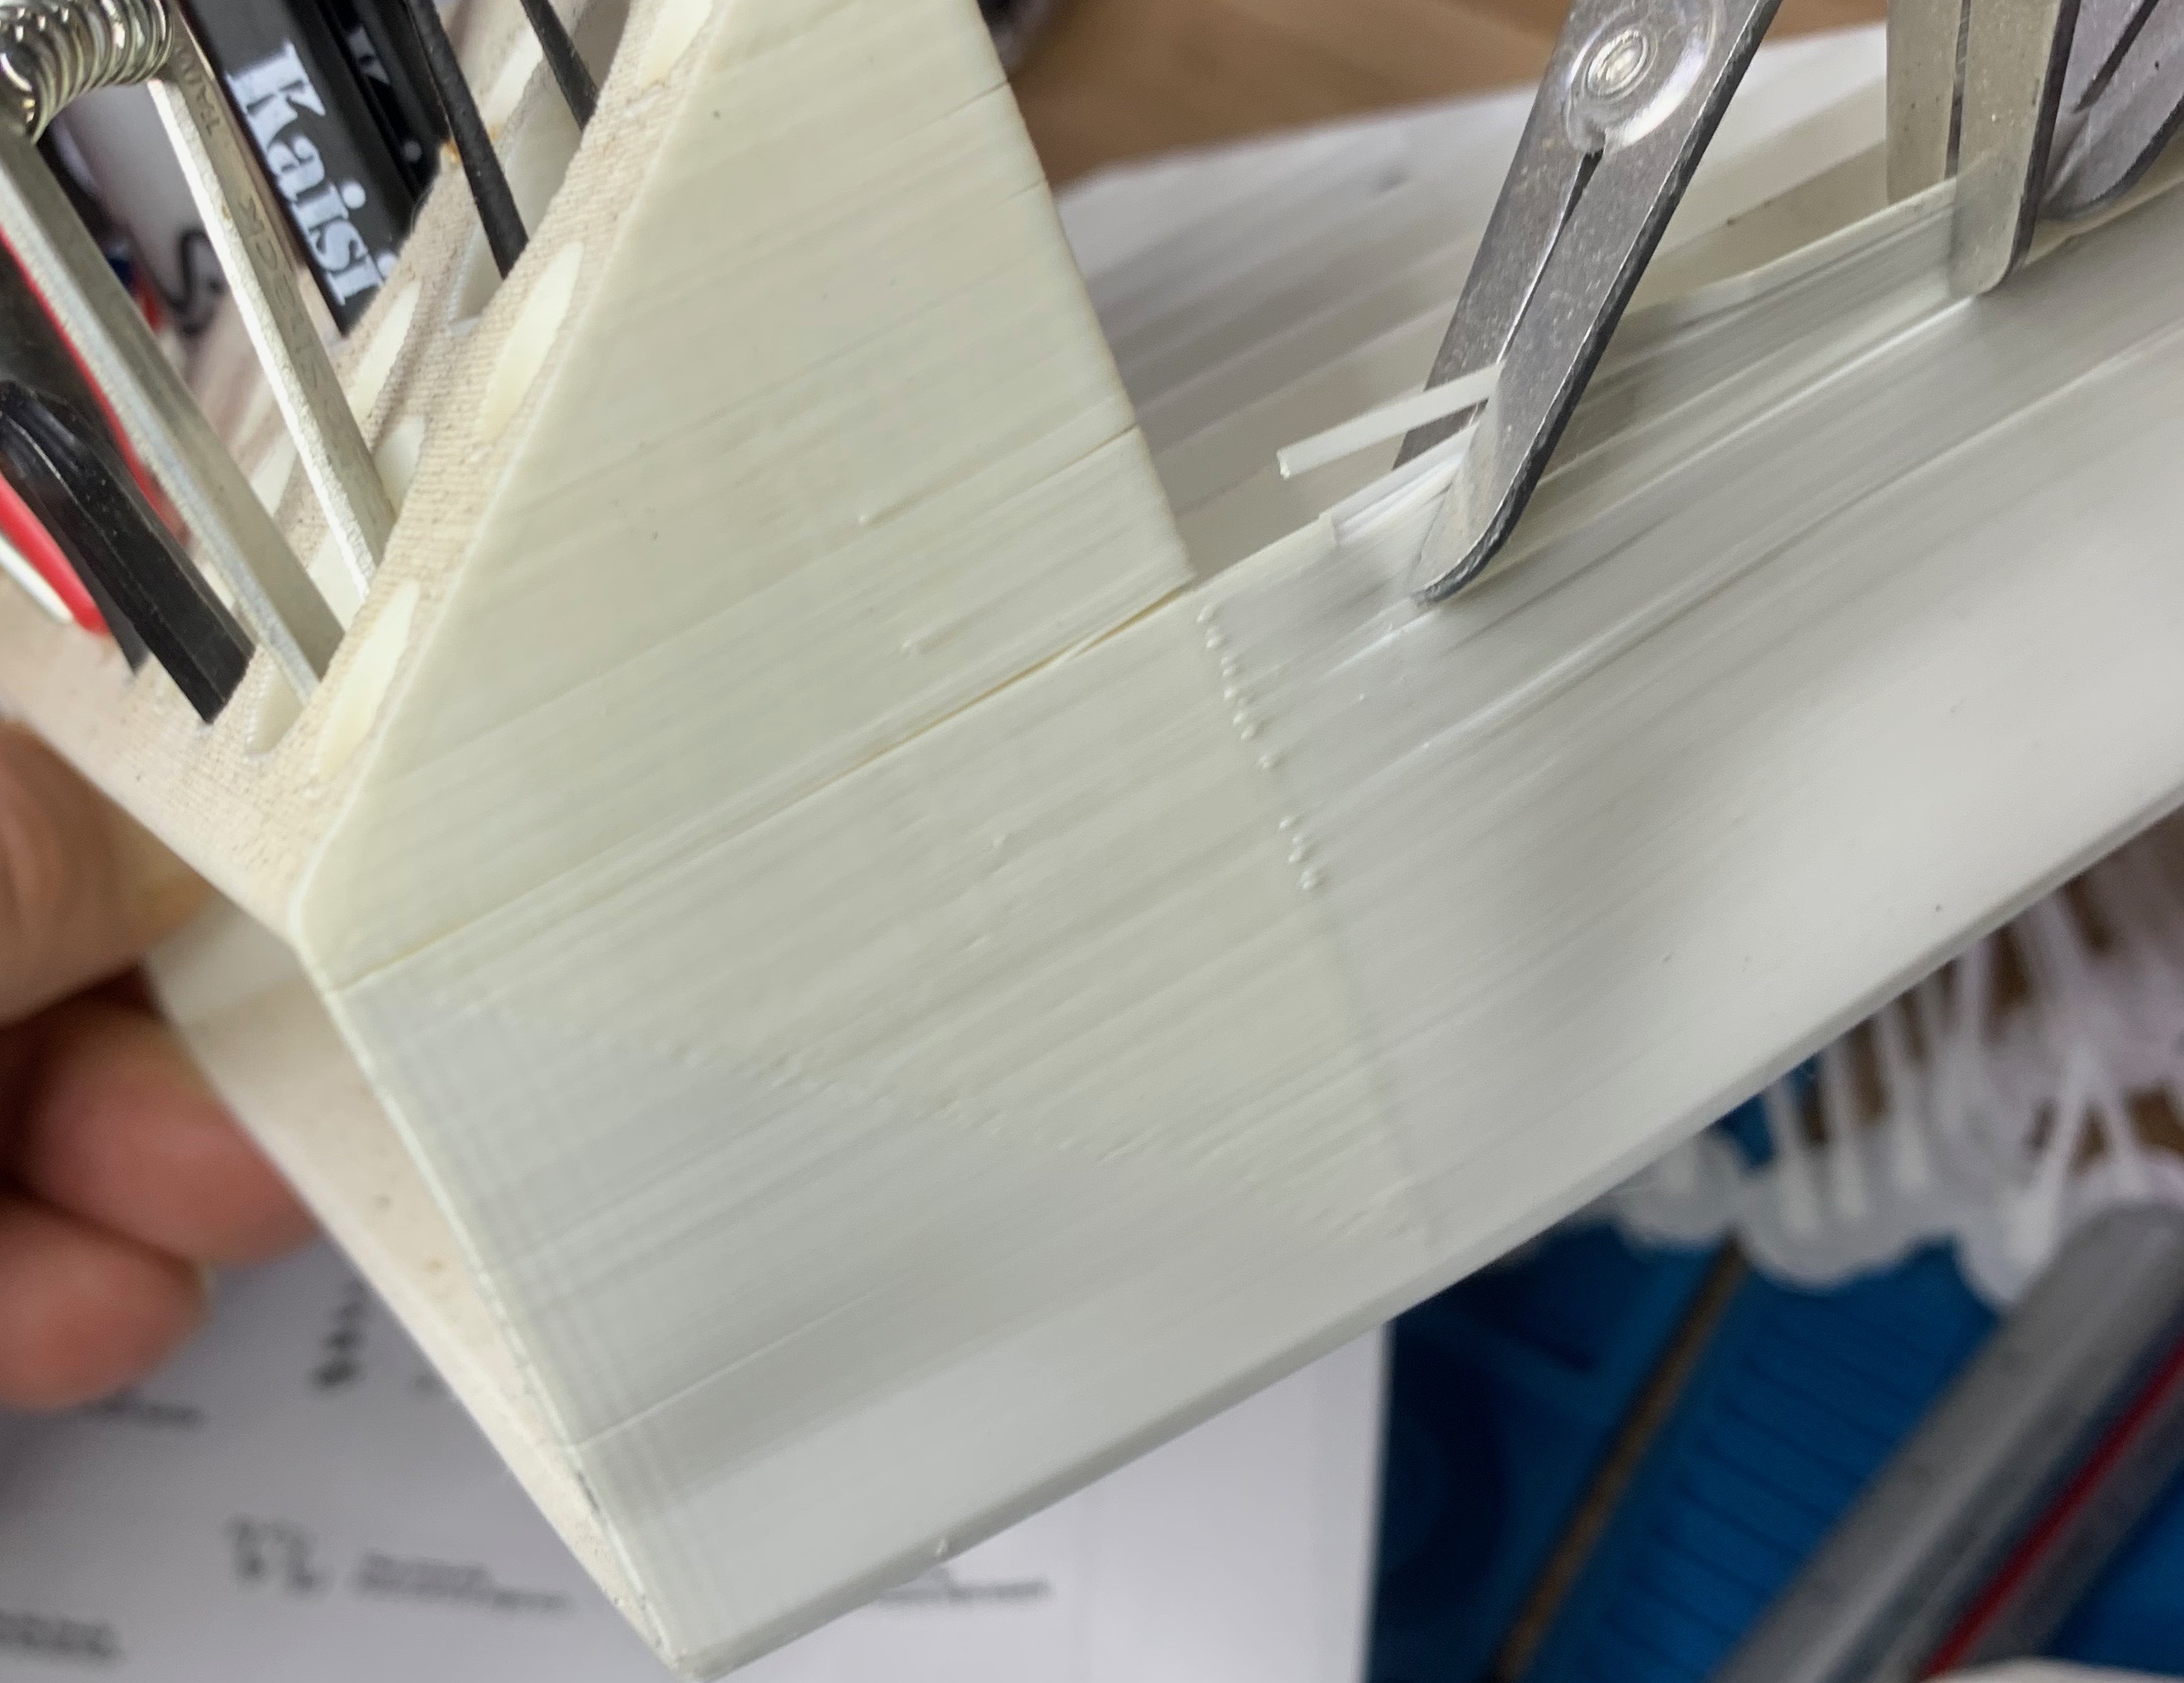
That’s an extreme close up of a part for a submarine model I printed with the A4. The vertical lines are part of the design. If you look closely the quality is quite good. Edges are crisp and well defined, the surface is smooth. Basically this is about as good as it gets when it comes to consumer level FDM printers.
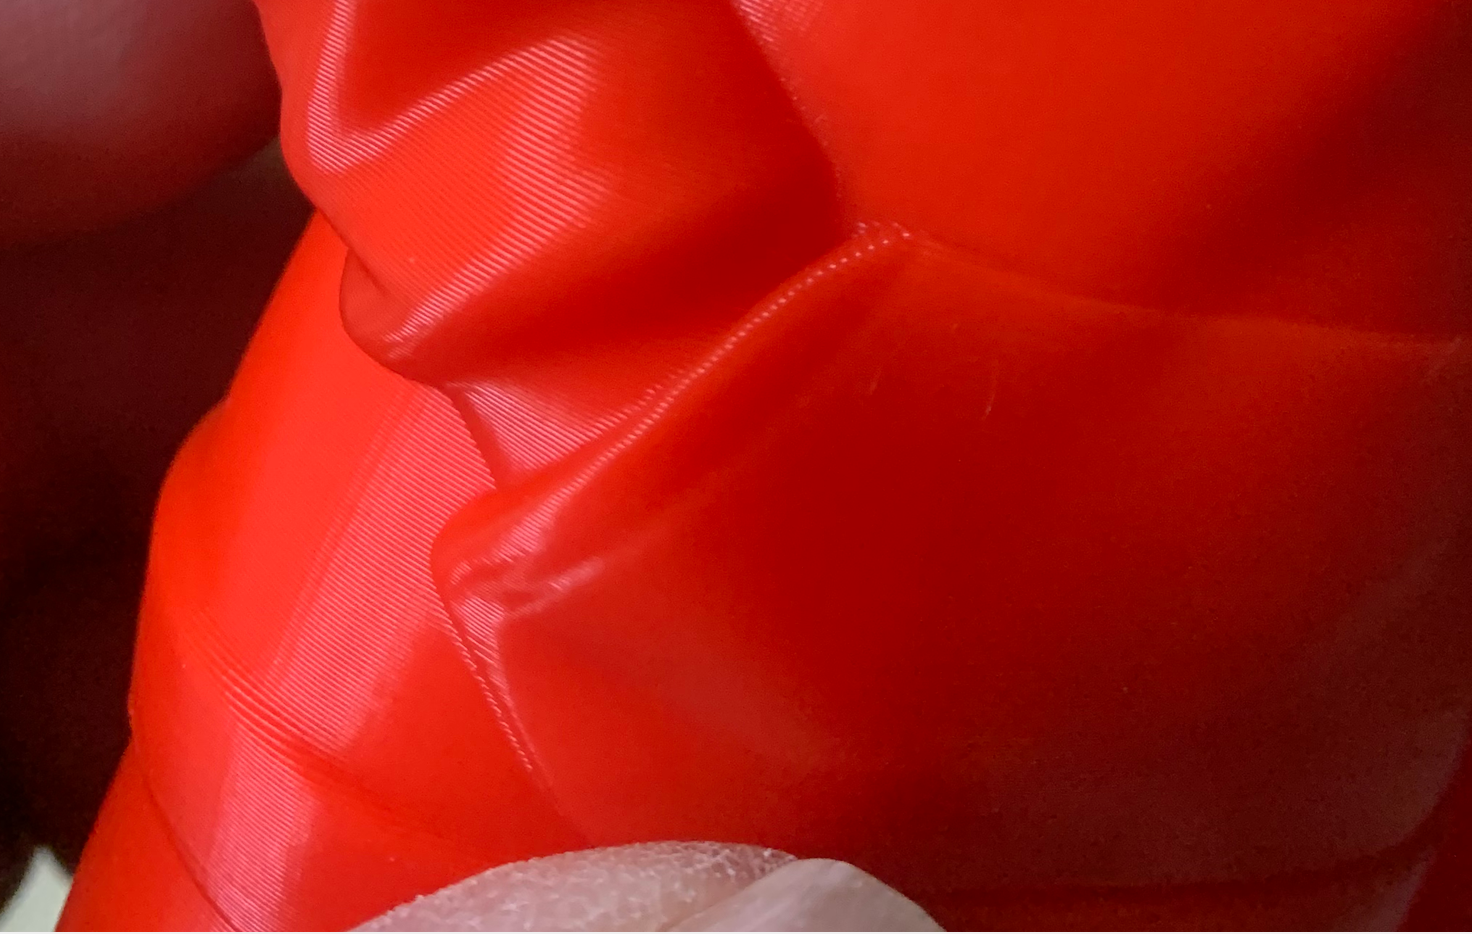
It’s a bit easier to see details with this red plastic. Another extreme closeup showing how well the A4 reproduces fine detail where the cloth folds and the hand slips into the pocket.
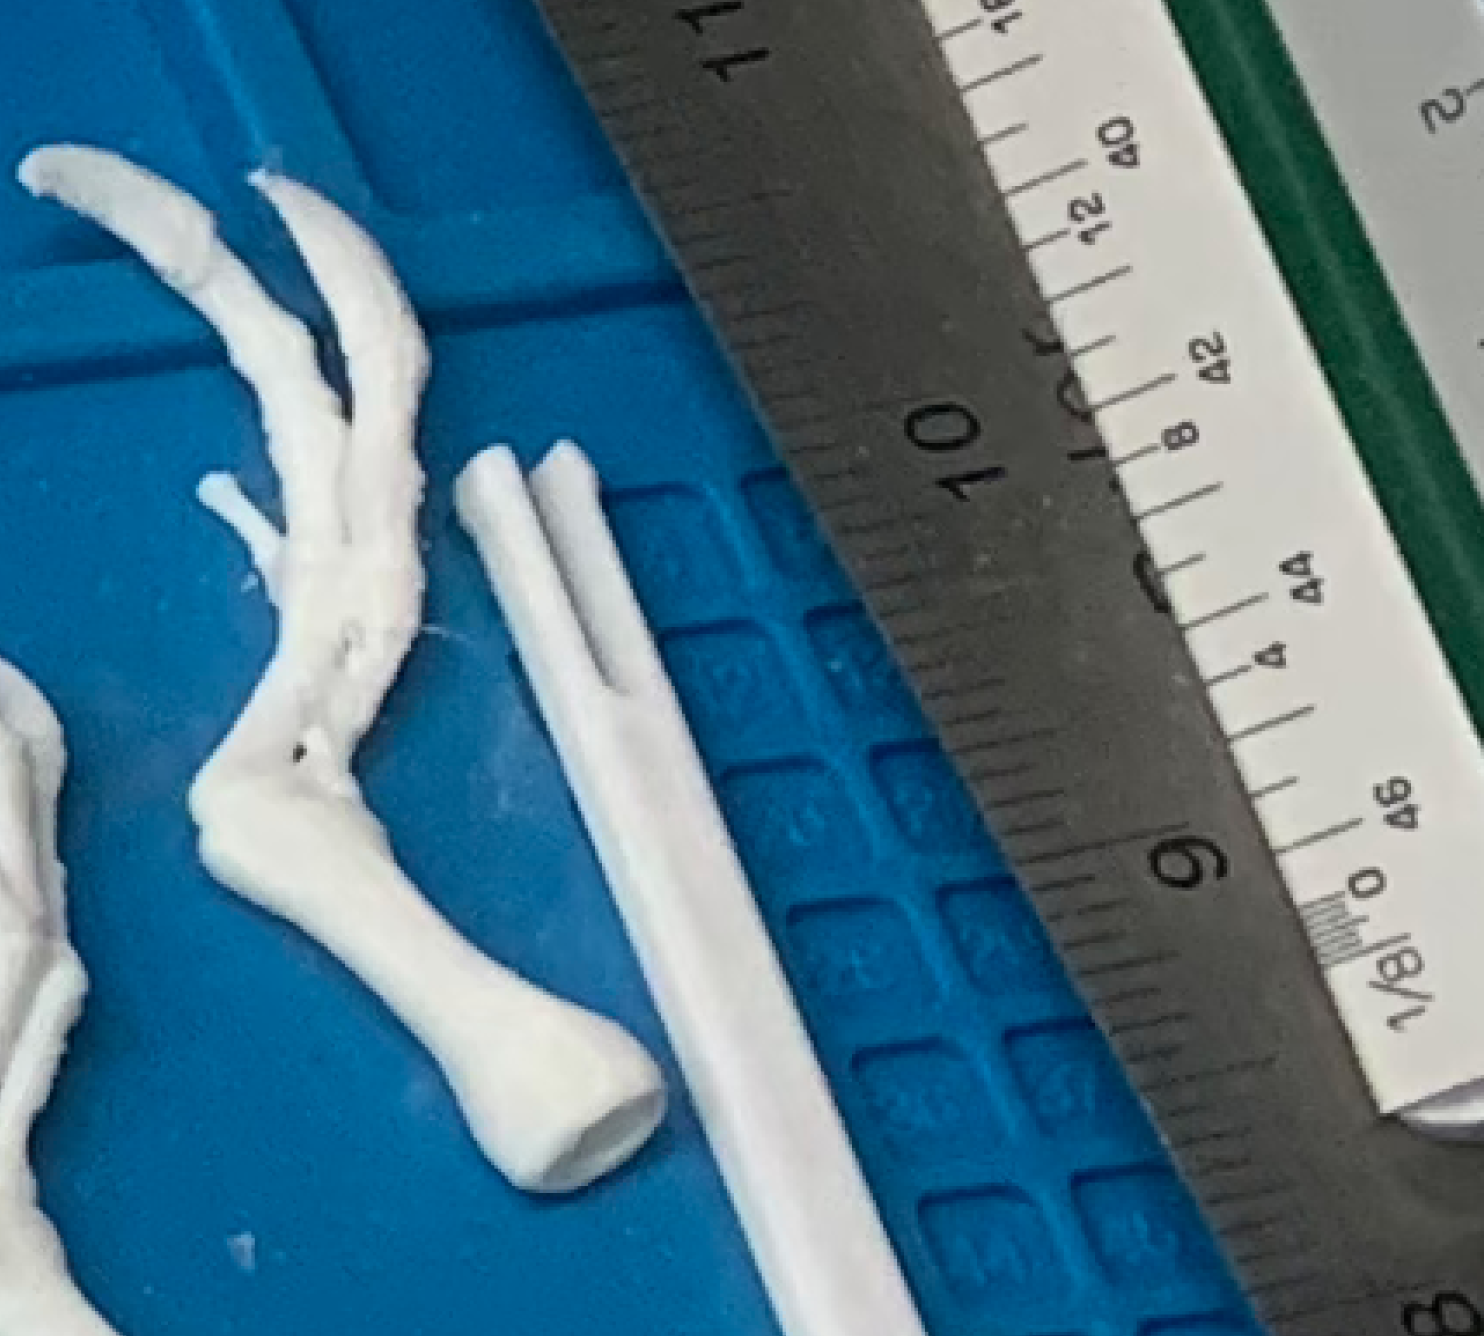
Even these tiny claws turned out pretty well. There is a bit of roughness around the edges but even the knuckle joints on those tiny claws turned out pretty good. Those “fingers” up there are only about 1 – 2 mm wide so getting that kind of detail is pretty impressive, IMO.
The Software: FlashPrint 5
I found the FlashPrint 5 software to be complete, stable, and gave me complete control over the whole printing process.
Of course the software on the PC side of things can be just as important as the printer’s hardware. FlashForge included FlashPrint 5 on a USB stick, and that’s what I’ve been using with the printer since I got it. Early reviews were not kind to the software but my experiences with it have been extremely positive so I suspect those early reviewers were working with a pre-production version that wasn’t ready for release.
FP5 is a slicer and a control program (sort of) for the A4. As a slicer it worked well. It handled every .STL and .OBJ file I threw at it. It can scale objects up or down in size, move them around the build plate, add supports if necessary, and give complete control over every aspect of the printing process.
Once the object is sliced you can look at every detail of what’s going on, all color coded, and then proceed to either save the sliced object to your computer, to a flash drive to plug into the printer, or stream it via WiFi to the printer. At first I saved projects to a flashdrive that was then plugged into the printer, but WiFi has been utterly reliable and far more convenient so I’ve been using that exclusively now.
There are some minor issues with the software. The automatic support generation has some problems. It regularly misses areas that definitely need some kind of support structure, and it often inserts supports where they aren’t needed. When adding supports you’re going to have to very carefully go over the entire object to make sure supports are properly placed. Fortunately adding supports manually is not hard to do. But I’ve had to do that with every slicer program I’ve ever used.
The user interface could use some work to organize it better and make some of the options easier to find but overall it isn’t bad and I’ve seen much, much worse.
Conclusions:
In my opinion the A4 is just plain good. The $800 retail price isn’t exactly cheap but you’re getting one heck of a good 3D printer for the money. It is very well made, extremely easy to use and the quality of prints has been excellent. This about as close to being a plug and play system as I’ve seen.
The removable build plate system works very well indeed. The automated bed leveling system works well. It can automatically re-start a print in progress if something like a power failure interrupts the print. It has a huge amount of memory built into it so it can store frequently printed objects internally so you don’t even need a computer connection or a flashdrive to run off multiple copies of an object. I haven’t really found anything about this printer that I don’t like.
Problems
Are there some problems or issues? Yes, but those have been very minor.
WiFi – Occasionally the Flashprint software will lose connection to the printer, or the printer loses connection to the computer running Flashprint, after a print job has completed. In every case turning the printer off and then back on has cured the problem. After the most recent firmware update losing WiFi has become extremely rare.
Flashdrive problem – Occasionally I’ve had the printer simply lock up when trying to load a file off a flashdrive plugged into the USB port. It will start loading the file and then just stop and the screen goes blank and I have to do an off/on cycle to recover. But those exact same files will print if sent over WiFi. I have no idea why. It hasn’t been a real issue for me because I always send prints to the A4 via WiFi, but it is something I thought I should mention.
The system that senses whether or not filament is present seems to have failed. This just happened while I was writing this and I haven’t had a chance to investigate yet. The printer would stop with an error message that there was no filament, even though there was. Fortunately that can be shut off in the printer settings and I’ve been able to continue using it, but that’s something that I’m going to have to look into. Personally I can live with not having a filament sensor. I’m pretty good about making sure there’s enough filament loaded into the machine before I start a print. If worst comes to worst and the sensor needs to be replaced it looks like it costs a whopping five bucks.
And that’s about all there is. If you’re looking for a good quality 3D printer you really should take a close look at the Adventurer 4. It’s been running here nearly nonstop for almost two months now and it has been very, very good.
This is the new one, Flashforge Adventurer 4. Review coming up. Spoiler: Ooo, it’s nice!
I’ve been dabbling with 3D printing for many years now and I’ve mentioned it in the past, but I haven’t talked about it here in ages. But I just got a new 3D printer and wanted to do a mini review of it after Christmas. While I was working on writing that up someone pointed out that while almost everyone has heard about 3D printing very few people who haven’t actually used one of these things know how they really work. He suggested I should first explain how it works and what the different types are so people know what I’m talking about when I start babbling about things like bed adhesion and feed rates and extruder temperatures in the review later. And since it’s late December, it’s cold and dark outside and I have some time on my hands, why not? So let’s go.
When 3D printing technology first appeared, visionaries told us it was going to revolutionize everything. They proclaimed a future where every home would have its own printer and instead of going out to a store and buying something you’d simply download a file from some central depository and print what you needed right there at home. But I remember what those visionaries said about the future when I was a kid. According to them by this time I should be able to jump into my personal flying car, go to the nearest spaceport, take a few days off on a vacation on the moon and come home to find that my personal robot, Jeeves, has remodeled the bathroom for me and has a gourmet lunch waiting when I get home. So whenever “visionaries” start spouting off, I tend to ignore them entirely.
That’s kind of what happened with 3D printing at the consumer level. To be fair 3D printing has indeed become extremely important. In industry, in research and development and even in medicine it has become an essential tool. But in the home? Not so much. At the consumer level, with printers people like you and I can afford, 3D printing is little more than a novelty, a toy, really. Can it do some useful things? Yes. But let’s face it, most home 3D printers are going to be used to print out trinkets, key fobs, the occasional Star Wars figurine and similar tat. If you can afford to drop $400 or more on a decent 3D printer just to play with it, good for you. There is nothing wrong with that. We spend a hell of a lot more than that on hobbies and toys. But you need to remember that for the average person a 3D printer is never going to be a practical investment.
How Does It Work
At the consumer level there are two basic types of 3D printers, fused deposition modeling and stereolithography. And because no one wants to have to keep typing ‘fused deposition modeling’ and ‘stereolithography’ all the time, they are usually referred to as FDM and SLA. Both types of 3D printing work by creating multiple layers of plastic in a specific pattern to build up a complete object, but that’s where the similarities end. Let’s look at FDM first.
FDM works by taking a solid plastic provided in the form of a filament that looks like thick wire and comes on spools. This filament is heated until it melts and then is forced through an extruder nozzle and deposited onto a build plate in a thin line usually less than .5mm thick. The extruder (and sometimes the build plate as well depending on the model) moves from left to right and back and forth and up and down, in a specific pattern determined by the software controlling the printer, that pattern being a three dimensional object created in a CAD program or 3D modeling software. Here’s a brief video of my new printer at work to give you an idea of what’s going on.
The plastic, in the form of a thin filament, is forced through that white tube at the top of the black extruder/heater. It is melted inside of the print head or extruder, in this case to 220C, then forced through a small nozzle to deposit it as a very thin string of melted plastic. The print head lifts up a bit less than a millimeter and the next layer is deposited. It’s printing the leg bones of a T-Rex model I’m building. Most of what you see being printed up there aren’t the bones themselves, they are supports, a sort of scaffolding that will support and steady the actual leg bones as they increase in height.
As you can see in the video with this particular printer the extruder, or print head, moves from left to right and up and down, while the build plate moves back and forth. With some models the build plate remains stationary and only the extruder moves. You can’t actually see the extruder moving up after it finishes depositing a layer because it’s only moving a fraction of a millimeter.
With early versions of FDM printers the end results were pretty crude and the size of the objects you could make was very small. But modern printers can reproduce extremely fine details and the size of the object being built has increased greatly. If you look at the photo on the right you’ll see one of the first test objects I tried on the new printer. I use this figurine to do testing because it is a challenge for a lot of FDM type printers. It has to reproduce some very small details like the strings of the hoodie and the shoe laces. It shows how well smooth details like the legs and sleeves are reproduced. It also shows how well the printer can deal with a variety of issues that can cause problems. The 0bject was scaled to push the printer’s size limitations as well. You can see from the ruler alongside that the print is over 8 inches tall. If there are any issues with the extruder positioning systems they tend to become more obvious on taller objects.
The filament comes on spools like the one over there on the right. It is available in just about every color imaginable, including clear, translucent and even glow in the dark plastics. The better printers can use a wide variety of different plastics as well that include ABS, PLA PC, PETG, PLA-CF, PETG-CF, nylon and others. There are even plastics that mimic the look of materials like wood and stone. The filament isn’t hugely expensive. The most commonly used types like ABS, PLA and PET sell for about $18 – $25. The stuff I am currently using sells for about $20 for a 1 kg spool, and you can print a lot of stuff with one spool.
Nothing is perfect, of course, and FDM technology has its share of problems. They keep getting better and better as manufacturing technology and software has become more sophisticated but they still have some issues, some of which can be difficult to deal with.
The Problems
FDM type printers are mechanically complicated for one thing. There are drive motors, drive belts, gears, screws, sensors, heaters, fans and other systems built into that printer, and all of it has to be manufactured to extremely tight tolerances.
(Note: The printer will, sooner or later, also break, which means it will have to be repaired. That means either you’re going to have to ship it off somewhere to get fixed which is a pain in the neck because of a lot of these printers are physically big and rather heavy, or you’re going to have to fix it yourself.)
Unless everything works perfectly and you have the temperatures set exactly right, the speeds exactly right, etc. you can end up with what you see over there on the right. That’s a tool holder that I printed a long time ago on a printer that is now, thankfully, long since gone. You’ll see a lot of the issues that plagued the early versions of FDM printers and still afflict some of the ones on the market. You can see delamination, where the deposited layers are pulling away from each other. You can see the layers often are irregular and uneven, indicating possible problems with feed rates and possibly temperature issues and problems with positioning the extruder. There is warping of the object. There is a whole list of things that went wrong here even though I had the printer set up properly and the temperatures set correctly. Fortunately modern FDM printers are much, much better than the one that created that mess up there. When everything is set up properly what you get should look like the photo below.
This is what a 3D print should look like: no warping, no striations, no problems at all, really. Those vertical lines you see are supposed to be there, they are part of the design.
3D printing is fiddly. Everything has to be exactly right in order to get a good print. And as I said the technology has improved a great deal and most systems will have default values that will work just fine under most circumstances, but you need to be prepared to start fiddling around with things if everything doesn’t work as you expect.
3D printing is also slow. Very, very, very, very slow. That tool holder in that one photo up there takes about 20 hours to print. Seriously. If I remember right the figurine in red plastic took 17 hours. If you get involved in 3D printing you need to have patience. Lots and lots of patience.
Another issue that crops up all the time with FDM printers is the build plate. This is the platform on which the plastic is deposited. It isn’t just a flat surface that the plastic is laid on. It has to hold the object tightly enough so that it remains anchored down so movement, vibrations, the extruder snagging on a bit of stray plastic and the like doesn’t shove the object out of position or tip it over as happened with that little ball over there on the right. The ball got knocked over and the printer went merrily on its way depositing filament into thin air because it has no way of knowing if there is actually an object in place or not.
So the bed has to be able to adhere to the plastic tightly enough so that the object being made doesn’t move. But at the same time it also has to be able to release that object from the bed when the print is done without you having to resort to using a hammer and chisel. Which, by the way, I’ve had to do once in a while.
Fortunately the technology has gotten better there as well and they’ve come up with materials that work much better. Some have removable, flexible build plates. You remove the entire bed from the printer, flex it and, in theory, the object pops right off.
The build plate or bed also has to be absolutely level and parallel to the extruder nozzle across the entire range the extruder travels over. This means having to go through a process called bed leveling, where the extruder is brought down until it is just barely touching the bed, then adjusting the bed height so a piece of paper or thickness gauge can just barely be slid between the extruder nozzle and the bed. The adjustment is often done with multiple thumbscrews located under the bed. Then this process is repeated at multiple points across the entire surface of the bed. And once you’ve done that, it’s a good idea to do it all over again because adjusting one of those leveling screws can mess up the adjustments on the others. And I assure you that it is a royal pain in the ass sometimes. I had one printer where I had to do that every single time I used it.
Fortunately the better printers on the market have come up with solutions to this problem. Some have automatic bed leveling systems to deal with it for you. Others have developed leveling systems that, while they aren’t fully automatic, make the process much, much easier.
Then we come to the plastics themselves. There can be problems there as well. Some of them are downright toxic. There’s no way to get around that. These days I work almost exclusively with PLA, polylactic acid, which is pretty benign. (I also use PET which is relatively safe as well.) PLA is made from plant starches from sources like corn and sugarcane. It is considered food safe. And it emits no toxic fumes when heated. It’s often used for food packaging. And it is biodegradable (sort of) so PLA waste material isn’t going to be laying around for hundreds of years. But PLA has some issues as well. It is relatively brittle, so it isn’t going to work for applications where an object needs to flex. It can warp and distort when exposed to high temperatures so objects made from it shouldn’t be exposed to heat sources and it is not UV resistant so it shouldn’t be used in direct sunlight.
PET is also relatively safe and is considered to be food safe. Some of the PET filaments on the market are made from recycled soda and water bottles. It is also much tougher and more flexible than PLA. But it also requires higher extruder temperatures so not all FDM printers can use it, and can be a bit more tricky to work with.
Other types of filament are not so benign and some are downright nasty, especially when heated. Some varieties give off fumes which can be irritating and even are potential carcinogens. That isn’t to say those types can’t be used, it’s just that you need to take basic precautions like proper ventilation if you do choose to use them.
And for those of you concerned about things like microplastics getting into the environment, yes, there is some risk of that happening with FDM printers as well. The printing process can result in very small particles of plastic getting into the atmosphere. However printer manufacturers are now realizing this and some of them are doing something about it. The one I just bought is completely enclosed and includes a HEPA and charcoal filtration system.
Let’s move on to stereolithography, printing systems. I don’t own an SLA printer but I do know how they work, so let’s take a look.
SLA printers use an entirely different technology than the FDM variety. It also builds up thin layers which will eventually become the desired object, but instead of depositing melted plastic it uses UV lasers (or at the consumer level UV LEDs) to “draw” each layer in a liquid resin that hardens when exposed to UV light. Here’s a 2 minute video off YouTube that shows how it works. This video is from a specific printer company, but what you see happening here is how most SLA printers work.
Note that I am not recommending printers from this company. Their printers are very, very nice and I’d love to have one but dear sweet lord they’re expensive! The last time I checked out their prices the cheapest one they had was in the $3,000 range and they ran up to well over $10K. These printers are aimed at the professional market, not at the hobbyist. Still, it’s a pretty neat little video and it gives a good illustration of how SLA printers work. Also understand that this is a company promotional video so they aren’t showing you all of the problems that can and do crop up, nor do they talk about safety.
In many ways SLA printers are superior to FDM printers. They generally have much better resolution, meaning they can make objects with much finer detail than FDM printers can. They are often faster than FDM printers as well.
SLA printers also have some fantastic resins to work with. The color choices are amazing, and the material types range from soft and flexible to rock hard. And the materials used can be far more durable than the plastic filaments used in FDM printers.
But there are problems here as well otherwise everyone would be using SLA printers and the FDM types would have gone obsolete long ago.
If you follow this blog you know that I work with liquid resins quite a bit, and I’ve mentioned before that some of these resins can be dangerous unless you take adequate safety precautions. The same is true of some of the resins used in SLA printing. Some of these products are nasty and probably shouldn’t be used in a home environment at all. There are some resins that claim they are safe to work with and don’t require any special handling or ventilation but even with those I’d still be cautious.
SLA printers are also just as fiddly to set up and get working properly as FDM printers are. In some cases they’re even harder to get set up and working properly than an FDM printer.
They’re messy. The build plate is moving up and down into a tank of liquid, and you can be sure the resin is going to splash around. Some printers are worse than others. It depends on how the tank system and build plate is designed. Even with the better ones though you can plan on spending a considerable amount of time cleaning the interior of these things after every print.
Once you have a finished SLA print, you aren’t done yet. The print has to be washed to remove the uncured resin clinging to it. Some resins are water soluble and can be washed in plain water. But other resins need to be washed in chemical solvents, often isopropyl alcohol, which has its own issues. Alcohol fumes are not good to inhale, the stuff is highly flammable, etc. And while it’s not all that expensive, it adds even more expense to the whole process. (You’re also going to need chemical proof gloves because uncured resin is something you most definitely do not want to get on your bare skin.)
And after washing you still aren’t done. Now you need to fully cure it using a special UV lighting system to fully harden the plastic. Working with UV light has its own set of safety issues. High intensity UV lights can cause eye damage.
Of course manufacturers will gladly sell you UV lighting systems to cure your print, and even washing systems. All of which adds even more expense. If you need a UV curing box, which you do, that will add about $100 or more to the cost unless you make your own. If you want to get a washer to make the messy job of washing your prints a bit easier, look to spend another $100 or so. So that $300 SLA printer that you picked up off Amazon now has cost you $500 or more.
Another problem is the build plate. As with FDM printers you can have a problem getting things to stick to the bed. Same is true of SLA printers, and this is made worse by the fact that these printers print upside down. The object hangs from the build plate. Thanks to gravity and suction from lifting the plate up out of the resin tank hundreds of times during the process, the object being printed can fall off the build plate into the resin tank below. especially as the object gets bigger and heavier.
And there can be other problems you won’t find with FDM printers. I’ve heard some people claim that some types of resin give off fumes that can cause the plastics used in making the printers degrade over time. One fellow told me that fumes from resins he was using caused the protective cover to craze and become opaque. Another told me that he has to use alcohol to clean up the interior of the printer after a build, and found that the plastics used in the construction of the printer softened and even started to dissolve when exposed to the alcohol he had to use to clean it.
The UV light source in the printer has a limited lifespan, whether it is LED or laser. Eventually the light source is going to have to be replaced. Replacing those can be difficult, and the parts are not cheap.
Personally I would like to experiment with an SLA printer but at the moment I think the drawbacks outweigh the benefits, at least for me.
Software
The hardware is just one part of the system. Just as important to the whole process is the software. You’re going to need what is generically called a slicer program. This is a piece of software that takes a 3 dimensional CAD file and converts it into the instructions the printer needs to actually build the object. There are several out there. Some will only work with a specific printer. Some are open source, free, and can be adapted to work with a variety of different printers. Some are commercial products you have to pay for. Most likely when you buy a 3D printer it will come with a slicer program of some sort that has, hopefully been tested and tweaked to work with the specific printer it came with.
Best advice I can give you is to use whatever slicer that came with your printer at first or which is recommended by the printer manufacturer. Once you have some experience and begin to understand how the software works, how things like temperatures, feed rates, etc. can be adjusted, then you can start to look at other options if the program you have doesn’t meet your needs.
Now we come to the question of what you’re actually going to print with the thing once you get one. You’re either going to have to design objects to print yourself using CAD software or find objects designed by other people who have provided the necessary files to plug into your slicing software to print yourself. And since most of us aren’t whizzes at CAD, that means finding already created objects that you might find useful and/or entertaining.
There are numerous sources for hundreds, even thousands of objects that people have designed to be 3D printed that they’ve made available for free on the internet. One source is Thingiverse where you can find hundreds and hundreds of objects you can download and print yourself, for free. If you need a specific item like, oh, let’s say a bracket for an out of production vacuum cleaner, you’re probably on your own and you’re going to have to design it yourself with a CAD program of some type.
What Does It Cost. Really
If you’ve read this far you’re obviously interested in 3D printing, perhaps enough to be thinking of getting one yourself. So which one should you get and how much is it going to cost? And the answer to the question is a very unsatisfying “It depends”. (I am going to ignore SLA printers because I don’t own one and haven’t done any research into what the current models are like)
It depends on what your goals are. If you’re just interested enough to want to fiddle around with 3D printing without sinking a lot of money into it you can get a fairly decent 3D printer like a Creality Ender 3 for about $200. It has decent reviews, but it is not enclosed and comes disassembled and takes a few hours to put it all together. For $100 more you can get a Flashforge Adventurer 3C which is fully enclosed, requires no assembly, works with just about any type of filament and is, arguably, all around a much better printer. (There were teething problems early on with the software but those issues seem to have been solved.)
(Side Note: One printer I would avoid is Dremel. I think they are over priced and the company’s warranty information indicates that using non-Dremel filament voids the warranty on the print head/extruder nozzle. Out of the box Dremel printers will only work with the company’s branded filament because it uses odd sized spools, and standard spools of filament won’t fit in the machine. And their filament is almost twice as expensive as the other brands on the market. Oh, and they’ve started to add RFID tags to their spools, supposedly for your convenience, to let the printer automatically select the proper temperature ranges and other settings. But considering the way things have gone in the paper printing business, i wouldn’t be surprised if the company goes the same direction as HP, Brother and others and modifies the software so the printer will work only with Dremel’s branded filament.)
If you’re more serious, want a printer with more bells and whistles, a larger build volume, higher accuracy, etc. you’re getting into the $800+ price range. Not exactly terrible but not exactly something you’d want to buy on impulse or to just print out toys and trinkets either.
I’m not going to tell you what to buy because everyone’s needs are different. You need to decide what your goals are for the printer, what your budget is, and do some research.
But this brings us to…
Why You Probably Don’t Need One
Now 3D printers, despite all their problems, are undeniably great fun to play with. But do you actually need one? No. Unless you are in a business that designs products, needs to fine tune prototype designs before going into production or has other needs for one where the ROI (return on investment) makes sense, no, you don’t. In their current state of development consumer grade 3D printers, whether FDM or SLA, are little more than toys. They’re great fun to fiddle around with but from a practical standpoint they’re useless for the average consumer.
Yes, there are literally thousands of .STL files of objects that you could print. But 99.999% of those objects are going to be things like anime figurines, cute little tchotchkes, visual puns and jokes, parts for obscure and/or obsolete machines you don’t own and don’t care about and mundane objects like little boxes and containers that you could pick up at the dollar store for far less than what it would cost to 3D print them.
Sometimes someone will come up with a practical application. My eldest son builds replacement power supplies for obsolete “collector” computers like the PC Jr and uses his to make brackets and switch holders and other plastic parts that simply aren’t available any longer or which had to be redesigned to fit the new parts. I use mine to make specialty parts for experimental antennas and the occasional special purpose enclosure. But I have to admit that mostly I use mine to make, well, anime figurines, cute little tchotchkes and other silliness.