

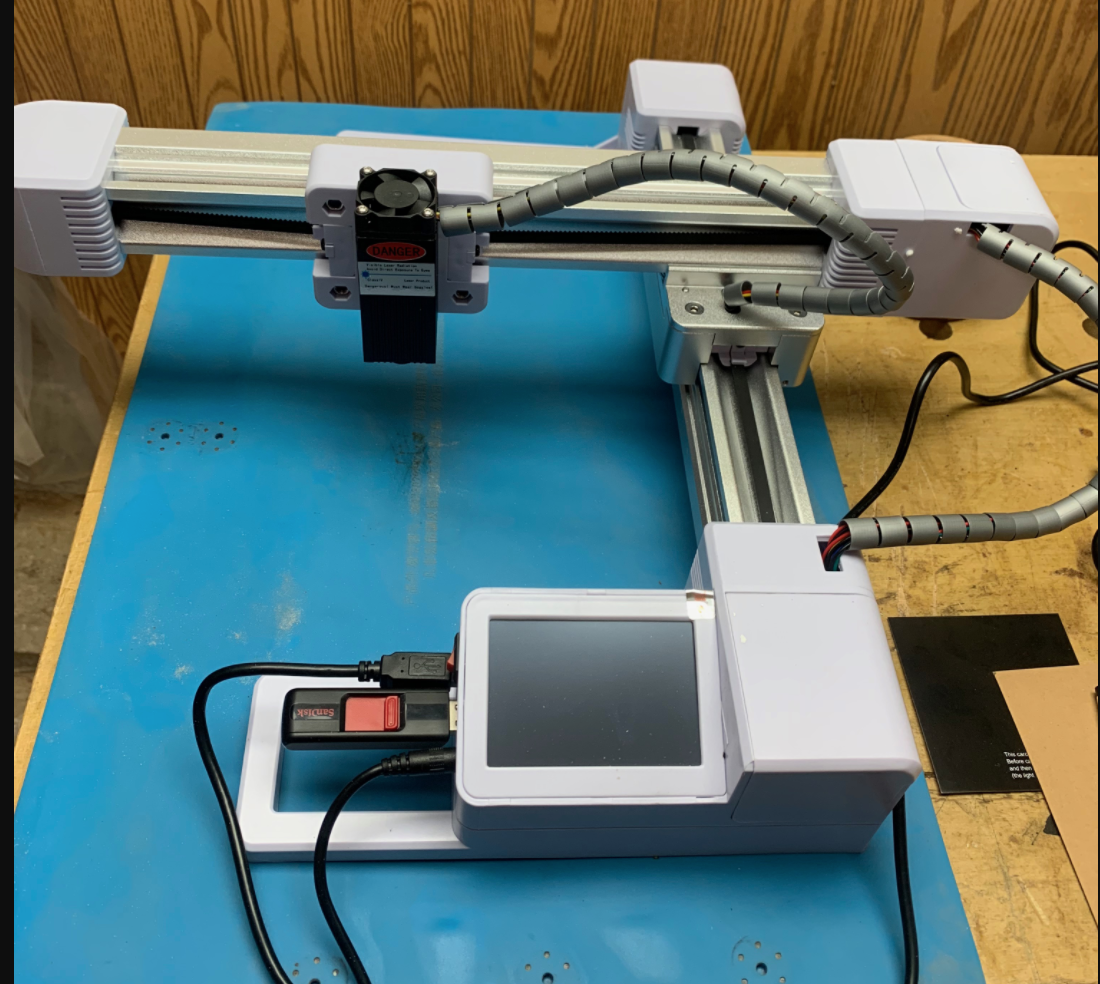
So it was time to replace my old laser engraver. That’s it over there on the right. And what’s replacing it is the one in the lead photo, the Laserpecker. The one over on the right is a more or less generic style engraver made in China that hit the consumer market a few years ago, often at ridiculously cheap prices. They were complicated machines, usually based on cheap CNC machines with the cutter replaced with a laser. There were rails and stepper motors and drive belts and complicated mechanical systems in addition to the controls needed to run the laser itself. As you can tell from looking at the two photos, the Laserpecker is much, much different. It doesn’t ride on rails, there are no stepper motors or belts. In fact it doesn’t move at all. It is entirely motionless during the entire engraving process. The only thing that moves is the laser. Here’s a quick video review I found on Youtube that will show you exactly how it works.
Now everything he says in that video is true, but needs to be taken with a grain of salt. He’s going through this so fast that he has no time to tell you about some of the issues you have to deal with if you get one of these. And there is some misleading information floating around out there about the LP that needs to be cleared up as well
Let’s look at the hardware first, and start with different models and prices. What the reviewer up there is showing is the standard Laserpecker which is selling for around $250 or so right now. It includes the LP itself, the tripod, a ruler to measure distance, a small power supply, and a pair of safety glasses. There are apparently three other versions. The only difference between them is that they come with more accessories, the most expensive of which is the focusing stand like the one shown in my photo at the start of this review.
The first ‘step up’ so to speak includes that stand, and more than doubles the price from around $250 to about $530. Why so much for a stand? It isn’t just a stand. In addition to getting rid of the awkward tripod that stand has some nifty electronics in it. It connects to the LP and when combined with the laser it eliminates the need to carefully measure the distance between the LP and the object being engraved. Just touch a button and it raises or lowers itself to the proper height to focus the laser.

The next option up adds a set of glass shields, edged in magnets, that clip together to form a folding safety screen to protect your eyes from the laser. Those are the panels over there on the left. You can also get just the safety shield from LP. Should you? Yeah, probably you should. Lasers and eyes don’t get along very well. You need some kind of eye protection when using any laser device. The panels are convenient, easy to set up, fold up flat for storage, and can be configured to work around just about any shaped object. And you can leave one corner open for a fume extractor, something you also absolutely need. I’ll talk about that a bit later.
The next level up only adds a storage case to hold all of the various parts which, of course, you don’t need at all.

I got what was labeled the “pro deluxe” model in the ad when I bought it, which includes the same laser head as shown in that video up there, the automatic focusing stand and the shields. Also included were the power supply, which is a tiny power pack with a USB connector in it and a cable with a USB C connector on the other end to go to the stand. The stand then connects to the LP itself with a short cord. There was also a set of safety glasses, simple instructions and some bits a paper that apparently you’re supposed to engrave for some reason.
Let’s talk about specifications. The LP uses a 405nm, 5 watt, blue violet laser with a specified lifetime of 10,000 hours. So the laser is fairly typical of laser engravers in this category. You aren’t going to be using this to burn through metal or anything else for that matter except paper and thin cardboard. It isn’t made for that. It’s an engraver. Period.
The included power supply is tiny, hardly the size of a small phone charger. It puts out 5 volts and is rated for 2 amps which, well, it isn’t a lot, really. I was rather surprised to find a laser engraver that ran at that low of an amperage. In some of the ads I’ve seen them running this thing from one of those little “power bank” battery packages that lets you recharge a cell phone.

The LP can do an engraving of up to 100 x 100 mm in size, or about 4 x 4 inches. Now that is smaller than the area that can be covered by some other engravers, but the size really isn’t an issue here. The LP is aimed at hobbyists, crafters and woodworkers who are probably working on small projects. Basically people like me who need to do the occasional company logo or piece of artwork to embellish a project. That 4×4 size isn’t going to be a problem for people like us. Most of the engravings I do are half that size or less. And you’ll want to keep engraving size small because larger ones take a long, long time. Almost all of the videos I’ve seen promoting the LP (and to be fair other laser engravers as well) drastically speed up the video and make it look like an engraving that really took an hour or more only took a few seconds.

The LP itself is a very simple looking little round box. That’s it in the photo over there on the right. That’s the entire thing, except for the stand. There are no moving parts, no rails, no motors, no drive belts. That’s it. Unlike my old engraver, the LP has no moving parts at all. The only thing that moves is the laser beam itself. It either attaches to the tripod with a screw or it sits in a cutout on the top of the stand if you opt for that. It’s about as simple as it gets, really.
Lasers are, of course, light, and in order to get the sharpest beam possible they need to be focused just like you need to focus the lens of your camera to get the sharpest image. With my old engraver this was done by adjusting a lens. But there is no lens with the LP, it is fixed focus. The LP has to be around 8″ away from the object being engraved or the laser won’t be properly focused. They include a ruler to make it easier to measure. If you’re working with the tripod you need to adjust the feet and use the ruler to get the measurement right. It can be a bit fiddly but working with just the tripod isn’t really a problem.
If the LP seems like something you are interested in, I strongly recommend you get the bare bones version that comes with just the laser head, tripod, power supply and safety glasses. You absolutely do not need the autofocusing stand. Now that I have the thing I wish I hadn’t bought the stand. Yes, it makes it a bit easier to set the height properly and it is pretty slick. But I’ve had some problems with the auto focusing stand that I’ll come to in just a bit. And in any case, it adds $200 to the price of the Laserpecker. I really don’t think it’s worth the money. Fiddling with the tripod is a minor nuisance, but once you do it a few times and have some practice with setting it up and getting the distance right it’s not that hard to do.
The other optional accessory that comes with the Laserpecker Pro Deluxe version that I got is the safety shield. That’s it below.
This shield is really slick. It’s made up of 4 glass panels made of a material designed to protect your eyes from the laser. Those metal strips along the edges are magnets. The whole thing just clips together. You can move the panels around, adjust the shape, leave one corner open for venting, etc. It is very, very handy and I like it a lot. Those 4 panels are available separately and sell for $90 at the moment. Now that may sound like a lot of money but actually it isn’t that bad. Protective glass panels for lasers are expensive if you want to build your own. At least the good ones are. When compared to high quality protective shielding panels available elsewhere, these are actually pretty inexpensive. You could get along without these, but remember that the LP is designed to be easily carried around and used anywhere. Quite possibly with other people present. Do you have protective glasses for everyone in the room when you’re using the thing? If not you need some kind of shielding, and these do the job. IMO the $90 price is worth it.
Now let’s look at the auto focusing stand. At first I liked it a lot, but as I’ve used it more I’ve come to think that going for the “Pro” package that included it was a waste of $200.

That’s it up there, and it is very, very nice. (Or so I thought at first.) Well it had better be nice considering it costs almost as much as the Laserpecker itself. It is undeniably very well made. But the more I worked with it the less I liked it and now I think it isn’t worth the money.

As I said it is very well made. Fit and finish is absolutely flawless. Obviously a lot of very high end engineering went into designing and building this thing.
Instead of plugging the power pack into the Laserpecker, the power pack is plugged into a connector on the stand, and a short cable then goes from the stand to the LP itself. Up on the top are 3 buttons. The two left buttons move it up and down. The right button starts the autofocusing sequence. It activates the LP’s laser to put a spot on an object below and then moves up or down automatically until it is properly focused. And it works pretty well.
No, let me correct that. It works pretty well when it wants to. Here’s the biggest problem I’ve run into with this thing. Sometimes it just – just stops when I engage the autofocus mode. It will begin the process, start to move the stand up or down, and then everything, the stand, the laser, all of it, shuts down completely and won’t restart unless I unplug it, wait about 10 seconds and then plug it in again. Here’s a video showing it doing just that.
It starts doing the focus routine, begins to lower into position, and then just shuts down completely. All the lights turn off, fan turns off, it and the Laserpecker itself shuts down. All of it is completely dead until I unplug it and plug it back in again. I have no idea why. It doesn’t do it all the time. Shortly before this happened in the video I used autofocus on a variety of different sized objects and it worked every time. Then I unplugged the unit, moved it to the other workbench, started making the video and bam, it died again. I suspected the problem might be that the power supply is too wimpy to handle the load of running both the laser and the motors of the focusing mechanism at the same time. One of the advantages of being a packrat like me is that I have all kinds of stuff laying around so I found a 5V 3A power supply and tried that. And it did exactly the same thing. A bit later I tried it again and guess what? Autofocus worked just fine. Then the next day it went through the shutdown thing again. Sigh…
The other problem is that fan up there next to the buttons. It shouldn’t be there at all. It serves no useful purpose except to blow the smoke generated by the laser all over your house. Smoke and fumes are a serious issue with these things. They can produce a lot of it depending on the material being engraved. Lasers work, after all, by burning. Smoke of any kind is not healthy to breathe. And when burning and melting various plastics and other materials some of the fumes given off can be downright toxic. Plus there is the significant risk of setting off the smoke detectors in your house, apartment or workshop. You absolutely, positively must have some kind of smoke/fume extraction system when you’re working with these things. That’s mine below. It’s home made and may look a bit crude but it works quite well.

There is a 4 inch flexible dryer vent pipe going to a piece of scrap plywood cut to fit the window opening just above my workbench. The pipe is caulked to that hole. At the other end is a ducted fan I picked up off Amazon for $27. I’ve been using it for some time and it works very well for things like smoke from lasers, fumes from soldering, etc. But that stupid and utterly useless fan on the top of the LP’s stand makes things more difficult. My extractor is trying to draw smoke across horizontally while that fan up top is trying to blow it up towards the ceiling so unless I get my pipe right up close to the object being engraved it doesn’t work very well. If I keep using the stand I’m going to cut the power going to that fan and possibly build some kind of container for it to make extracting the smoke easier.

So why is that fan there at all? Cooling? Nope. The laser doesn’t need cooling. The bare bones LP works just fine without any fan at all. And the fan’s in the wrong place to cool anything in any case. From what I’ve been able to discover, once upon a time LP was going to offer some kind of filter that would sit on top of the stand and the fan was going to pull smoke from the laser up through there. Only there doesn’t seem to actually be any such filtration system for sale on the LP website. At least not one that works with that dopey fan. There is a sort of an attempt at some kind of filtration system, but that’s an entirely different system that is a complete enclosure that won’t work with the stand at all. And while there’s a fan in that little box over there, there don’t seem to be any actual filters in it. It seems to just suck the smoke up and blow it out a vent in the side.
Let’s get to the important part, though. Is it any good as a laser engraver?

The answer is that it is quite good. It does exactly what it’s supposed to do, engrave stuff, and it does it well. That’s the disc the machine was engraving in the video and it turned out pretty well. It takes about 4 minutes to do one of those with is actual a bit faster than my old engraver was. And the resolution is better.
I’ve done quite a few engravings with it, mostly on wood, and all of them have turned out very well once I got the settings dialed in properly. Most of these lasers have setting to adjust the power the laser uses expressed as a percentage, from 100% being full power, to lower power settings. Also a ‘depth’ setting which actually is how long (I think) the laser remains in one spot before moving on. The ‘deeper’ the setting the slower the laser goes. Sometimes it takes some fiddling with the settings before you get the settings right for the material you’re working with.

People are always asking if you can engrave curved surfaces and the answer to that is sort of? It depends on how severe the curve is because a laser has to be properly focused in order to work well. But as you can see from the logo engraved on the bowl over on the left it handles curved surfaces reasonably well.
It does fine detail well also. I haven’t experimented to see just how small I can shrink down an image before it loses definition, but I suspect the LP will handle that pretty well also.
So that covers the hardware. Now we come to the software that drives the whole system.
The Laserpecker runs on proprietary software available only for Android and iOS devices. In other words it runs only on cell phones and tablets. There is no software for the Laserpecker 1 for PCs of any flavor. There is software for PCs to control the Laserpecker 2 but that is an entirely different machine that doesn’t seem to be available yet. It is not compatible with any other software.

The program can be rather clumsy and awkward to use at times and I don’t like the user interface at all, but that’s personal preference. The software does work well to control the LP but there is certainly room for improvement.
You download it from whichever app store you use (Apple or Google) and then you have to go through a registration process in order to get an unlock code that will let you actually use the LP. This took longer than it should have. I spent half an hour fiddling around with this thing. It took at least six or seven attempts before it finally sent me the the unlock code via email. Why does it need to be “unlocked” in the first place? I bought the thing, the software will only work with the Laserpecker hardware, what the hell do you need to unlock it for?
You then need to enter a pin number (they call it a password) which the software will ask you for repeatedly. Now I can understand needing a pin number because you wouldn’t want your eight year old to start messing around with this so it does need some security.
Then you can get ready to start lasering stuff. First you need to turn the LP on and connect the software to it via Bluetooth. That was painless and fast.
The Examples takes you to a library of a few dozen cutesy little black and white drawings you can engrave.

The Creation option takes you to a very simplistic editor that lets you enter text to engrave or do some doodling on the screen with your fingertip. Photoshop it ain’t. The text option is useful, but the drawing app is, IMO, completely useless for producing anything useful. Even a professional artist would have trouble using that thing to make something that didn’t look like a child’s bad doodle.
And if you look at that screen shot over there you’ll see the software has given it a name, filename8.bmp. This implies that the software is going to be saving that drawing somewhere and you’ll be able to use it again. Don’t worry about someone ever seeing your alleged attempt at artwork and causing your family to disown you in shame or anything like that. It doesn’t. Save it, I mean. As far as I can tell that file goes absolutely nowhere. At least nowhere I could find. It doesn’t save it on my phone, doesn’t save it to my iCould, doesn’t save it to my photo library. It just vanishes after the engraving is done.
That brings me to the two biggest problems with the software.
The ads for the LP imply that you can import .jpg, .bmp, .png and other graphics files into the software. It also implies that you can even import gcode files. Only you can’t. The only thing the software has access to for import options is the photo library on your phone or tablet. You can import an existing photo from your phone’s photo library, and that is it. Nothing else. If you want to use an image you found somewhere, use artwork you’ve created yourself, etc. the only way you can import it into the software is to take a picture of it with your phone and then import that photo from your photo library and use the programs bare bones editor to crop it and adjust some visual parameters before you engrave it.
And once you’ve done the engraving, all the work you did importing that photo, cropping it, etc. just vanishes into thin air because the software has no provision for saving any of it. So when I do something like create a logo for a business or just some artwork I’ve done in Photoshop, the only way I can get it into the LP software is to take a photo of my computer screen and import that from my photo library, fiddle around cropping it and adjusting the few parameters the software lets me change, and then do the engraving. And then the next time I want to do that same engraving, I have to start all over again. Grrrrr….
The rest of the software is pretty basic but it gets the job done. Once you’re ready to engrave something you go to a screen that lets you select power level, depth of burn, the number of repeats necessary, the usual stuff associated with using a laser engraver. And then send it to the Laserpecker to actually do the engraving.
There is an option to select various materials that are being engraved which then sets the power levels, etc. automatically based on the material. Those presets generally aren’t very useful. The single best way to set the various parameters is to take a piece of scrap material and try that first and adjust the parameters manually to get the best look.
So let’s sum this all up.
The Laserpecker itself, that little round box, is a great piece of equipment that works quite well. The relatively small size of the engraving it can do, 100mm x 100mm isn’t going to be much of an issue for most of us. It just does a good job all the way around.
The software isn’t the best and has some serious drawbacks, but it does work and you can work around the drawbacks.
Considering the bare bones version of the Laserpecker sells for $250 or so, the price is pretty darned good for this thing.
The accessories that come with the “Pro” version, well, that’s a different story. The autofocusing stand is neat, but it costs darn near as much as the Laserpecker itself and I don’t think it’s worth the money. And as I noted earlier I had problems with it just shutting down and making me reboot the whole thing when trying to use it.
The clip together shields are neat and genuinely useful, but you don’t need to go for the “pro” version to get them. You can buy them separately for $90 if you want to get them.
The device is completely portable. You can set it up anywhere. The laser head can be adjusted on the tripod so it can engrave vertical surfaces or things at an angle if you get it adjusted properly. It can even run off one of those power banks that are used to recharge phones as long as it can provide 5V at 2 amps.
It isn’t the fastest thing in the world but none of the laser engravers in this price range are. Doing that 2 inch disc with the shop’s logo on it takes about 4 minutes, which is pretty reasonable. But some of the test engravings I’ve done took half an hour or more. It depends on the size of the engraving and the settings of the laser. It’s at least as fast as my old engraver.
Smoke and fumes can be a serious issue, but that’s true for all laser engravers. Using this thing for extended periods of time without proper venting will set off smoke detectors and possibly give off dangerous fumes. But that’s true of all laser engravers.
Remember this thing is not a toy! It is a potentially dangerous device that can cause some serious problems if it is not used properly.

Now, the most important question of all. Can it engrave a banana?
Yes, it can.
If you’re in the market for an inexpensive laser engraver, definitely give the Laserpecker a look. But stick with the $250 bare bones version. You definitely do not need the over priced autofocusing stand. The glass shields at $90 are something you should consider as well.
Now you’ll see promotions for the Laserpecker 2 floating around out there, and it looks really, really nice. But it doesn’t actually seem to exist yet. At least not for the average consumer. If you want to buy one you’re looking at a delivery date of at least December of 2022, almost a year away. But that being said the LP2 looks really interesting. Interesting enough and possibly useful enough that in a year or so I might look into getting one of those. But for the time being I like my little LP1 and I’m quite satisfied with it.

Although it’s a different model, I was having the same issue regarding the Gcode files in the laserpecker 2. It so happens that I need to use the LaserPecker app, instead of the LP2. That one does contain a tab for Gcode inside the Examples.
How I went about it was, I use Inkscape with an extension that is specific for the LaserPecker called Gcode Generator V2.1. You need to select the model and firmware, designate the folder you want to save the files to, and it will convert it for you. You then rename the file extension to .txt, or the app won’t recognize it. Furthermore, you can check the file using this online tool: https://ncviewer.com/
Perhaps it will work for you as well.
LikeLike
thanks for the information. I’ll check it out.
LikeLike
I have absolutely no hesitations at all in considering you to be a master craftsman of the highest order and I am totally impressed with your projects and your knowledge about things. As for me, I barely graduated high school industrial arts class and the only thing I really care about farming is petting the animals. I did help a friend bale 500 acres of hay once or twice…more for the comradery than for the money…and I loved the feel and smell of the farm…and I did make a pet out of his big Tom Turkey….and I enjoyed all that …but somehow I never quite made the grade other than in an orbital or peripheral manner….there is nothing on earth worse in my opinion than trying to lift a bale of wet hay or shovel out the manure in a horse barn. If I were a lot younger my attitude would be a lot different of course.
LikeLike