

I’ve been dabbling with 3D printing for many years now and I’ve mentioned it in the past, but I haven’t talked about it here in ages. But I just got a new 3D printer and wanted to do a mini review of it after Christmas. While I was working on writing that up someone pointed out that while almost everyone has heard about 3D printing very few people who haven’t actually used one of these things know how they really work. He suggested I should first explain how it works and what the different types are so people know what I’m talking about when I start babbling about things like bed adhesion and feed rates and extruder temperatures in the review later. And since it’s late December, it’s cold and dark outside and I have some time on my hands, why not? So let’s go.
When 3D printing technology first appeared, visionaries told us it was going to revolutionize everything. They proclaimed a future where every home would have its own printer and instead of going out to a store and buying something you’d simply download a file from some central depository and print what you needed right there at home. But I remember what those visionaries said about the future when I was a kid. According to them by this time I should be able to jump into my personal flying car, go to the nearest spaceport, take a few days off on a vacation on the moon and come home to find that my personal robot, Jeeves, has remodeled the bathroom for me and has a gourmet lunch waiting when I get home. So whenever “visionaries” start spouting off, I tend to ignore them entirely.
That’s kind of what happened with 3D printing at the consumer level. To be fair 3D printing has indeed become extremely important. In industry, in research and development and even in medicine it has become an essential tool. But in the home? Not so much. At the consumer level, with printers people like you and I can afford, 3D printing is little more than a novelty, a toy, really. Can it do some useful things? Yes. But let’s face it, most home 3D printers are going to be used to print out trinkets, key fobs, the occasional Star Wars figurine and similar tat. If you can afford to drop $400 or more on a decent 3D printer just to play with it, good for you. There is nothing wrong with that. We spend a hell of a lot more than that on hobbies and toys. But you need to remember that for the average person a 3D printer is never going to be a practical investment.
How Does It Work
At the consumer level there are two basic types of 3D printers, fused deposition modeling and stereolithography. And because no one wants to have to keep typing ‘fused deposition modeling’ and ‘stereolithography’ all the time, they are usually referred to as FDM and SLA. Both types of 3D printing work by creating multiple layers of plastic in a specific pattern to build up a complete object, but that’s where the similarities end. Let’s look at FDM first.
FDM works by taking a solid plastic provided in the form of a filament that looks like thick wire and comes on spools. This filament is heated until it melts and then is forced through an extruder nozzle and deposited onto a build plate in a thin line usually less than .5mm thick. The extruder (and sometimes the build plate as well depending on the model) moves from left to right and back and forth and up and down, in a specific pattern determined by the software controlling the printer, that pattern being a three dimensional object created in a CAD program or 3D modeling software. Here’s a brief video of my new printer at work to give you an idea of what’s going on.
As you can see in the video with this particular printer the extruder, or print head, moves from left to right and up and down, while the build plate moves back and forth. With some models the build plate remains stationary and only the extruder moves. You can’t actually see the extruder moving up after it finishes depositing a layer because it’s only moving a fraction of a millimeter.

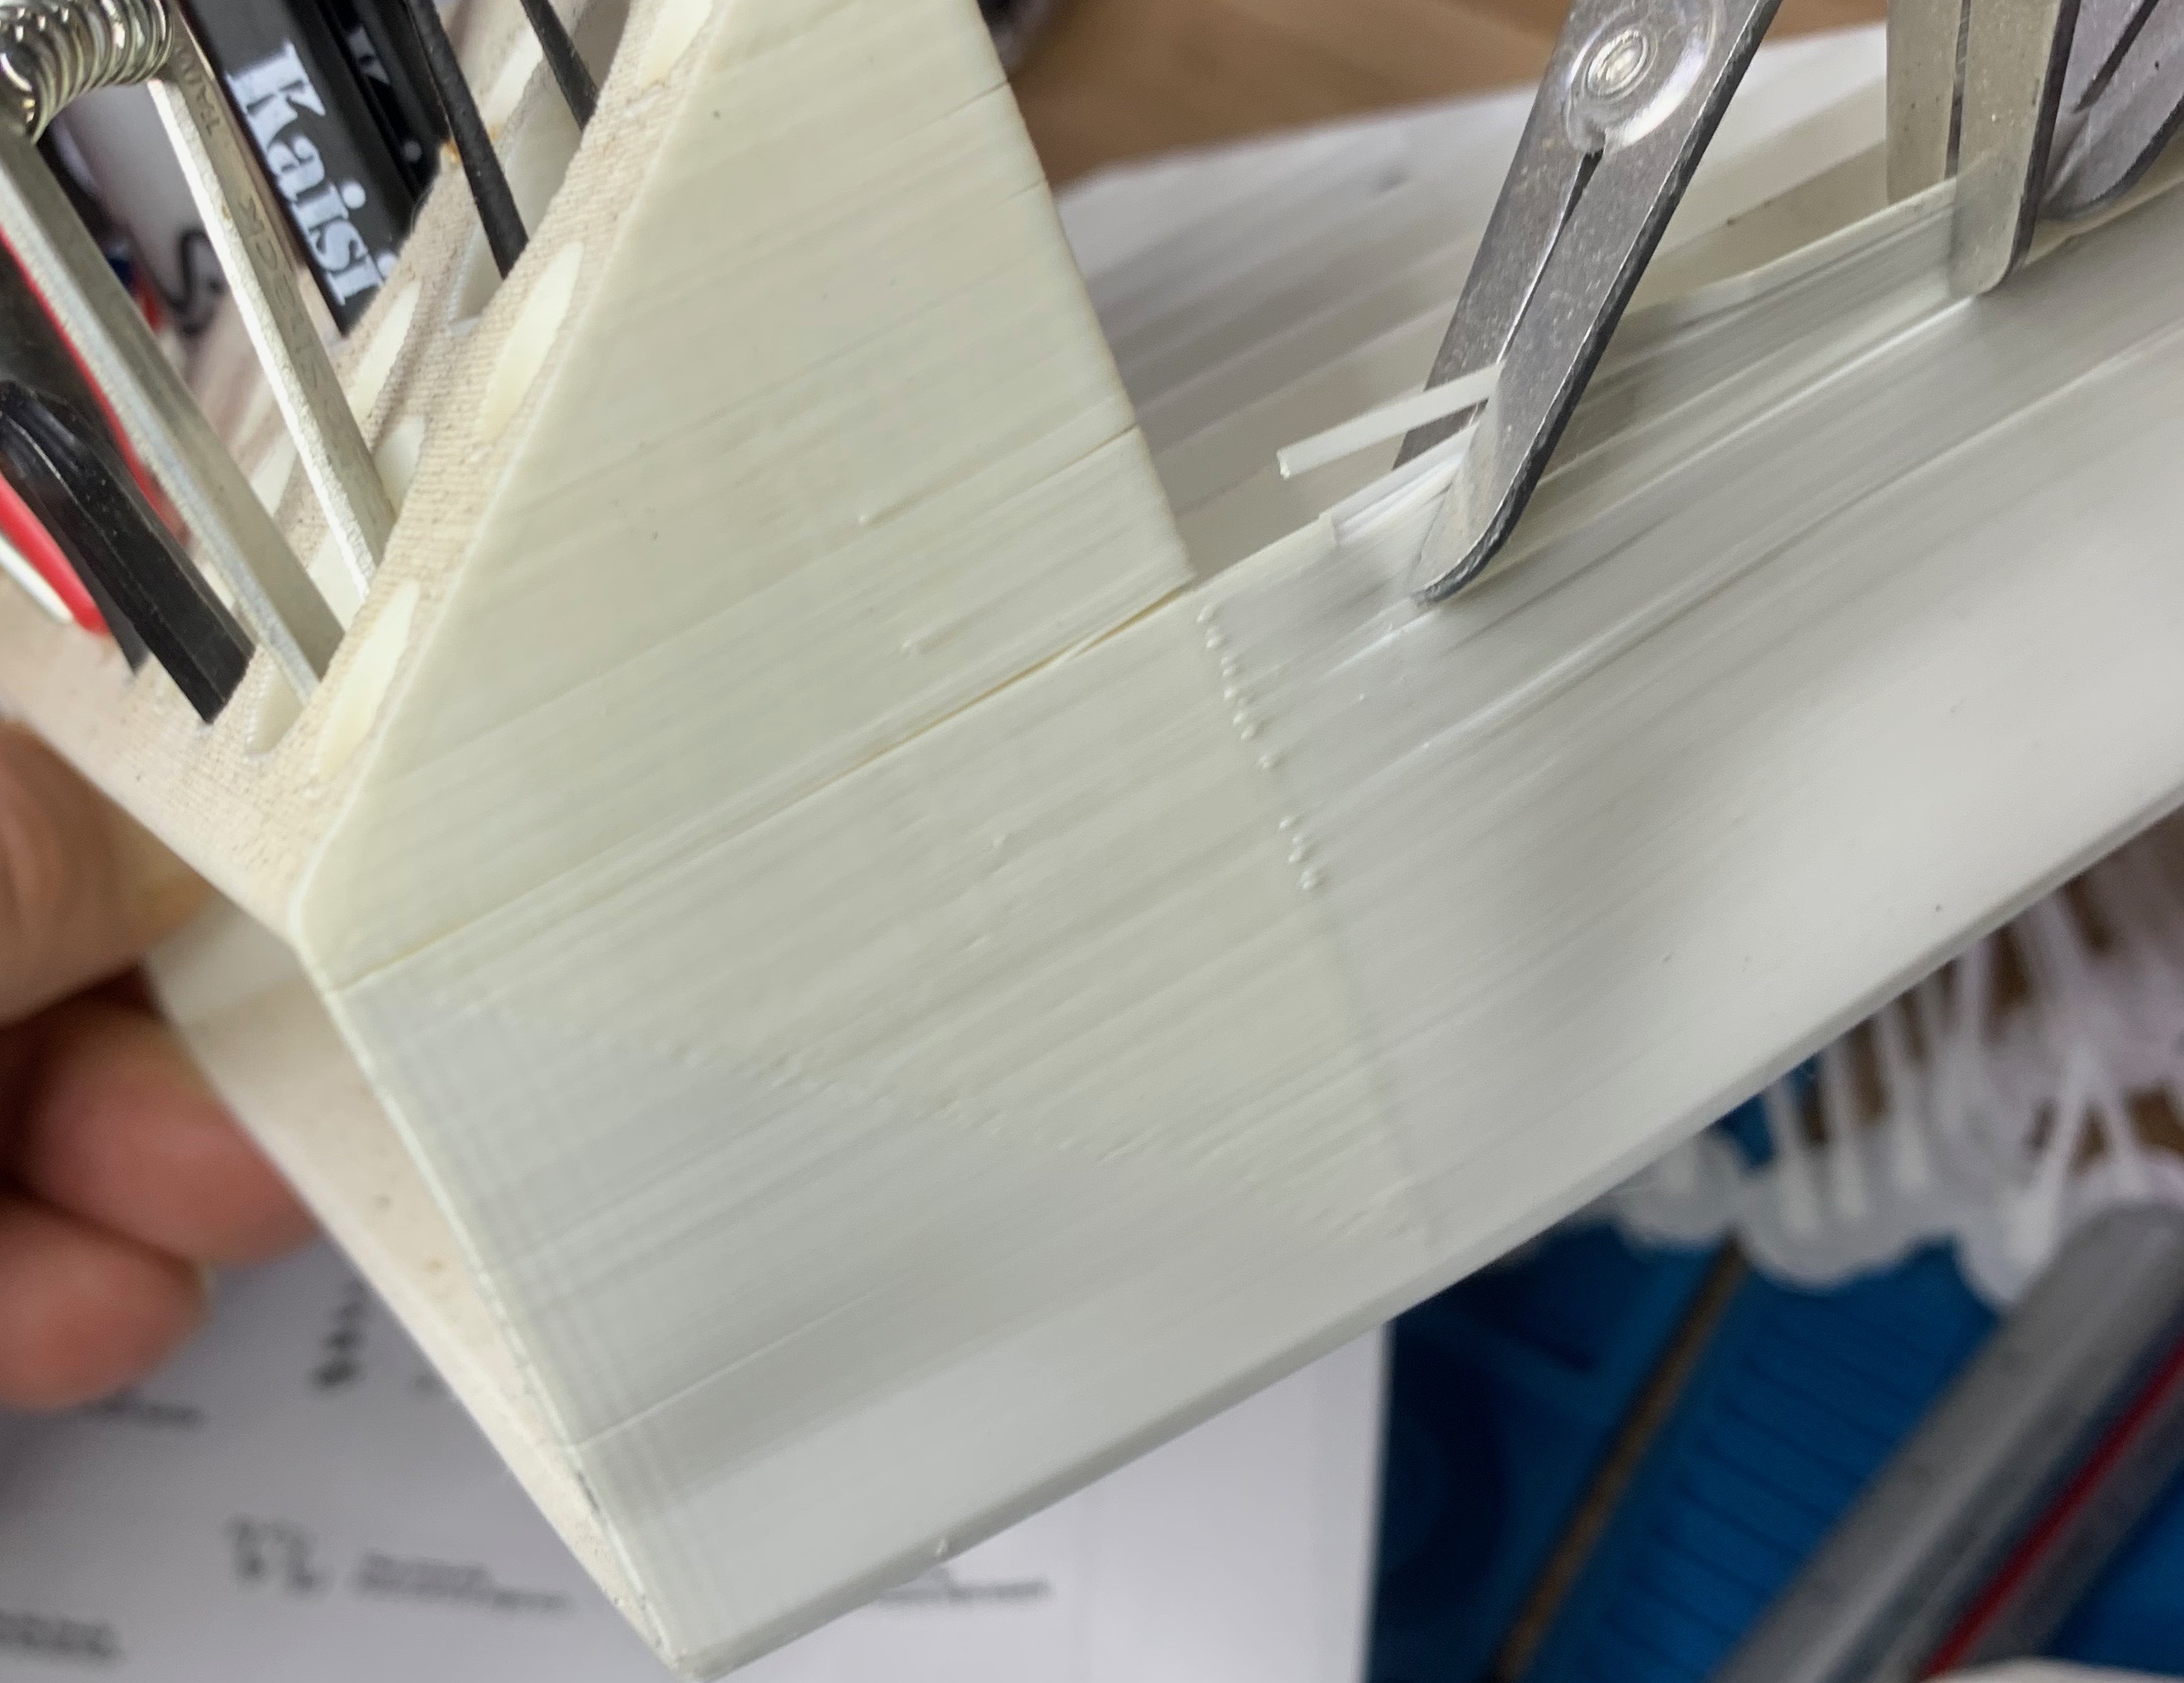
With early versions of FDM printers the end results were pretty crude and the size of the objects you could make was very small. But modern printers can reproduce extremely fine details and the size of the object being built has increased greatly. If you look at the photo on the right you’ll see one of the first test objects I tried on the new printer. I use this figurine to do testing because it is a challenge for a lot of FDM type printers. It has to reproduce some very small details like the strings of the hoodie and the shoe laces. It shows how well smooth details like the legs and sleeves are reproduced. It also shows how well the printer can deal with a variety of issues that can cause problems. The 0bject was scaled to push the printer’s size limitations as well. You can see from the ruler alongside that the print is over 8 inches tall. If there are any issues with the extruder positioning systems they tend to become more obvious on taller objects.

The filament comes on spools like the one over there on the right. It is available in just about every color imaginable, including clear, translucent and even glow in the dark plastics. The better printers can use a wide variety of different plastics as well that include ABS, PLA PC, PETG, PLA-CF, PETG-CF, nylon and others. There are even plastics that mimic the look of materials like wood and stone. The filament isn’t hugely expensive. The most commonly used types like ABS, PLA and PET sell for about $18 – $25. The stuff I am currently using sells for about $20 for a 1 kg spool, and you can print a lot of stuff with one spool.
Nothing is perfect, of course, and FDM technology has its share of problems. They keep getting better and better as manufacturing technology and software has become more sophisticated but they still have some issues, some of which can be difficult to deal with.
The Problems
FDM type printers are mechanically complicated for one thing. There are drive motors, drive belts, gears, screws, sensors, heaters, fans and other systems built into that printer, and all of it has to be manufactured to extremely tight tolerances.
(Note: The printer will, sooner or later, also break, which means it will have to be repaired. That means either you’re going to have to ship it off somewhere to get fixed which is a pain in the neck because of a lot of these printers are physically big and rather heavy, or you’re going to have to fix it yourself.)
Unless everything works perfectly and you have the temperatures set exactly right, the speeds exactly right, etc. you can end up with what you see over there on the right. That’s a tool holder that I printed a long time ago on a printer that is now, thankfully, long since gone. You’ll see a lot of the issues that plagued the early versions of FDM printers and still afflict some of the ones on the market. You can see delamination, where the deposited layers are pulling away from each other. You can see the layers often are irregular and uneven, indicating possible problems with feed rates and possibly temperature issues and problems with positioning the extruder. There is warping of the object. There is a whole list of things that went wrong here even though I had the printer set up properly and the temperatures set correctly. Fortunately modern FDM printers are much, much better than the one that created that mess up there. When everything is set up properly what you get should look like the photo below.

3D printing is fiddly. Everything has to be exactly right in order to get a good print. And as I said the technology has improved a great deal and most systems will have default values that will work just fine under most circumstances, but you need to be prepared to start fiddling around with things if everything doesn’t work as you expect.
3D printing is also slow. Very, very, very, very slow. That tool holder in that one photo up there takes about 20 hours to print. Seriously. If I remember right the figurine in red plastic took 17 hours. If you get involved in 3D printing you need to have patience. Lots and lots of patience.
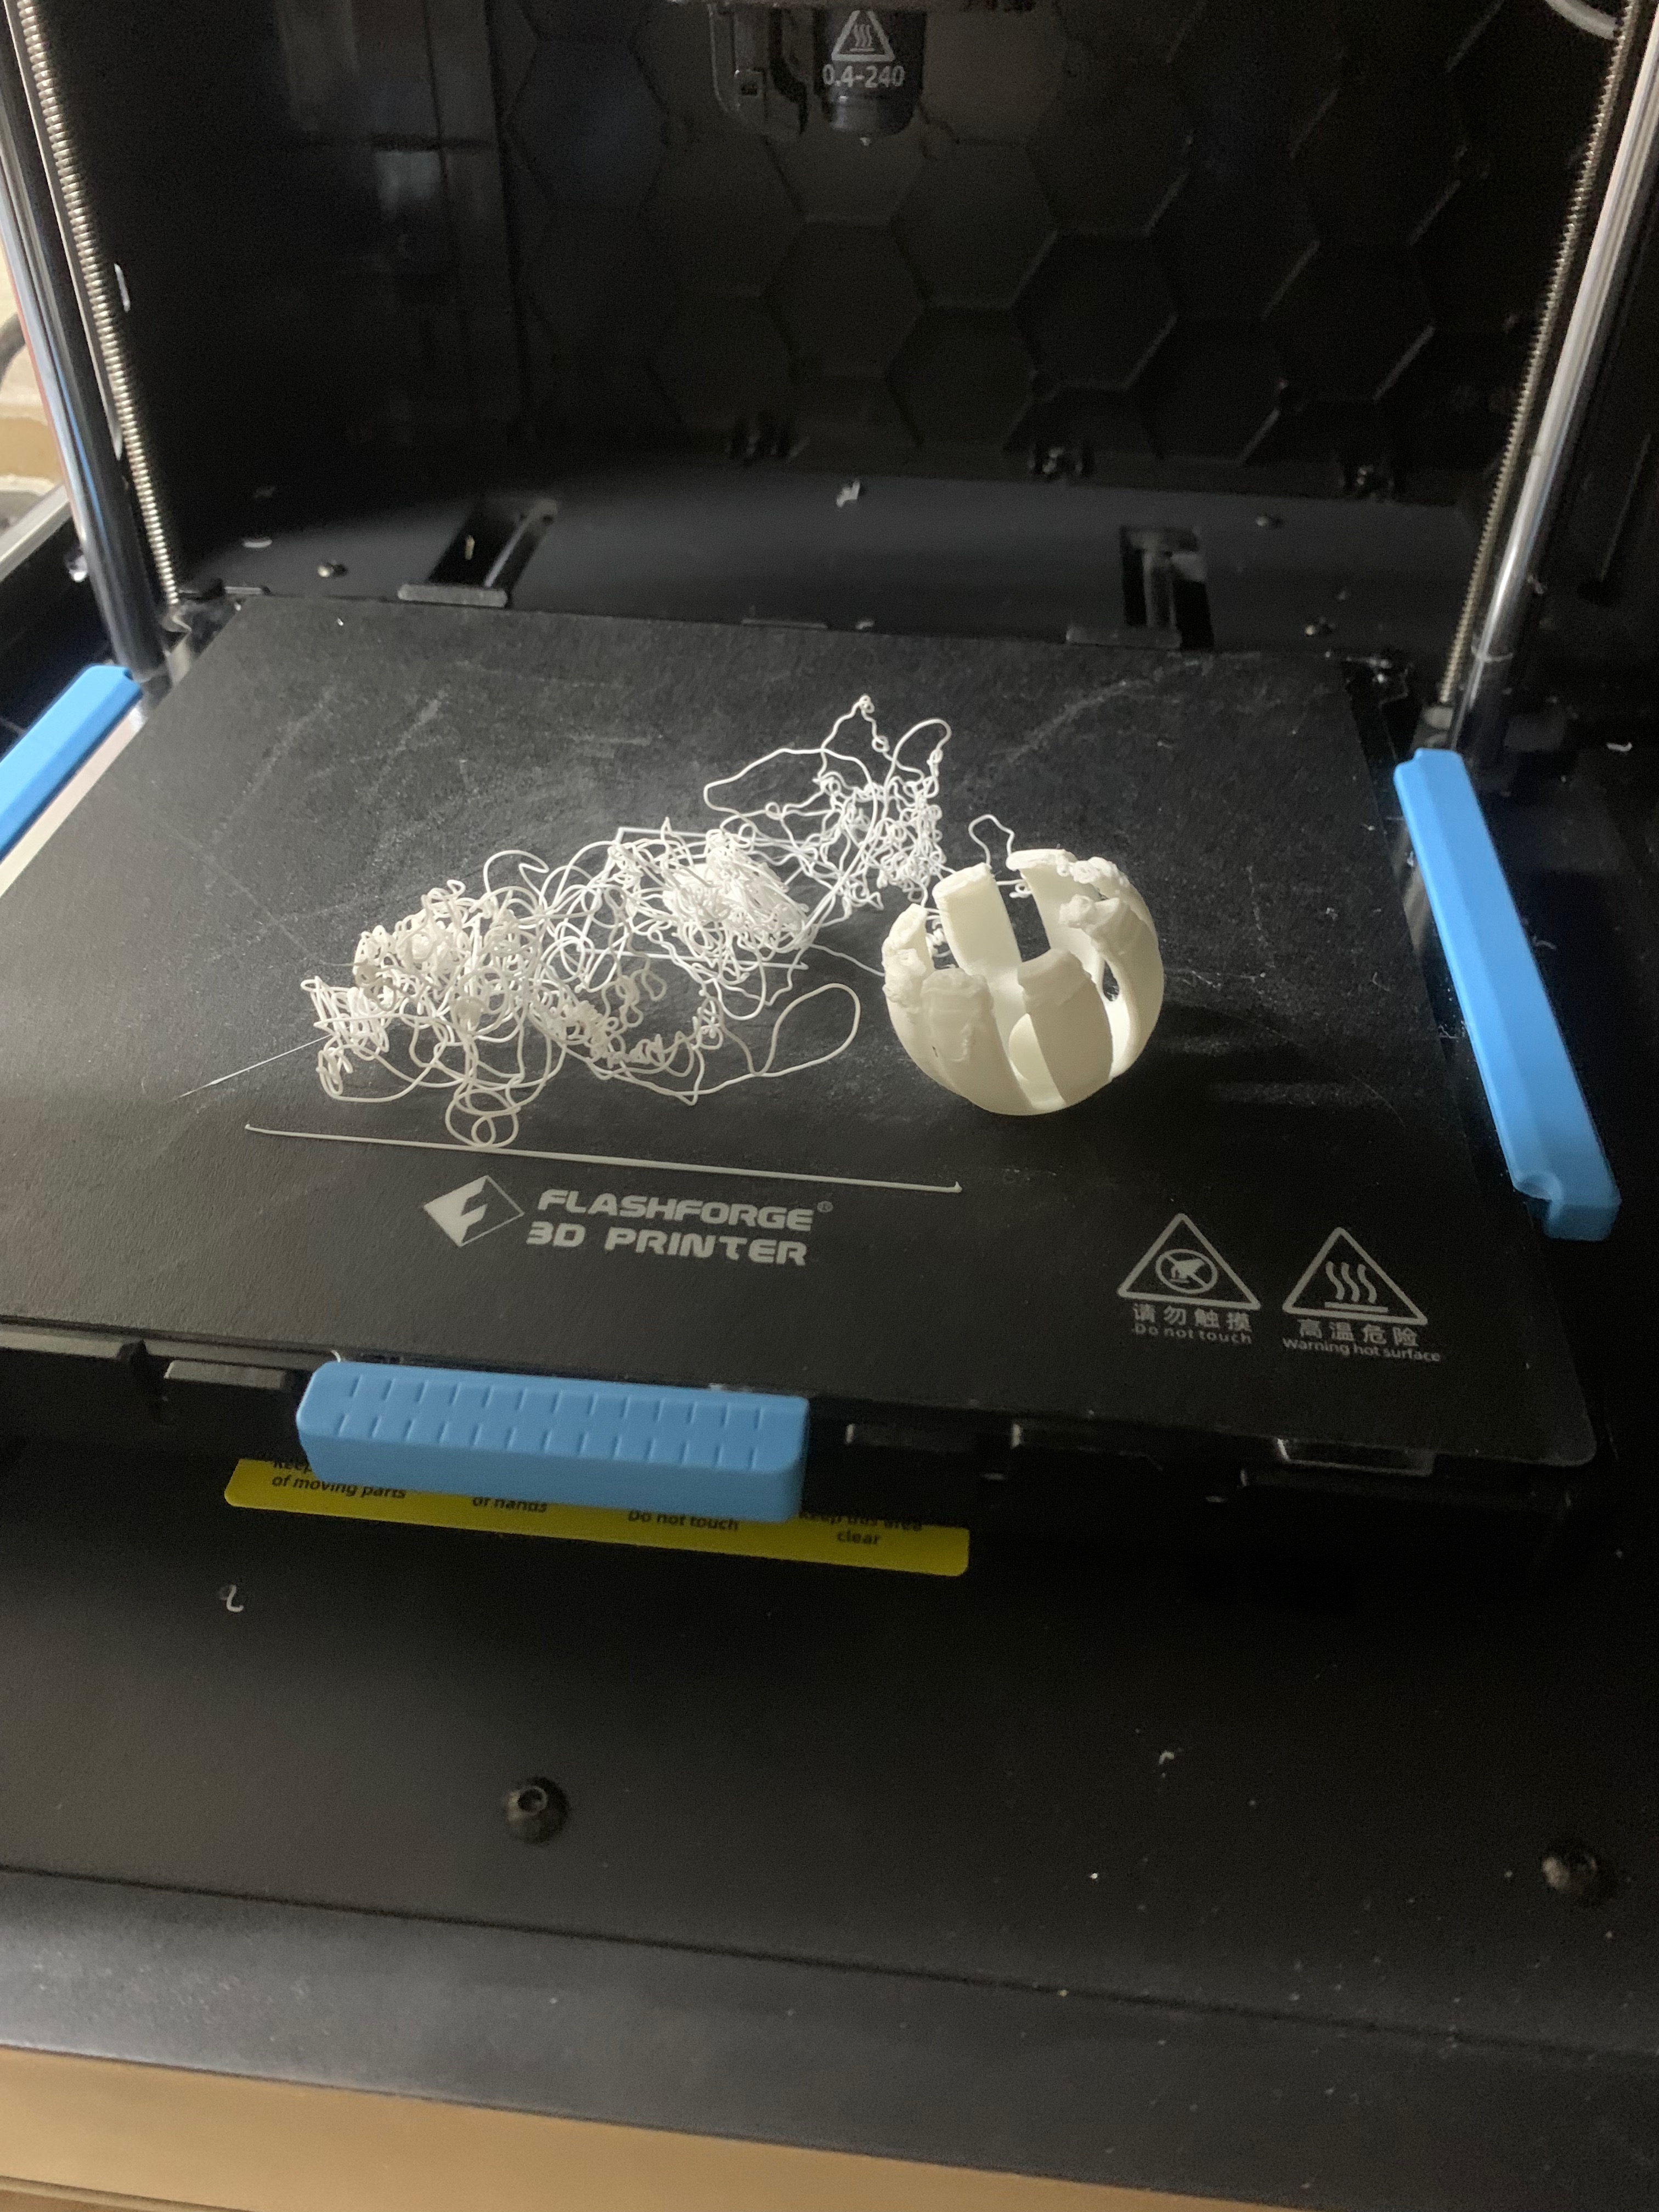
Another issue that crops up all the time with FDM printers is the build plate. This is the platform on which the plastic is deposited. It isn’t just a flat surface that the plastic is laid on. It has to hold the object tightly enough so that it remains anchored down so movement, vibrations, the extruder snagging on a bit of stray plastic and the like doesn’t shove the object out of position or tip it over as happened with that little ball over there on the right. The ball got knocked over and the printer went merrily on its way depositing filament into thin air because it has no way of knowing if there is actually an object in place or not.
So the bed has to be able to adhere to the plastic tightly enough so that the object being made doesn’t move. But at the same time it also has to be able to release that object from the bed when the print is done without you having to resort to using a hammer and chisel. Which, by the way, I’ve had to do once in a while.
Fortunately the technology has gotten better there as well and they’ve come up with materials that work much better. Some have removable, flexible build plates. You remove the entire bed from the printer, flex it and, in theory, the object pops right off.
The build plate or bed also has to be absolutely level and parallel to the extruder nozzle across the entire range the extruder travels over. This means having to go through a process called bed leveling, where the extruder is brought down until it is just barely touching the bed, then adjusting the bed height so a piece of paper or thickness gauge can just barely be slid between the extruder nozzle and the bed. The adjustment is often done with multiple thumbscrews located under the bed. Then this process is repeated at multiple points across the entire surface of the bed. And once you’ve done that, it’s a good idea to do it all over again because adjusting one of those leveling screws can mess up the adjustments on the others. And I assure you that it is a royal pain in the ass sometimes. I had one printer where I had to do that every single time I used it.
Fortunately the better printers on the market have come up with solutions to this problem. Some have automatic bed leveling systems to deal with it for you. Others have developed leveling systems that, while they aren’t fully automatic, make the process much, much easier.
Then we come to the plastics themselves. There can be problems there as well. Some of them are downright toxic. There’s no way to get around that. These days I work almost exclusively with PLA, polylactic acid, which is pretty benign. (I also use PET which is relatively safe as well.) PLA is made from plant starches from sources like corn and sugarcane. It is considered food safe. And it emits no toxic fumes when heated. It’s often used for food packaging. And it is biodegradable (sort of) so PLA waste material isn’t going to be laying around for hundreds of years. But PLA has some issues as well. It is relatively brittle, so it isn’t going to work for applications where an object needs to flex. It can warp and distort when exposed to high temperatures so objects made from it shouldn’t be exposed to heat sources and it is not UV resistant so it shouldn’t be used in direct sunlight.
PET is also relatively safe and is considered to be food safe. Some of the PET filaments on the market are made from recycled soda and water bottles. It is also much tougher and more flexible than PLA. But it also requires higher extruder temperatures so not all FDM printers can use it, and can be a bit more tricky to work with.
Other types of filament are not so benign and some are downright nasty, especially when heated. Some varieties give off fumes which can be irritating and even are potential carcinogens. That isn’t to say those types can’t be used, it’s just that you need to take basic precautions like proper ventilation if you do choose to use them.
And for those of you concerned about things like microplastics getting into the environment, yes, there is some risk of that happening with FDM printers as well. The printing process can result in very small particles of plastic getting into the atmosphere. However printer manufacturers are now realizing this and some of them are doing something about it. The one I just bought is completely enclosed and includes a HEPA and charcoal filtration system.
Let’s move on to stereolithography, printing systems. I don’t own an SLA printer but I do know how they work, so let’s take a look.
SLA printers use an entirely different technology than the FDM variety. It also builds up thin layers which will eventually become the desired object, but instead of depositing melted plastic it uses UV lasers (or at the consumer level UV LEDs) to “draw” each layer in a liquid resin that hardens when exposed to UV light. Here’s a 2 minute video off YouTube that shows how it works. This video is from a specific printer company, but what you see happening here is how most SLA printers work.
Note that I am not recommending printers from this company. Their printers are very, very nice and I’d love to have one but dear sweet lord they’re expensive! The last time I checked out their prices the cheapest one they had was in the $3,000 range and they ran up to well over $10K. These printers are aimed at the professional market, not at the hobbyist. Still, it’s a pretty neat little video and it gives a good illustration of how SLA printers work. Also understand that this is a company promotional video so they aren’t showing you all of the problems that can and do crop up, nor do they talk about safety.
In many ways SLA printers are superior to FDM printers. They generally have much better resolution, meaning they can make objects with much finer detail than FDM printers can. They are often faster than FDM printers as well.
SLA printers also have some fantastic resins to work with. The color choices are amazing, and the material types range from soft and flexible to rock hard. And the materials used can be far more durable than the plastic filaments used in FDM printers.
But there are problems here as well otherwise everyone would be using SLA printers and the FDM types would have gone obsolete long ago.
If you follow this blog you know that I work with liquid resins quite a bit, and I’ve mentioned before that some of these resins can be dangerous unless you take adequate safety precautions. The same is true of some of the resins used in SLA printing. Some of these products are nasty and probably shouldn’t be used in a home environment at all. There are some resins that claim they are safe to work with and don’t require any special handling or ventilation but even with those I’d still be cautious.
SLA printers are also just as fiddly to set up and get working properly as FDM printers are. In some cases they’re even harder to get set up and working properly than an FDM printer.
They’re messy. The build plate is moving up and down into a tank of liquid, and you can be sure the resin is going to splash around. Some printers are worse than others. It depends on how the tank system and build plate is designed. Even with the better ones though you can plan on spending a considerable amount of time cleaning the interior of these things after every print.
Once you have a finished SLA print, you aren’t done yet. The print has to be washed to remove the uncured resin clinging to it. Some resins are water soluble and can be washed in plain water. But other resins need to be washed in chemical solvents, often isopropyl alcohol, which has its own issues. Alcohol fumes are not good to inhale, the stuff is highly flammable, etc. And while it’s not all that expensive, it adds even more expense to the whole process. (You’re also going to need chemical proof gloves because uncured resin is something you most definitely do not want to get on your bare skin.)
And after washing you still aren’t done. Now you need to fully cure it using a special UV lighting system to fully harden the plastic. Working with UV light has its own set of safety issues. High intensity UV lights can cause eye damage.
Of course manufacturers will gladly sell you UV lighting systems to cure your print, and even washing systems. All of which adds even more expense. If you need a UV curing box, which you do, that will add about $100 or more to the cost unless you make your own. If you want to get a washer to make the messy job of washing your prints a bit easier, look to spend another $100 or so. So that $300 SLA printer that you picked up off Amazon now has cost you $500 or more.
Another problem is the build plate. As with FDM printers you can have a problem getting things to stick to the bed. Same is true of SLA printers, and this is made worse by the fact that these printers print upside down. The object hangs from the build plate. Thanks to gravity and suction from lifting the plate up out of the resin tank hundreds of times during the process, the object being printed can fall off the build plate into the resin tank below. especially as the object gets bigger and heavier.
And there can be other problems you won’t find with FDM printers. I’ve heard some people claim that some types of resin give off fumes that can cause the plastics used in making the printers degrade over time. One fellow told me that fumes from resins he was using caused the protective cover to craze and become opaque. Another told me that he has to use alcohol to clean up the interior of the printer after a build, and found that the plastics used in the construction of the printer softened and even started to dissolve when exposed to the alcohol he had to use to clean it.
The UV light source in the printer has a limited lifespan, whether it is LED or laser. Eventually the light source is going to have to be replaced. Replacing those can be difficult, and the parts are not cheap.
Personally I would like to experiment with an SLA printer but at the moment I think the drawbacks outweigh the benefits, at least for me.
Software
The hardware is just one part of the system. Just as important to the whole process is the software. You’re going to need what is generically called a slicer program. This is a piece of software that takes a 3 dimensional CAD file and converts it into the instructions the printer needs to actually build the object. There are several out there. Some will only work with a specific printer. Some are open source, free, and can be adapted to work with a variety of different printers. Some are commercial products you have to pay for. Most likely when you buy a 3D printer it will come with a slicer program of some sort that has, hopefully been tested and tweaked to work with the specific printer it came with.
Best advice I can give you is to use whatever slicer that came with your printer at first or which is recommended by the printer manufacturer. Once you have some experience and begin to understand how the software works, how things like temperatures, feed rates, etc. can be adjusted, then you can start to look at other options if the program you have doesn’t meet your needs.
Now we come to the question of what you’re actually going to print with the thing once you get one. You’re either going to have to design objects to print yourself using CAD software or find objects designed by other people who have provided the necessary files to plug into your slicing software to print yourself. And since most of us aren’t whizzes at CAD, that means finding already created objects that you might find useful and/or entertaining.
There are numerous sources for hundreds, even thousands of objects that people have designed to be 3D printed that they’ve made available for free on the internet. One source is Thingiverse where you can find hundreds and hundreds of objects you can download and print yourself, for free. If you need a specific item like, oh, let’s say a bracket for an out of production vacuum cleaner, you’re probably on your own and you’re going to have to design it yourself with a CAD program of some type.
What Does It Cost. Really
If you’ve read this far you’re obviously interested in 3D printing, perhaps enough to be thinking of getting one yourself. So which one should you get and how much is it going to cost? And the answer to the question is a very unsatisfying “It depends”. (I am going to ignore SLA printers because I don’t own one and haven’t done any research into what the current models are like)
It depends on what your goals are. If you’re just interested enough to want to fiddle around with 3D printing without sinking a lot of money into it you can get a fairly decent 3D printer like a Creality Ender 3 for about $200. It has decent reviews, but it is not enclosed and comes disassembled and takes a few hours to put it all together. For $100 more you can get a Flashforge Adventurer 3C which is fully enclosed, requires no assembly, works with just about any type of filament and is, arguably, all around a much better printer. (There were teething problems early on with the software but those issues seem to have been solved.)
(Side Note: One printer I would avoid is Dremel. I think they are over priced and the company’s warranty information indicates that using non-Dremel filament voids the warranty on the print head/extruder nozzle. Out of the box Dremel printers will only work with the company’s branded filament because it uses odd sized spools, and standard spools of filament won’t fit in the machine. And their filament is almost twice as expensive as the other brands on the market. Oh, and they’ve started to add RFID tags to their spools, supposedly for your convenience, to let the printer automatically select the proper temperature ranges and other settings. But considering the way things have gone in the paper printing business, i wouldn’t be surprised if the company goes the same direction as HP, Brother and others and modifies the software so the printer will work only with Dremel’s branded filament.)
If you’re more serious, want a printer with more bells and whistles, a larger build volume, higher accuracy, etc. you’re getting into the $800+ price range. Not exactly terrible but not exactly something you’d want to buy on impulse or to just print out toys and trinkets either.
I’m not going to tell you what to buy because everyone’s needs are different. You need to decide what your goals are for the printer, what your budget is, and do some research.
But this brings us to…
Why You Probably Don’t Need One
Now 3D printers, despite all their problems, are undeniably great fun to play with. But do you actually need one? No. Unless you are in a business that designs products, needs to fine tune prototype designs before going into production or has other needs for one where the ROI (return on investment) makes sense, no, you don’t. In their current state of development consumer grade 3D printers, whether FDM or SLA, are little more than toys. They’re great fun to fiddle around with but from a practical standpoint they’re useless for the average consumer.
Yes, there are literally thousands of .STL files of objects that you could print. But 99.999% of those objects are going to be things like anime figurines, cute little tchotchkes, visual puns and jokes, parts for obscure and/or obsolete machines you don’t own and don’t care about and mundane objects like little boxes and containers that you could pick up at the dollar store for far less than what it would cost to 3D print them.
Sometimes someone will come up with a practical application. My eldest son builds replacement power supplies for obsolete “collector” computers like the PC Jr and uses his to make brackets and switch holders and other plastic parts that simply aren’t available any longer or which had to be redesigned to fit the new parts. I use mine to make specialty parts for experimental antennas and the occasional special purpose enclosure. But I have to admit that mostly I use mine to make, well, anime figurines, cute little tchotchkes and other silliness.
