It’s been ages since I posted anything here except for the brief announcement about Cat moving in with us. But there is a good reason for that. Pretty much nothing has been going on here. At least nothing worth writing about. But now I do.
Solar, Taxes and ROI
So we just got our taxes back from the accountant so I wanted to talk about money and solar power. Especially about the 30% federal tax credit for the purchase of solar equipment. I’ve been wading through a lot of solar power related forums for some time now and there is a lot of misinformation floating around about this, so let’s see if I can straighten some of this out.
First of all, the best way to determine what is or is not a qualified purchase for the purposes of the tax credit is to go straight to the horse’s mouth, the IRS, and the agency’s information about Form 5695, which is how you apply for the tax credit. All of the information you need is right there if you click on that link up there. Stop paying attention to the self appointed “experts” on the internet and go directly to the IRS if you want information.
Note first of all that this is a federal tax credit. That means it is applicable only if you owe the federal government. It goes towards reducing the amount of tax you pay.
In our case here pretty much everything that we bought for the solar power system was allowable: batteries, solar panels, inverters, circuit breakers, wiring, switches, etc. could be applied to the tax credit. Once our accountant got done with all of it, our residential energy tax credit amounted to about $5,000. Needless to say, MrsGF and I were more than pleased with this.
So what does this mean when applied to our out of pocket costs? When everything we had receipts for (you did save your receipts and invoices, right?) was added up our total cost, including solar panels, was $16,000. The tax credit brought that down to $11,000.
So let’s now talk about ROI, or return on investment. How long will it take for our solar system to more or less pay for itself?
Since we put in the system about a year ago we saw a dramatic decrease in our electric utility bill, far more than I’d anticipated. I had estimated that if we were able to use the system as intended, it would cut our utility bill by about 1/3 when it was in operation. This should have been significantly more but at the moment we are restricted because we can’t get enough solar panels out there to really feed enough power into the system. We’re going to need to mount panels permanently on the garage roof. We can fit about 5KW – 6KW of panels up there. But the garage roof (and the house, for that matter) are scheduled to have the roofs replaced in another year. That’s how we have things budgeted, and we aren’t going to change the schedule at this point in time. It doesn’t make sense to put all those panels on the roof, only to have to take them all down again and then immediately have to reinstall them in a year or so when the roof is replaced. So for the time being we only have 2KW of solar out there on the backside of the garage. Once we get enough solar panels out there, we can take full advantage of the system and batteries and there should be a lot of days when all of our electrical needs are met by solar.
Anyway, let’s look at some numbers. Our electric bill in the year before we put in the system was pushing close to $300/month and some months even more. After we put in the system that dropped to around $150 – $170 per month. We estimate that we’re saving about $1,800 per year.
Our cost after the tax credit was $11,000. 11,000 divided by 1,800 is 6.11. So the system will basically pay for itself in 6 years. That’s assuming the rate we pay the utility for electricity stays the same as it is now, $0.16/kWh. And the chances of that rate going up significantly in the next few years are pretty much 100% considering the way things are going.
Of course our expense is going to go up when we add more solar panels, but once we do that we’ll be able to utilize the system more fully and further cut our utility bill as well.
I still need to do some work on the system. It is still in “experimental mode” so to speak. I need to make some changes to the wiring, run conduit, add a few safety features dictated by building codes, etc. But now that I know the system pretty much works well I can go forward with that.
V2H
In case you don’t know what that means up there in the heading, it stands for Vehicle to Home, and it’s related to EVs and their potential use to power a house during a blackout. The idea is, of course, that you have this massive battery pack sitting in your EV so why not use that power, or at least some of it, to keep essential equipment running in your home during a blackout.
There is also something called V2G, vehicle to grid, which is where the utility company wants to suck the power out of your EV to keep the grid going under heavy load conditions, but that’s an entirely different subject.
Ford made a big deal out of the V2H capabilities of the Lightning when it was first introduced, promising to actually sell you all of the equipment you’d need to do it. At the time I did a bit of research and the marketing people were saying the kit to do this would cost about $5,000, which I thought was a bit expensive, but not too horrible, all things considered.
Well last week I was talking to an actual real person who puts these things in out in California and I found out that the $5K price that was initially bandied about was ridiculously optimistic. He just put one in last week and the total cost was actually $14,000. He’s done about a dozen of these now and the cost of the installation, including labor parts, etc, has been running between $12,000 to $15,000 depending on what the electrical service in the customer’s home is like.
But $14K??? Seriously? That is a hell of a lot of money just to be able to suck power back out of your truck. Especially when you consider that my entire solar system, including batteries, inverters and solar panels, was only $16K.
That’s about it for now. Hopefully I’ll be getting back to updating this on a more timely basis!
Someone asked what it’s like actually living with this system. And since it’s been more than two months since it’s been running this is a good time to update what’s been going on.
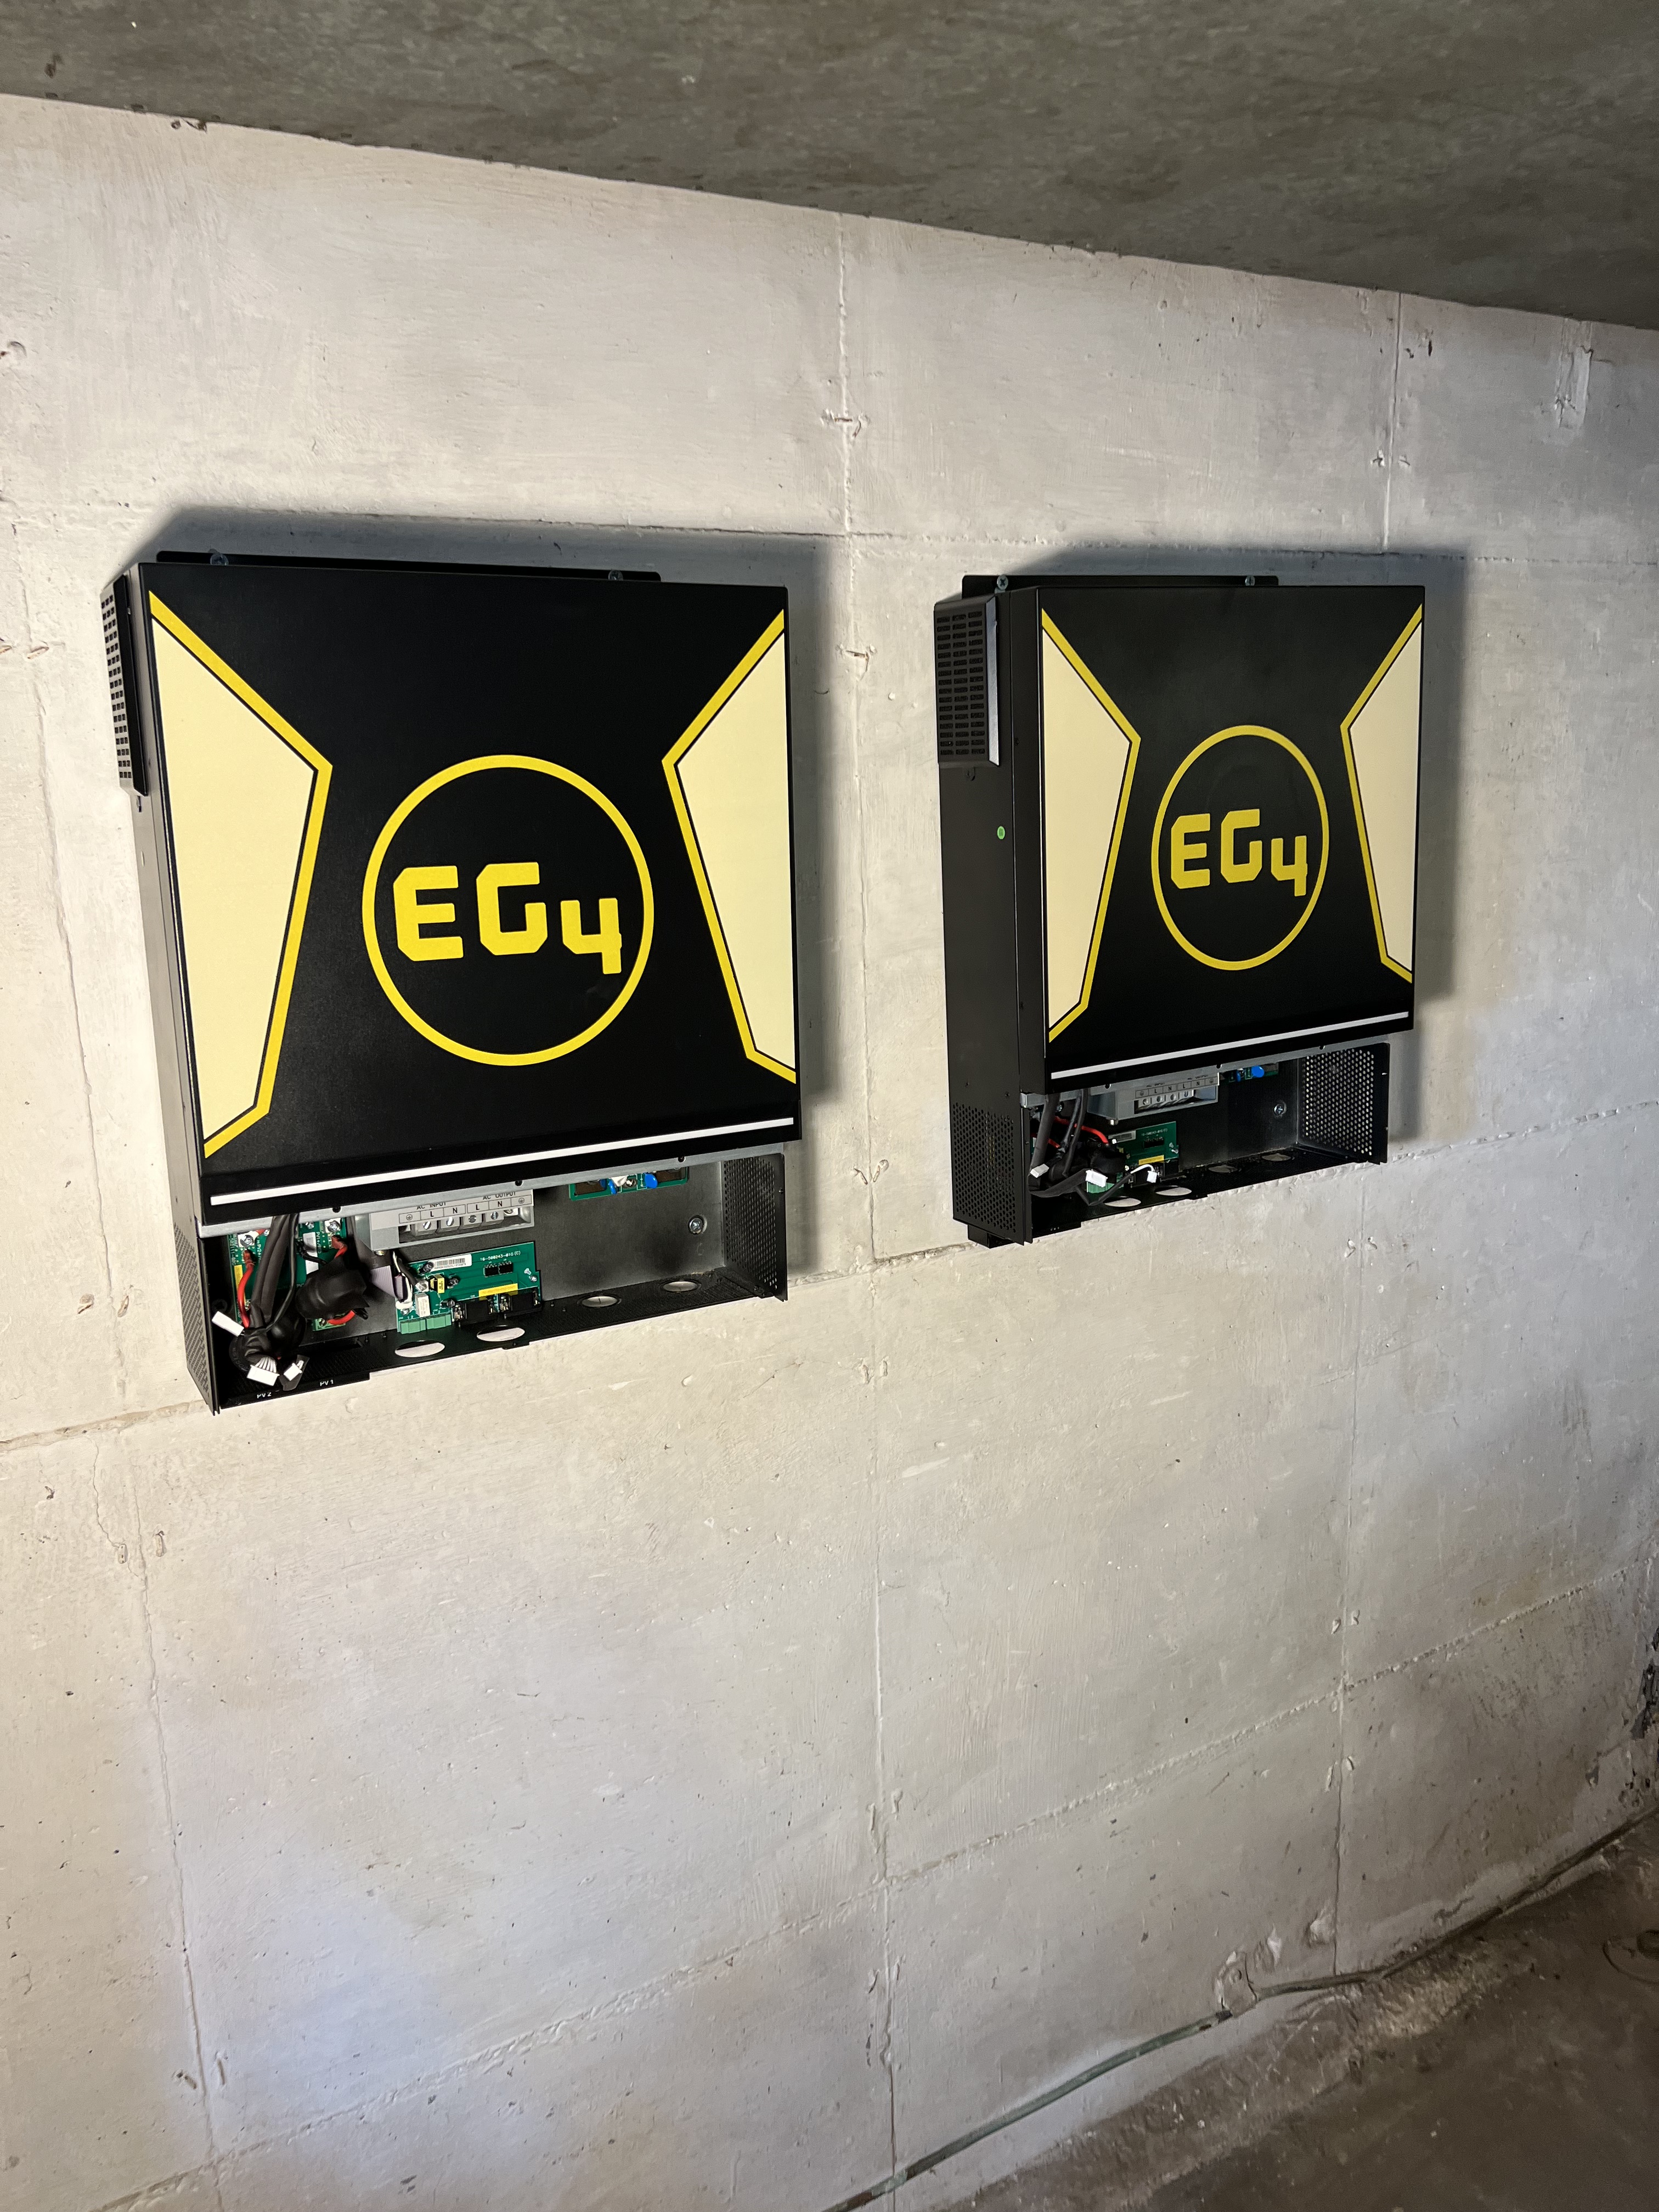
As for what it’s like living with a system like this, it’s just like being on the grid. If you were in our house you wouldn’t be able to tell if we were running on grid power or on power provided by the EG4s and solar/battery power. Everything just works. We do avoid using 240V equipment like the clothes dryer and central air when we’re running off the EG4s because they are such huge energy hogs. But for everything else? We just use everything else as we normally would.
We’ve had no problems at all with any of the components of the system with the exception of the solar panels. More about that in a moment. The inverter/chargers and batteries have worked exactly up to their specifications. The only annoyance is that the fans on the EG4s can get pretty loud when we have a lot of solar power coming in from the panels. But since they’re down in the basement and not in our living space we don’t notice it.
The only real drawback to the system is that we don’t have enough solar power coming in to adequately keep the system fed, so to speak. We can’t, for example, run the house off batteries at night and then make enough solar during the day to both run the house and recharge the batteries by a significant percentage. If we’d draw down the batteries to, oh, about 70% or less, we wouldn’t be able to fully recharge them and run the house at the same time.
But that’s something we knew when we started this. We knew we weren’t going to have enough space to put in as many solar panels as we really needed without resorting to using the garage roof, and we can’t do that at this time because the roofs are scheduled to be replaced in the next year or two. So we decided to make do with as much solar as we could put in now and then put in the roof top solar after the work was done.
But the solar panel situation has changed this week so let’s take a look at that.
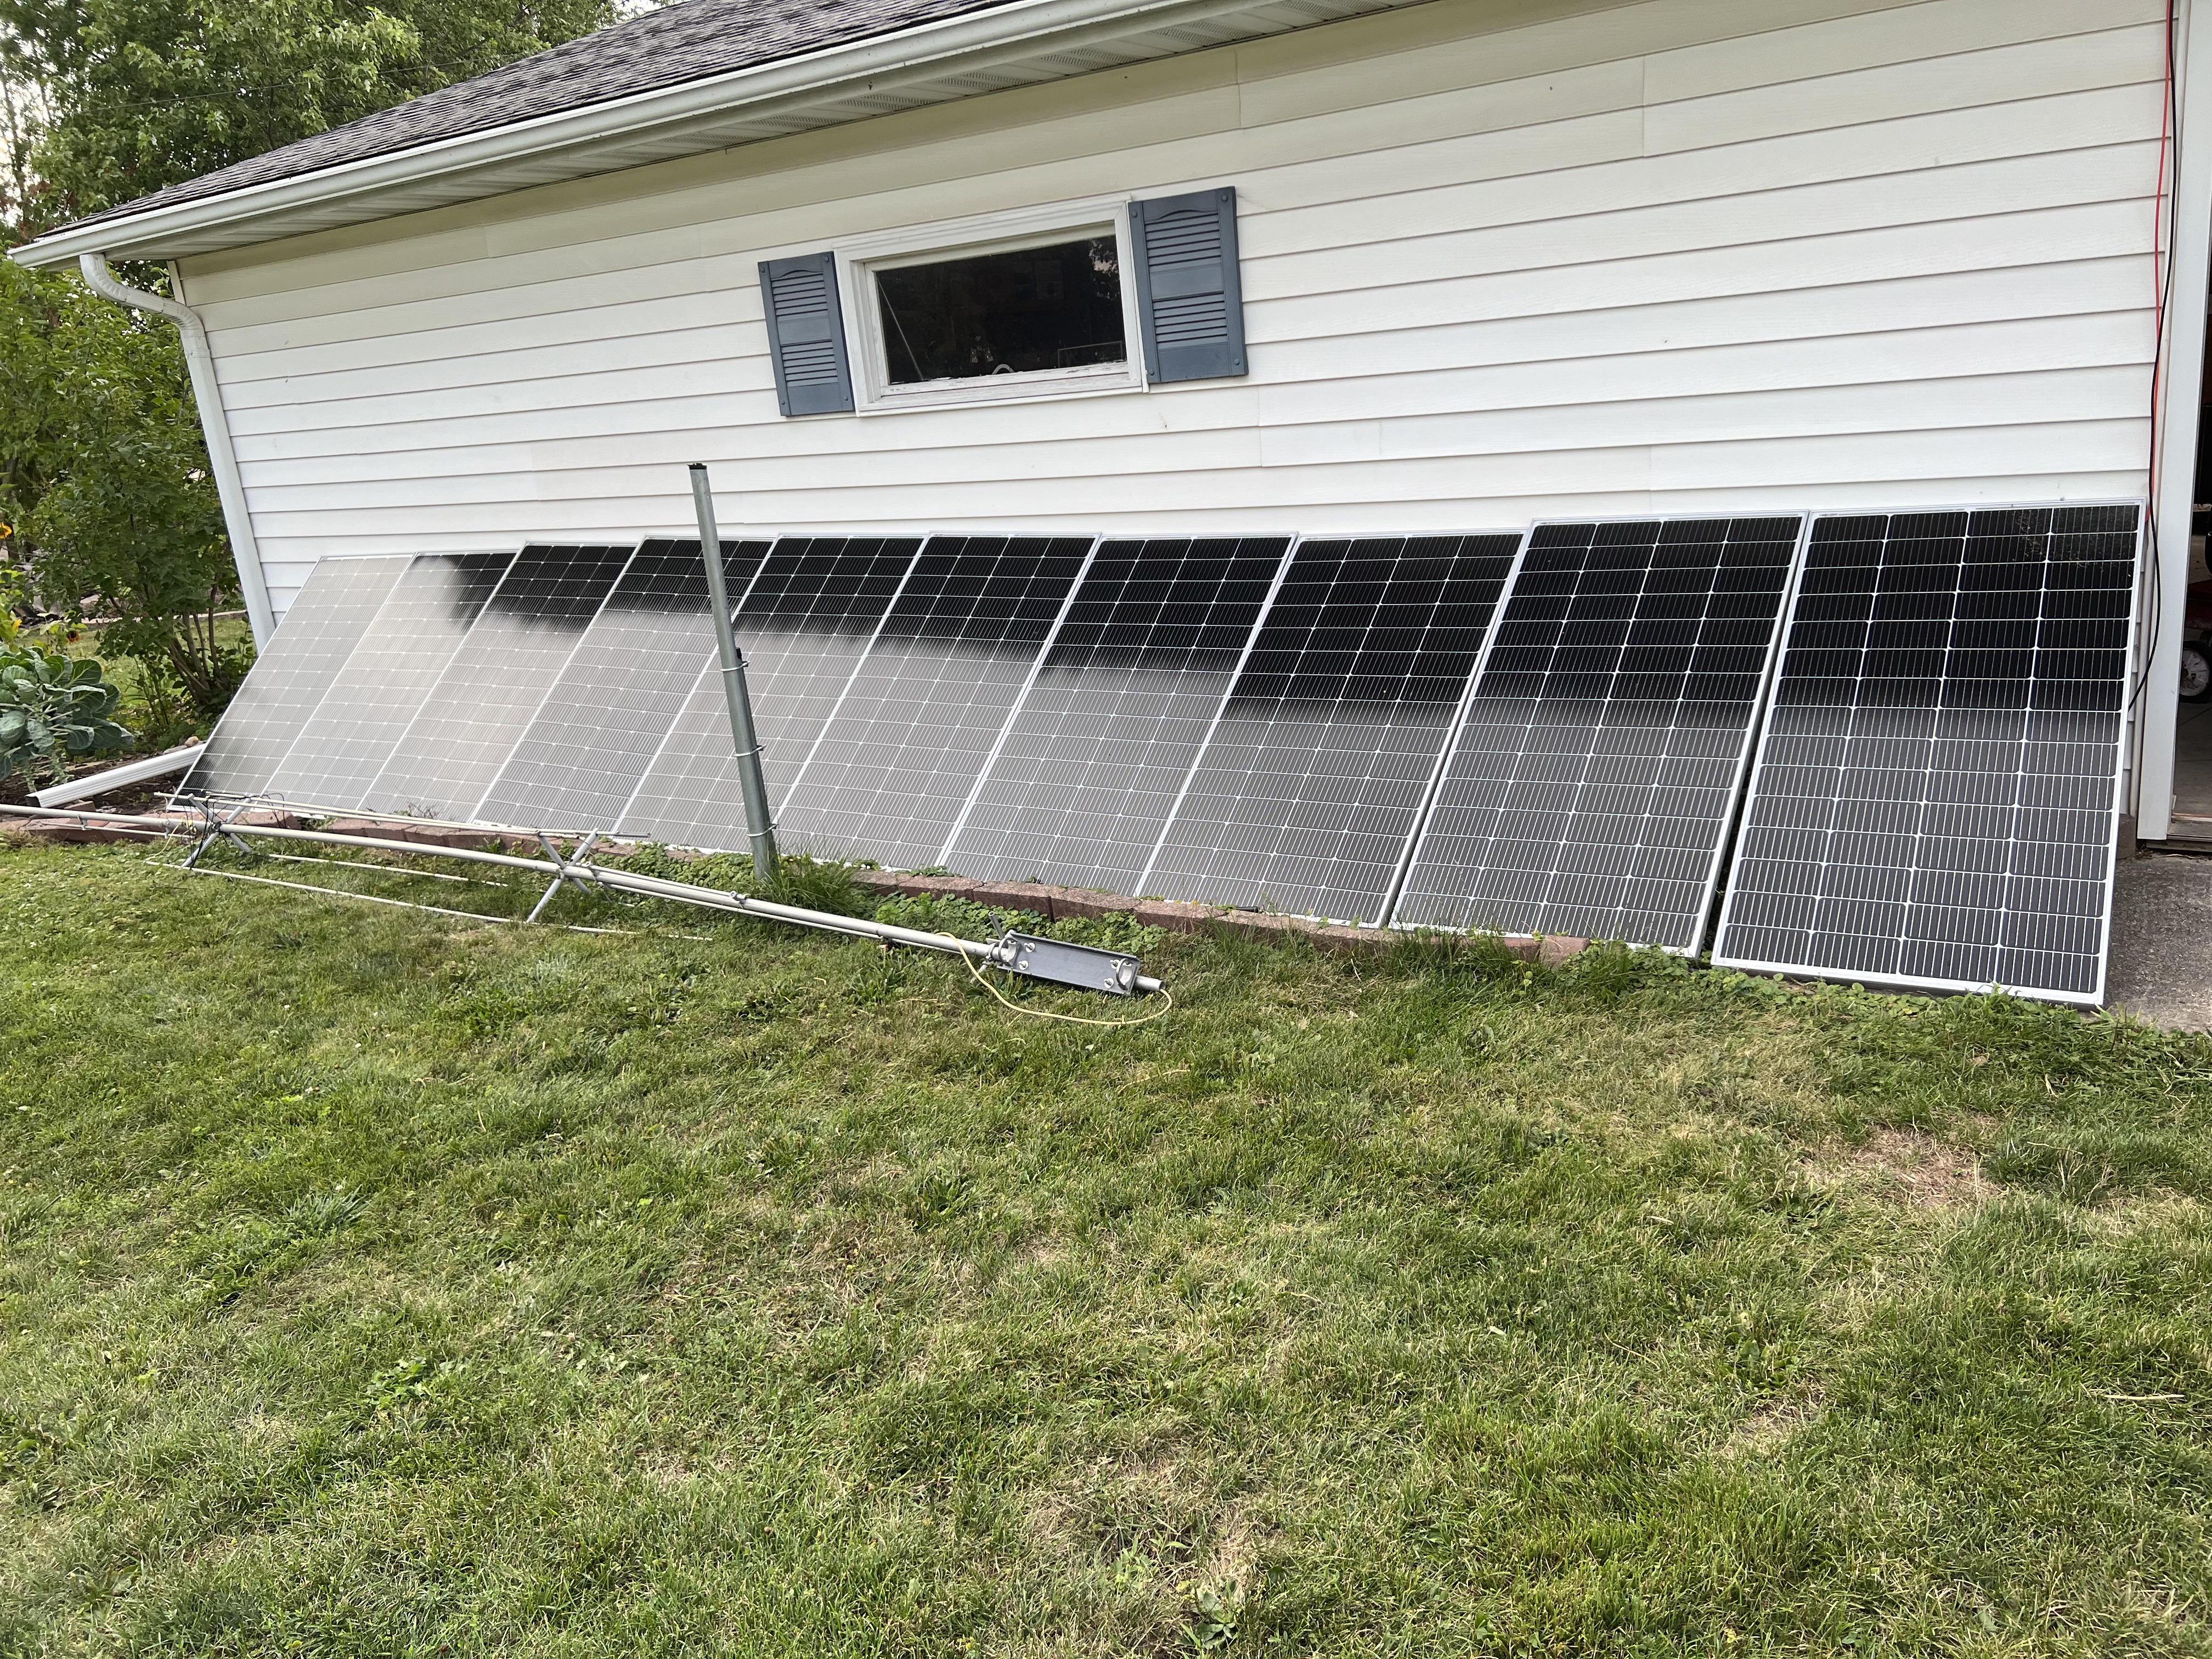
Those are the HQST 100W panels that originally fed the Bluetti and those, along with several 220W panels from Newpowa have been feeding the EG4s. And unfortunately I’ve been having some problems with them. Considering how cheap they are, about $75 each, they’ve been doing pretty good. In good weather conditions they’ll produce about 650W. Now I know that 650 out of 800 doesn’t sound very good but when you consider the conditions here in Wisconsin plus all of the smoke we’ve been getting from the Canadian forest fires, that’s actually pretty good.
Unfortunately that abruptly dropped to 450W or even less so something obviously is wrong. I checked all the wiring, connectors, etc and couldn’t find anything so one of the panels must have a problem. And now I have 10 of the Newpowa 220W panels up against the back of the garage for the time being. I’ll need to put in some kind of semi-permanent mounting system for them before winter comes but for the time being just leaning them up against the garage is working fine. I’m pleased with them so far. At midday under good conditions they put out a full 2 KW. Yesterday we had pretty dense cloud cover and just for the heck of it I hooked them into the system and even with the clouds they were putting out 345W.
First chance I get I’ll have to test all of the HQST panels individually to see what’s going on with them. The ones that test good are going to a business outside of Milwaukee that’s going to use them to run security lights.
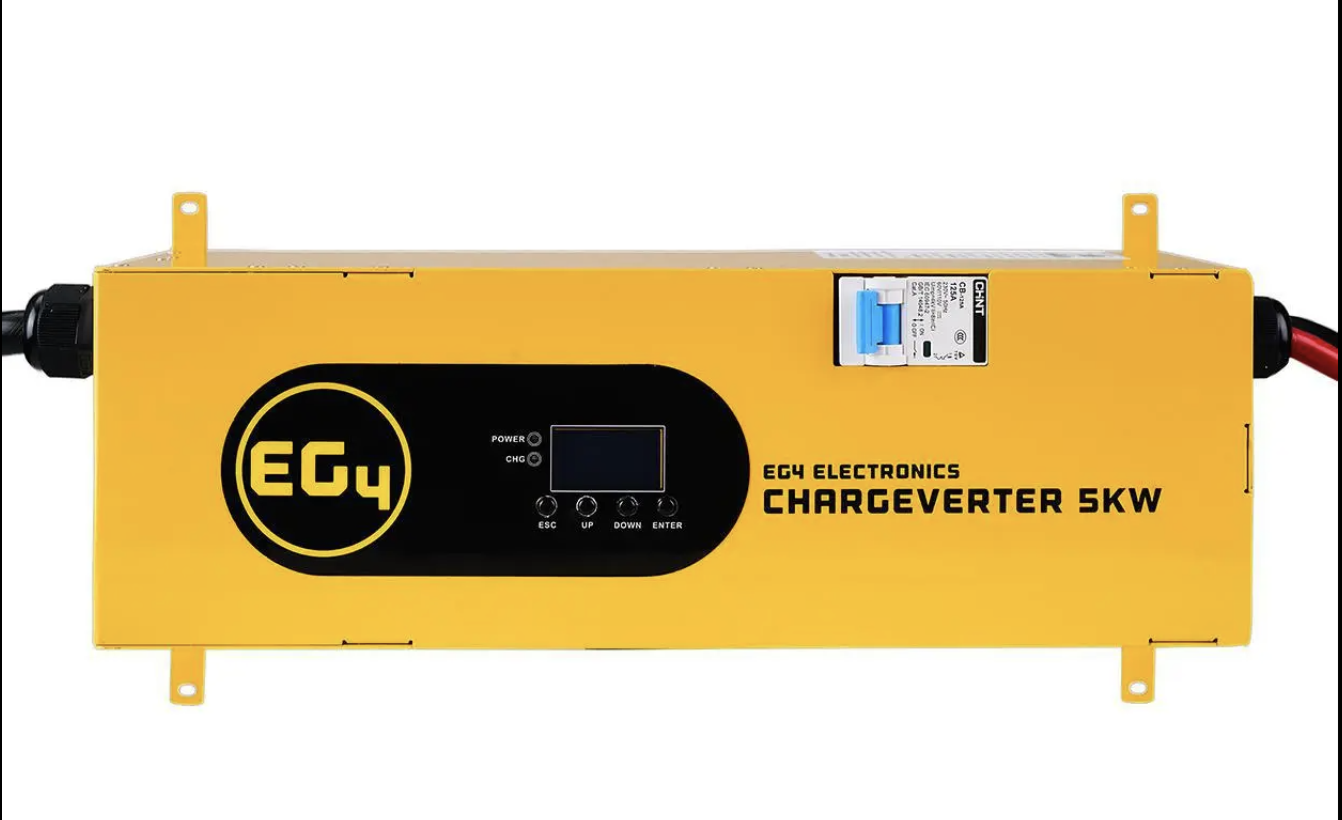
I wanted to take a look at the EG4 48V Chargeverter and I finally had a chance to try it over the weekend. I got in three more EG4LL batteries last Tuesday and before they could be installed they had to be at the same voltage as the existing batteries in order to avoid problems. So that meant they had to be charged up from about 54% to 99%. So this was a good opportunity to test it.
It’s that small yellow box on the floor. Not the best picture in the world, I know.
In the interest of full disclosure I should point out that I got the Chargeverter free from Signature Solar. They were running a deal where you’d get the device if you bought a package deal with two EEG6500EX inverters. Normally it sells for about $500.
So why does someone need this device? Well if you are really off grid or you are in an extended power outage, and you aren’t getting enough solar power to keep your batteries charged because of cloudy conditions, you’re going to need to recharge those batteries somehow if you want to keep your electrical devices working. And chances are good you’re going to turn to a good old fashioned gasoline powered backup generator to recharge those batteries. And that’s where this yellow box comes in.
Someone will point out that many inverters like my 6500EX already have AC powered battery chargers built into them. Just plug the 120V AC input on the inverter into the generator and let it charge the batteries. And you can, in theory, but there are some serious issues with that. There have been reports of people wrecking their inverter/chargers by trying to do just that. Apparently a lot of these inverter/chargers don’t work very well with backup generators. The problem is that a lot of these generators put out some of the nastiest, dirtiest, power imaginable with lots of voltage fluctuations. The inverter/chargers expect to see nice, clean, steady, pure 120V AC sine wave power coming in from the utility company, while the power coming out of some of these generators is so bad it can actually damage the inverter/charger.
The EG4 Chargeverter is designed specifically for these situations. It’s intended to plug directly into the 240V socket of a backup generator, convert that power to nice, steady 48V DC, and pump that into your batteries. Well actually 56V AC but I’ll come to that in a moment.
Yes, I said 240V. This thing can be rewired to work off 120V or you can get adaptors to let it do so, but you’re going to need at least a 120V, 30 Amp circuit power this thing if you’re going to try to use it off our house’s electrical system. If you have a 240V electric clothes dryer you might be able to plug it into that with the right adaptor but I don’t really care about that so I didn’t look into it. I’m interested in running this thing off a backup generator.
Since this charger can suck up at least 5KW of power to dump into the batteries, you’re going to want a fairly hefty generator to plug it into. You can use a smaller one but you’re going to need to adjust the power level of the charger to a lower amperage or you’re going to overload the generator. I’m using it with my big Generac 7.5 KW gasoline generator.
I bolted the plus and minus cables from the chargeverter to the battery. I started up the Generac….
Ah, the Generac… I have a love/hate relationship with that generator. It hasn’t been used much over the years, there are only a few hours on it and most of that is from test runs. It can be a real beast to get started. It has electric start, which generally doesn’t work because no one ever remembers to put the battery on the maintainer, so that means it either has to be jump started from an battery pack or started with the recoil starter. I will not describe the language I used trying to get that thing going with the pull starter. I finally found one of those jump starter packs used to jump start cars and used that to power the electric starter and got it going. Once it’s running, it’s fine. When the engine is warm, it’s fine. But starting it that first time…
Never mind. I got it started, plugged in the chargeverter and… And the engine immediately died. WTF?
I started it again. I plugged in the chargeverter and… And the engine immediately died again. WTF?
Oh… I forgot to turn the gas on. Sigh…
Now with the generator finally running, I plugged in the chargeverter. The display came on. I used the buttons on the front to set the voltage to 55.5V and the amperage to 50A, and flipped on the circuit breaker to start it up and, well, it just worked exactly the way it was supposed to.
It was really going to be that easy? Apparently it was. According to the display on the battery it was being charged with about 48.5 amps of current. Cool.
I kicked the amperage up to 80A which made the generator work a bit hard for the first time in its life and the battery reported it was getting 78.8 amps…
What can I say? It just worked exactly as specified.
I charged all three batteries from about 50% to 99% in about two hours total.
The only issue is that the case of that charger gets seriously hot, hot enough to be painful to touch but the manual warns of this so it wasn’t unexpected.
I like it when things just work.
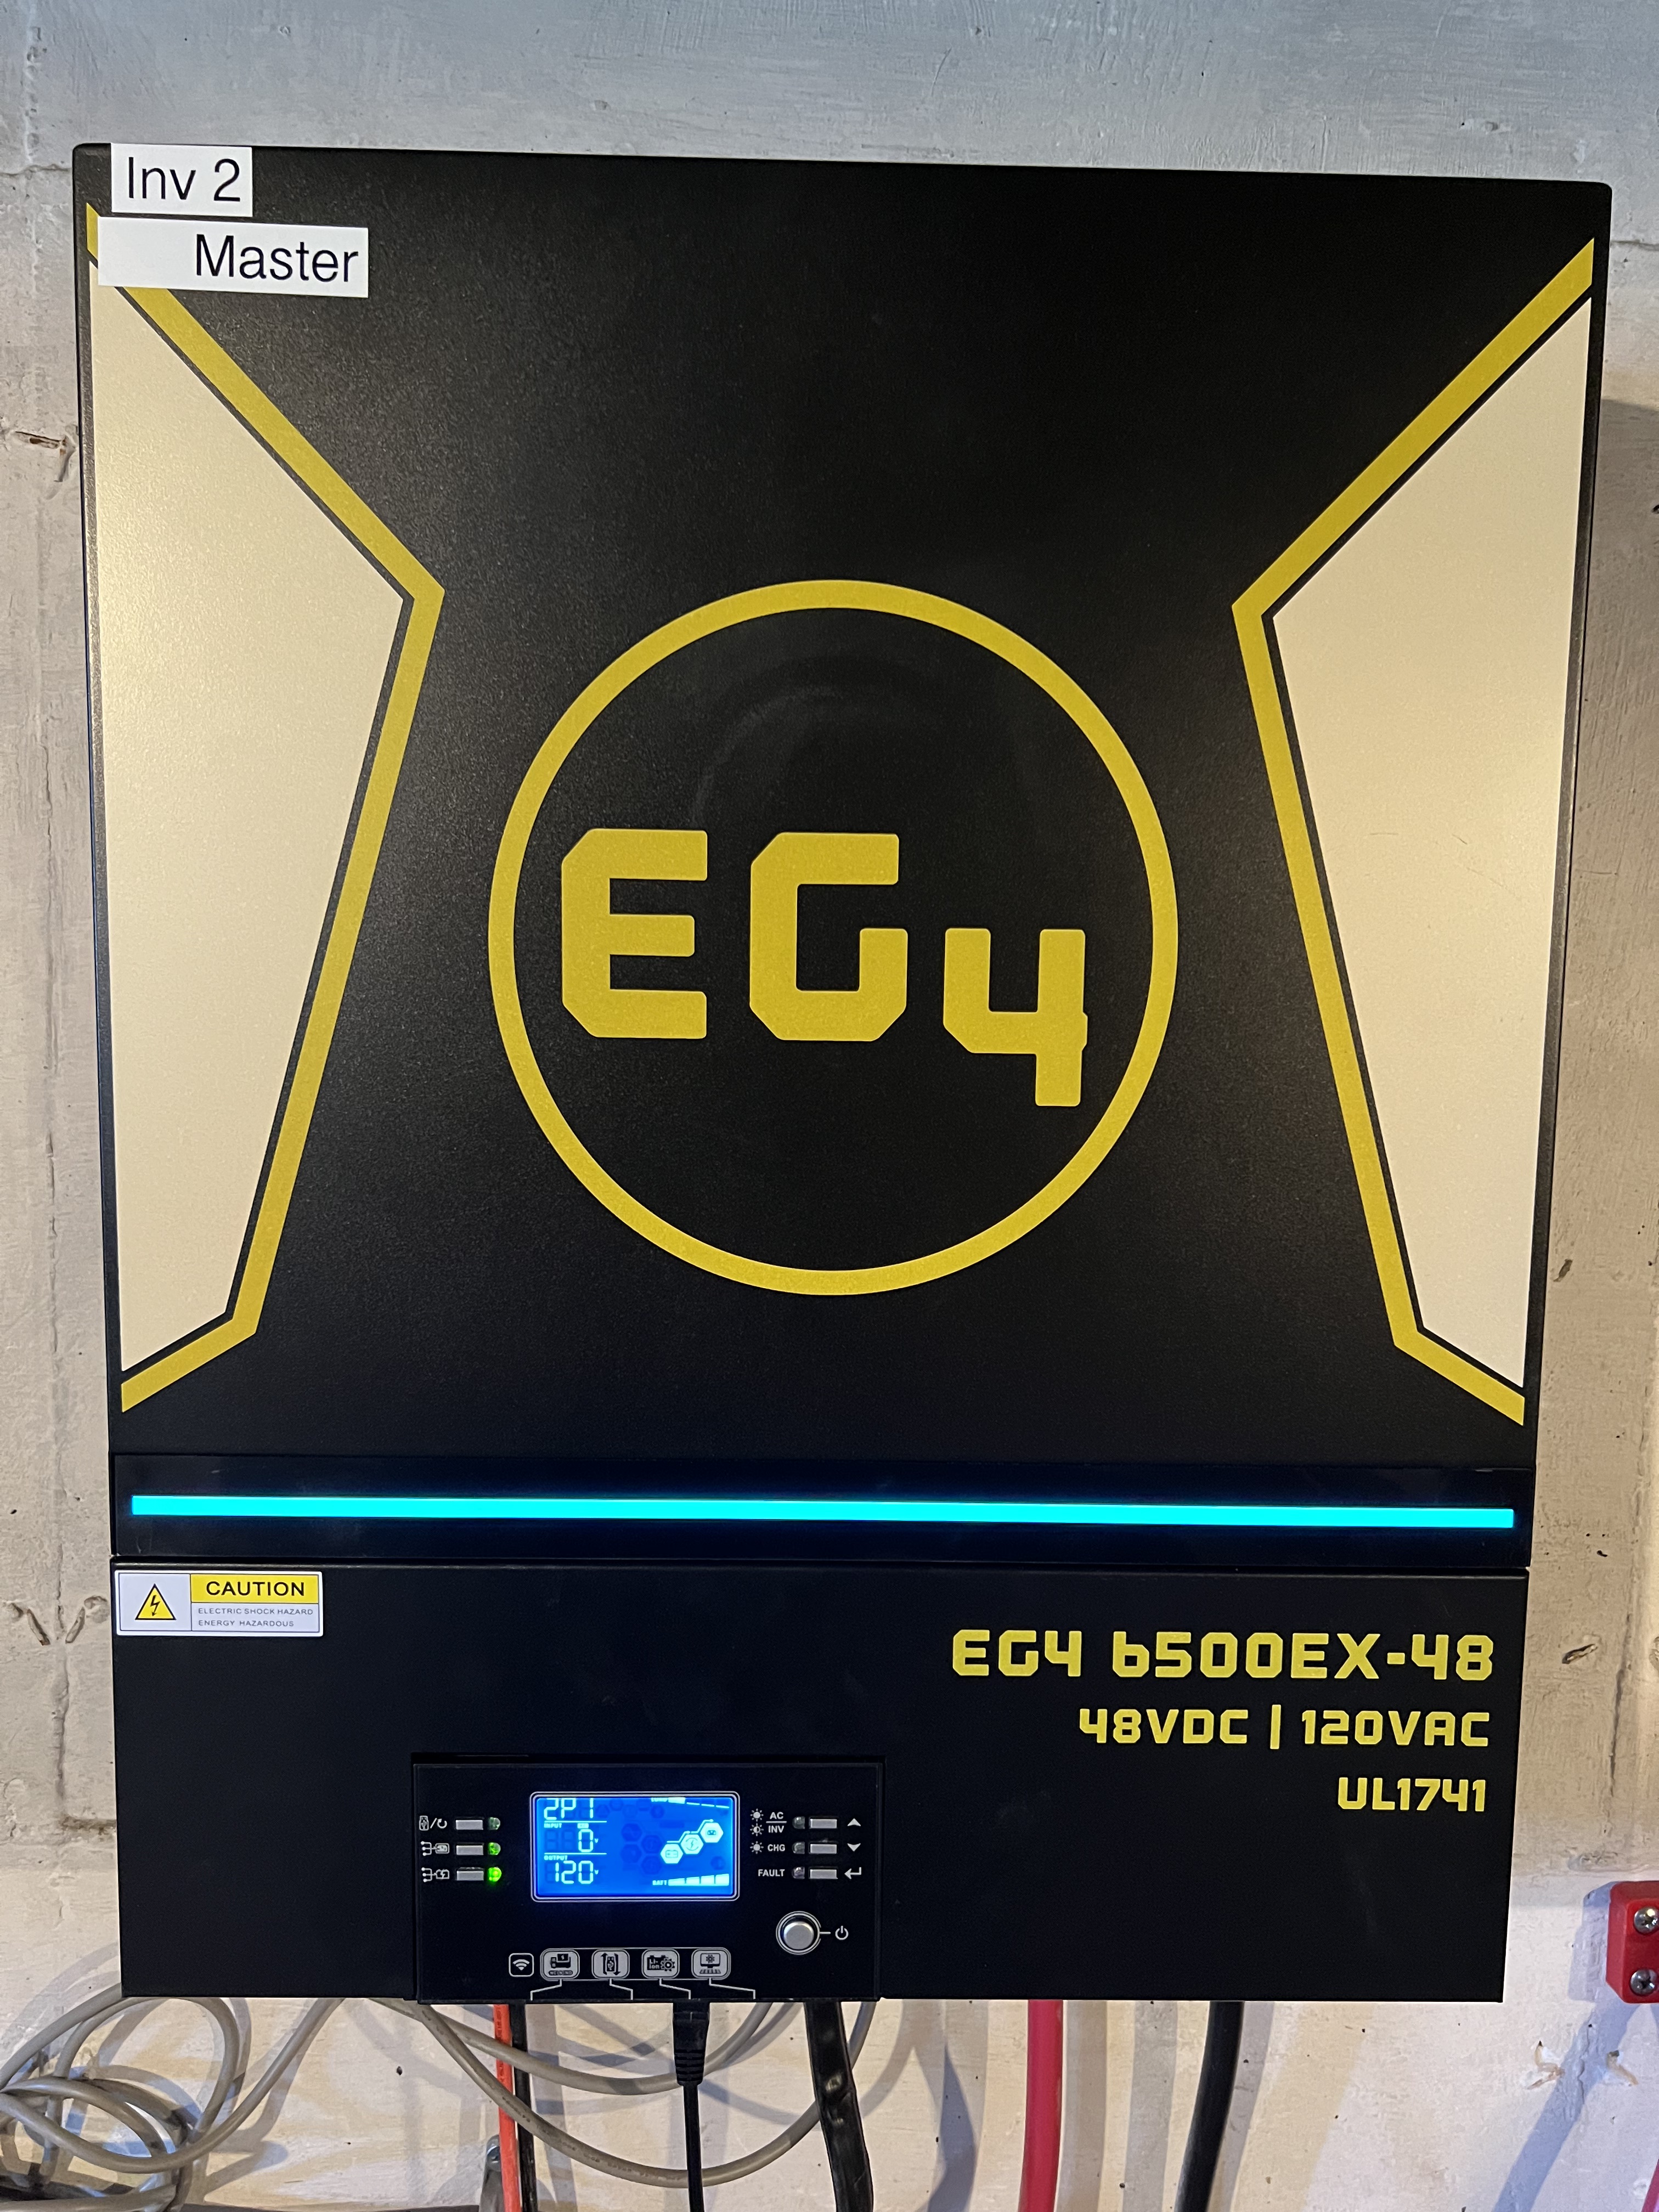
EG4 6500EX and EG4LL Battery long term evaluation.
This is another rather dull report because the EG4 6500EX inverters have just plain worked. Something that was made abundantly clear when we had a power failure this morning about 8 AM that lasted for about two hours. First the power flickered out for about 10 seconds or so around 7:3o. And then at around 8 it went out completely and stayed out. So down into the basement I scurried, flipped a couple of circuit breakers and we were back to the electrical system running normally in about a minute. Furnace, sump pumps, furnace (weather changed from hot and dry to cold and wet so the sump pumps and the furnace have all been running), lights, microwave and, most important of all in the early morning, the coffee maker, all worked just fine and dandy.
The outage lasted about two hours and even the sump pumps weren’t a problem. By the time power came back on the batteries were still at about 95%. Granted we weren’t using a lot of power. The sump pumps only cycled once and the furnace only ran for a few minutes.
Anyway I’m quite pleased with the system. It’s nice to be able to just switch over like that with just a couple of circuit breakers and get back to normal.
I managed to injure my left leg when I was wrestling around with those massive batteries for the solar power system so my physical activity was seriously limited for a couple of weeks. Yesterday was the first day I felt comfortable enough to get out on the bike for an extended ride, and it was a great day to start. Was absolutely beautiful out with temps in the high 70s and a gentle breeze.
Phlox everywhere. They’re pretty but they’re an invasive species that spreads very aggressively in this area.
I injured my left calf pretty seriously back in the 1990s in a farm accident. Took me 6 weeks to recover from that one and ever since I’ve had to be cautious with that leg. Lugging 100 lb batteries down the basement stairs and into the battery cabinet didn’t do the leg any good. Neither did repeatedly kneeling down on the floor to work on wiring.
Out in the gardens the irises are coming into full bloom. They don’t bloom for very long but when they do that whole area is covered with these amazing flowers in brilliant blue, purple and yellow. When the sun hits them the colors are so brilliant they almost glow.
Alas the flowers don’t last long but by the time they fade away others will have blossomed to take their place.
More solar stuff: I really need to do some meaningful testing of the EG4 system to get some basic data about run times and things like that. I can guess how long the batteries will last when running the house off the EG4 system but I don’t have any actual operational data giving me actual run times under particular sets of circumstances and things like that. Two days ago I started it up, took the house off-grid and ran entirely from the EG4 system starting at 7 AM and ending at 3 PM, a total of 8 hours. At the end of that time the batteries were still at about 78% capacity because we had a pretty good day for solar production. While that was interesting I really need to see how long I can run the house just off the batteries, with no solar power at all.
The string of Newpowa panels have been peaking at around 1,000 watts, and the HQST panels at around 600 watts. That’s less their rated peak output which should be around 1,320 and 800 respectively. The HQST panels were putting out close to 700W earlier this year so I know they can do better than what I’m seeing. And the weather was clear with bright sunshine…
Or was it? The sky looked clear when looking straight up, but if you’d look towards the horizon it was a different story. The wind shifted again and we’re back to getting air quality alerts because of the forest fires in Canada. It looks clear and sunny but it really isn’t. There is a significant amount of fine particulate material floating around in the atmosphere that is cutting back on the amount of solar radiation that is reaching the ground. What it boils down to is that I theoretically have enough solar out there to take my batteries from about 50% to near 100% in one day of full sun. In reality, with variable cloud conditions and the smoke from the fires, I’m lucky if I get half of that.
(And I can sure tell there are air quality problems with my allergies, too. I was up at 3 AM this morning with my head so stuffed up I could hardly breathe. I gave up trying to get back to sleep. Since all of this air quality stuff started I’ve been having problems sleeping, stuffed up sinuses, etc. Makes it very hard for me to stay asleep. I’ve generally been waking up around 3 or 4 AM and find it almost impossible to get back to sleep again. Running on four or five hours of sleep is unpleasant. Sigh…)
This thing started out at around $500 but is currently selling for $399 over at Signature Solar. In the interest of full disclosure I should point out that I got this thing free from Signature Solar.
Speaking of battery charging I got one of these in earlier this week from Signature Solar, the EG4 Chargeverter, a 48V battery charger that plugs into a 240V AC power source to rapidly recharge LiFePo batteries. This thing can put out up to 100 Amps which means it could fully recharge my 15 KWh of batteries in just 3 hours. It’s only been on the market for a few months and I’m curious to see how well it works so when I get a chance to check it out I’ll talk about it in the future.
Now why would someone need one of these? After all a lot of modern inverters like my EG4 6500EX already have built in AC battery chargers. I could wire my EG4s directly to the house’s AC power and they would automatically keep the batteries topped up even when there is no solar. But a lot of these systems are sold to people who are entirely off the grid. They have no connection to the grid at all. (And my system has no grid connection.) If they don’t get enough solar power to keep their batteries topped up, they have to resort to using a gasoline powered generator to charge them up. And that’s where the problems come in. These cheap, gasoline generators often produce very dirty power that isn’t even close to a pure sine wave and which can damage electronics. This chargeverter apparently doesn’t care how dirty the AC power coming into it may be. So if you’re living entirely off the grid, or if you’re going through an extended blackout and there isn’t enough solar to keep the batteries charged, you could plug this thing into a cheap Harbor Freight generator to charge your batteries and not have to worry about damaging anything.
I have a 7,500W Generac gasoline generator sitting out in the garage and this thing should plug right into it so I’ll be testing this out in the near future. If it works as advertised it will probably be kept permanently wired up to the bus bars in the battery cabinet. I doubt if it will get much use but it could come in very handy if we have an extended power outage.
What I’ll probably do is run my batteries down to about 25% and then try charging them with the chargeverter connected to the Generac and see what happens.
Now that I’ve been actually using the solar power system for a few days I’ve run into a few interesting quirks. First the solar charging system. Other people with the EG4 6500EX inverter, or who are thinking of buying one, have been following along so I thought I’d warn you about this.
Up in that photo are 5 new 220W solar panels from Newpowa. I picked up 6 of those because I badly need more solar but I don’t have a lot of space to put them. These from Newpowa were the smallest size 200W panels I could find and that’s why I bought ’em. The charger in the EG4 is rated between 80V to 500V input from solar. That’s the minimum amount of voltage it takes to “trigger” so to speak the charger, and the maximum voltage it can handle from the solar panels.
Those five panels in series were putting out about 91 volts, which should have been enough to make the charger work properly. But apparently not. When I plugged them into the EG4 it looked like I was only getting about 450 – 500 watts out of panels that should have been putting out at least 75% – 90% of their rated capacity under the conditions I had that day. They were putting out half of what they should have.
I went back out, checked all of the connectors, all of the wires, made sure I had everything wired properly and couldn’t find any problems. The EG4 has two solar chargers so I plugged into the second one. Nope, same thing, I was only getting a little over 500W under full sun.
Grr, so now what… Could it be that 91V wasn’t enough? I had one more panel that I didn’t have room for. I shuffled things around and connected up all six panels and then checked. I was now getting a bit over 100V and…920W? Yeah, 920 watts. Adding that one panel, kicking the voltage up another 10V doubled the amount of power the panels were putting out.
So apparently that 80V lower limit on the solar charger in the EG4 isn’t quite accurate. I had to push 100V into it in order to get the charge controller to get it to work properly. So if you have one of these things and you aren’t getting the wattage out of your solar panels you think you should, check your voltage. If your panels are putting out less than 100V that could be it.
The other oddity is also related to solar charging. Before I configured the two inverters to work in parallel I was using one inverter alone for testing. It exhibits some interesting behavior. If I had the inverter physically turned off with the switch on the front panel and plugged solar power into it, it would turn itself on and start charging the batteries.
I personally find this a bit troubling. If I have a device that is physically turned off, I expect it to remain off. Period. Now I can understand why they might do this. If you’ve been using the system from battery only and drain the batteries down and shut the system off, it might then start to recharge the batteries automatically when it begins to get solar power. It turned on only the solar charger, not the inverter, so it wasn’t putting out AC so that was something at least.
Once I put the two units in parallel, that behavior changed. When I plugged solar into the turned off master inverter, it would still turn itself on with the power switch turned off. But it wouldn’t actually charge the batteries. It looked like it was in charging mode but it really wasn’t. It indicated it was getting only 47W of power out of solar panels that were putting out 500W. Eventually I figured out that both units need to be physically turned on with the power switch before it will now start actually charging the batteries. I find that disappointing as well. I’d prefer to be able to do what I did before, which was to use the unit to charge the batteries without having to switch the inverters on. Running an inverter while it’s just “idling” along without drawing power from it uses a small but still significant amount of power from the system. Each inverter takes somewhere between 70 – 90 watts of power, or 140W – 180W for the pair. And that’s 140+ watts that could be going into the batteries.
One last observation. These things aren’t exactly quiet. The fans on the EG4s run all the time the units are operating, and depending on the load on the units those fans quickly ramp up in speed. Tucked away in the basement this isn’t a problem but if you’re putting them near a living space some people could find the fans more than a little annoying.
One last thing about the solar system. I finally got the batteries mounted in the cabinet. And found that my existing battery cables going from the inverters to the batteries are too short because of course they are. So it’s time to get out the crimping tools and spend even more money on overpriced copper cable. Always something…
Gardening stuff
We moved the two raised beds from the north side of the backyard to the south side. In the previous location they were starting to get shaded out by a fast growing maple tree and a spruce tree. Growing conditions there were getting worse every year. Now that the ash tree is gone the area where we moved them now gets full sun all day long. Moving them was simple but took a lot of physical labor. Had to shovel out all of the dirt in them, drag them over to the new location and then shovel all the dirt back into them.
We’re doing some decorative work as well. An old, crumbling stone wall is being pulled out along the west side of the garage and being replaced with block, so we got a pallet full of blocks coming in the near future.
I’m not looking forward to that project. I am, at heart, a lazy person when it comes right down to it. I’ve developed an allergy to hard physical labor over the last few years. Still, it needs to get done.
Let’s see, what else? Oh, I found this while I was biking around the other day and I had to stop and take a picture of it.
We have some interesting people around here, including some who are pretty good folk artists. From the road I thought this was a real person for a brief moment when I saw the hi-viz vest.
And let’s finish up with a cat.
I love cats and cats love me, normally. But I don’t know what’s going on with this one. She stares at me, yells at me, glares at me and just barely tolerates my existence. I want to pet her and give her treats. She wants to shred my face. Sigh…
We had to take care of our youngest son’s cat for a few days while he was on vacation and she, being a cat, decided she owned the house.
Yeah, that title is probably a lie. I’ll probably talk more about it in the future as I gain experience with this. I’ll certainly let you know if I run into problems. And you’re probably getting tired of reading about as I am of writing about it so let me wrap this all up.
The good news is that the damned thing actually works. I got tired of waiting for some miscellaneous parts to arrive to do the final installation and cobbled together a messy looking but safe wiring configuration so I could get on with testing the inverters. That may look like a mess down there, but it is, frankly, a lot better looking than some of the wiring I’ve seen people turn out on Youtube and other places.
But it is a mess that works and, believe it or not, is safe. And the battery cabinet is here now so today this whole thing is going to get torn down and put back together the right way and will meet building codes, etc.
I fired the sucker up. I went through the “commissioning” procedures in the manuals to set the two inverters up to run in 240V split phase, rebooted everything and it all started up and, well, damn. It actually worked! I had the entire house was running off-grid, running from the inverters, batteries and solar panels. Everything in the house was working just as it did running off the grid. Lights, microwave, coffee maker, even the 240V appliances like the stove and clothes dryer. Just for the heck of it I fired up my big table saw in the wood shop. The lights flickered a bit when it first kicked in, but they do that even when I’m running off grid power. End result is I ran the house for the rest of the afternoon off the two inverters with no problems at all before shutting it down and pulling the plug, so to speak, so I could start prepping to put in the battery cabinet.
So, it works! I actually put together something that works? Wow…
So for those of you who are interested in all the technical stuff and some observations about the equipment, let me get on with us. Some of this I’ve mentioned before but I want to make sure I covered everything for those of you who are interested in putting together a solar power system yourselves. And yes, I’m going to include the actual retail cost of all of this as well along the way. So so be warned this could get long.
So let’s start with the inverters.
What I have are two EG4 6500EX all in one inverters. Each one can handle a sustained load of 6,500 watts with a surge capacity of 13,000W for up to 5 seconds. When some equipment (like my table saw or sump pumps) first start up they can demand huge amounts of power for a brief time, so that’s why that surge capacity is important. Both of them together give me 13KW load capacity, more than enough to run the entire house.
Each inverter has two MPPT solar charge controllers. Each of the two chargers can handle up to 4,000 watts of solar panels at 80 to 500 volts. And I can tell you that they absolutely have to have at least that 80V before they’ll start charging the batteries. Anyway that’s some pretty hefty solar charging capacity. If I’d max out the capacity of both inverters I could feed about 16KW of solar power into these things.
If the inverter is connected to grid power it can charge the batteries off the grid, or off solar, or off both, or prioritize one source over another. And I’m told these things, if hooked to the grid, will pass through grid power to your house, and switch to battery/solar power in case of a blackout, and do it in 10 ms. I don’t have mine hooked to the grid and don’t plan to so I’m not going to be able to test that.
The battery chargers, both solar powered and grid powered, can be configured to deal with just about any kind of 48V battery system you might have, ranging from old fashioned lead acid batteries up to state of the art LiFePo batteries like the EG4LLs I have. You can set maximum and minimum voltages, rate of charge, you name it. In my case I just told it I was using EG4LL batteries and it automatically sets itself up properly. It also has battery communications as well to talk to the battery management systems most LiFePo batteries have these days. And I should add that the inverters are UL listed as well so they should be able to pass inspection.
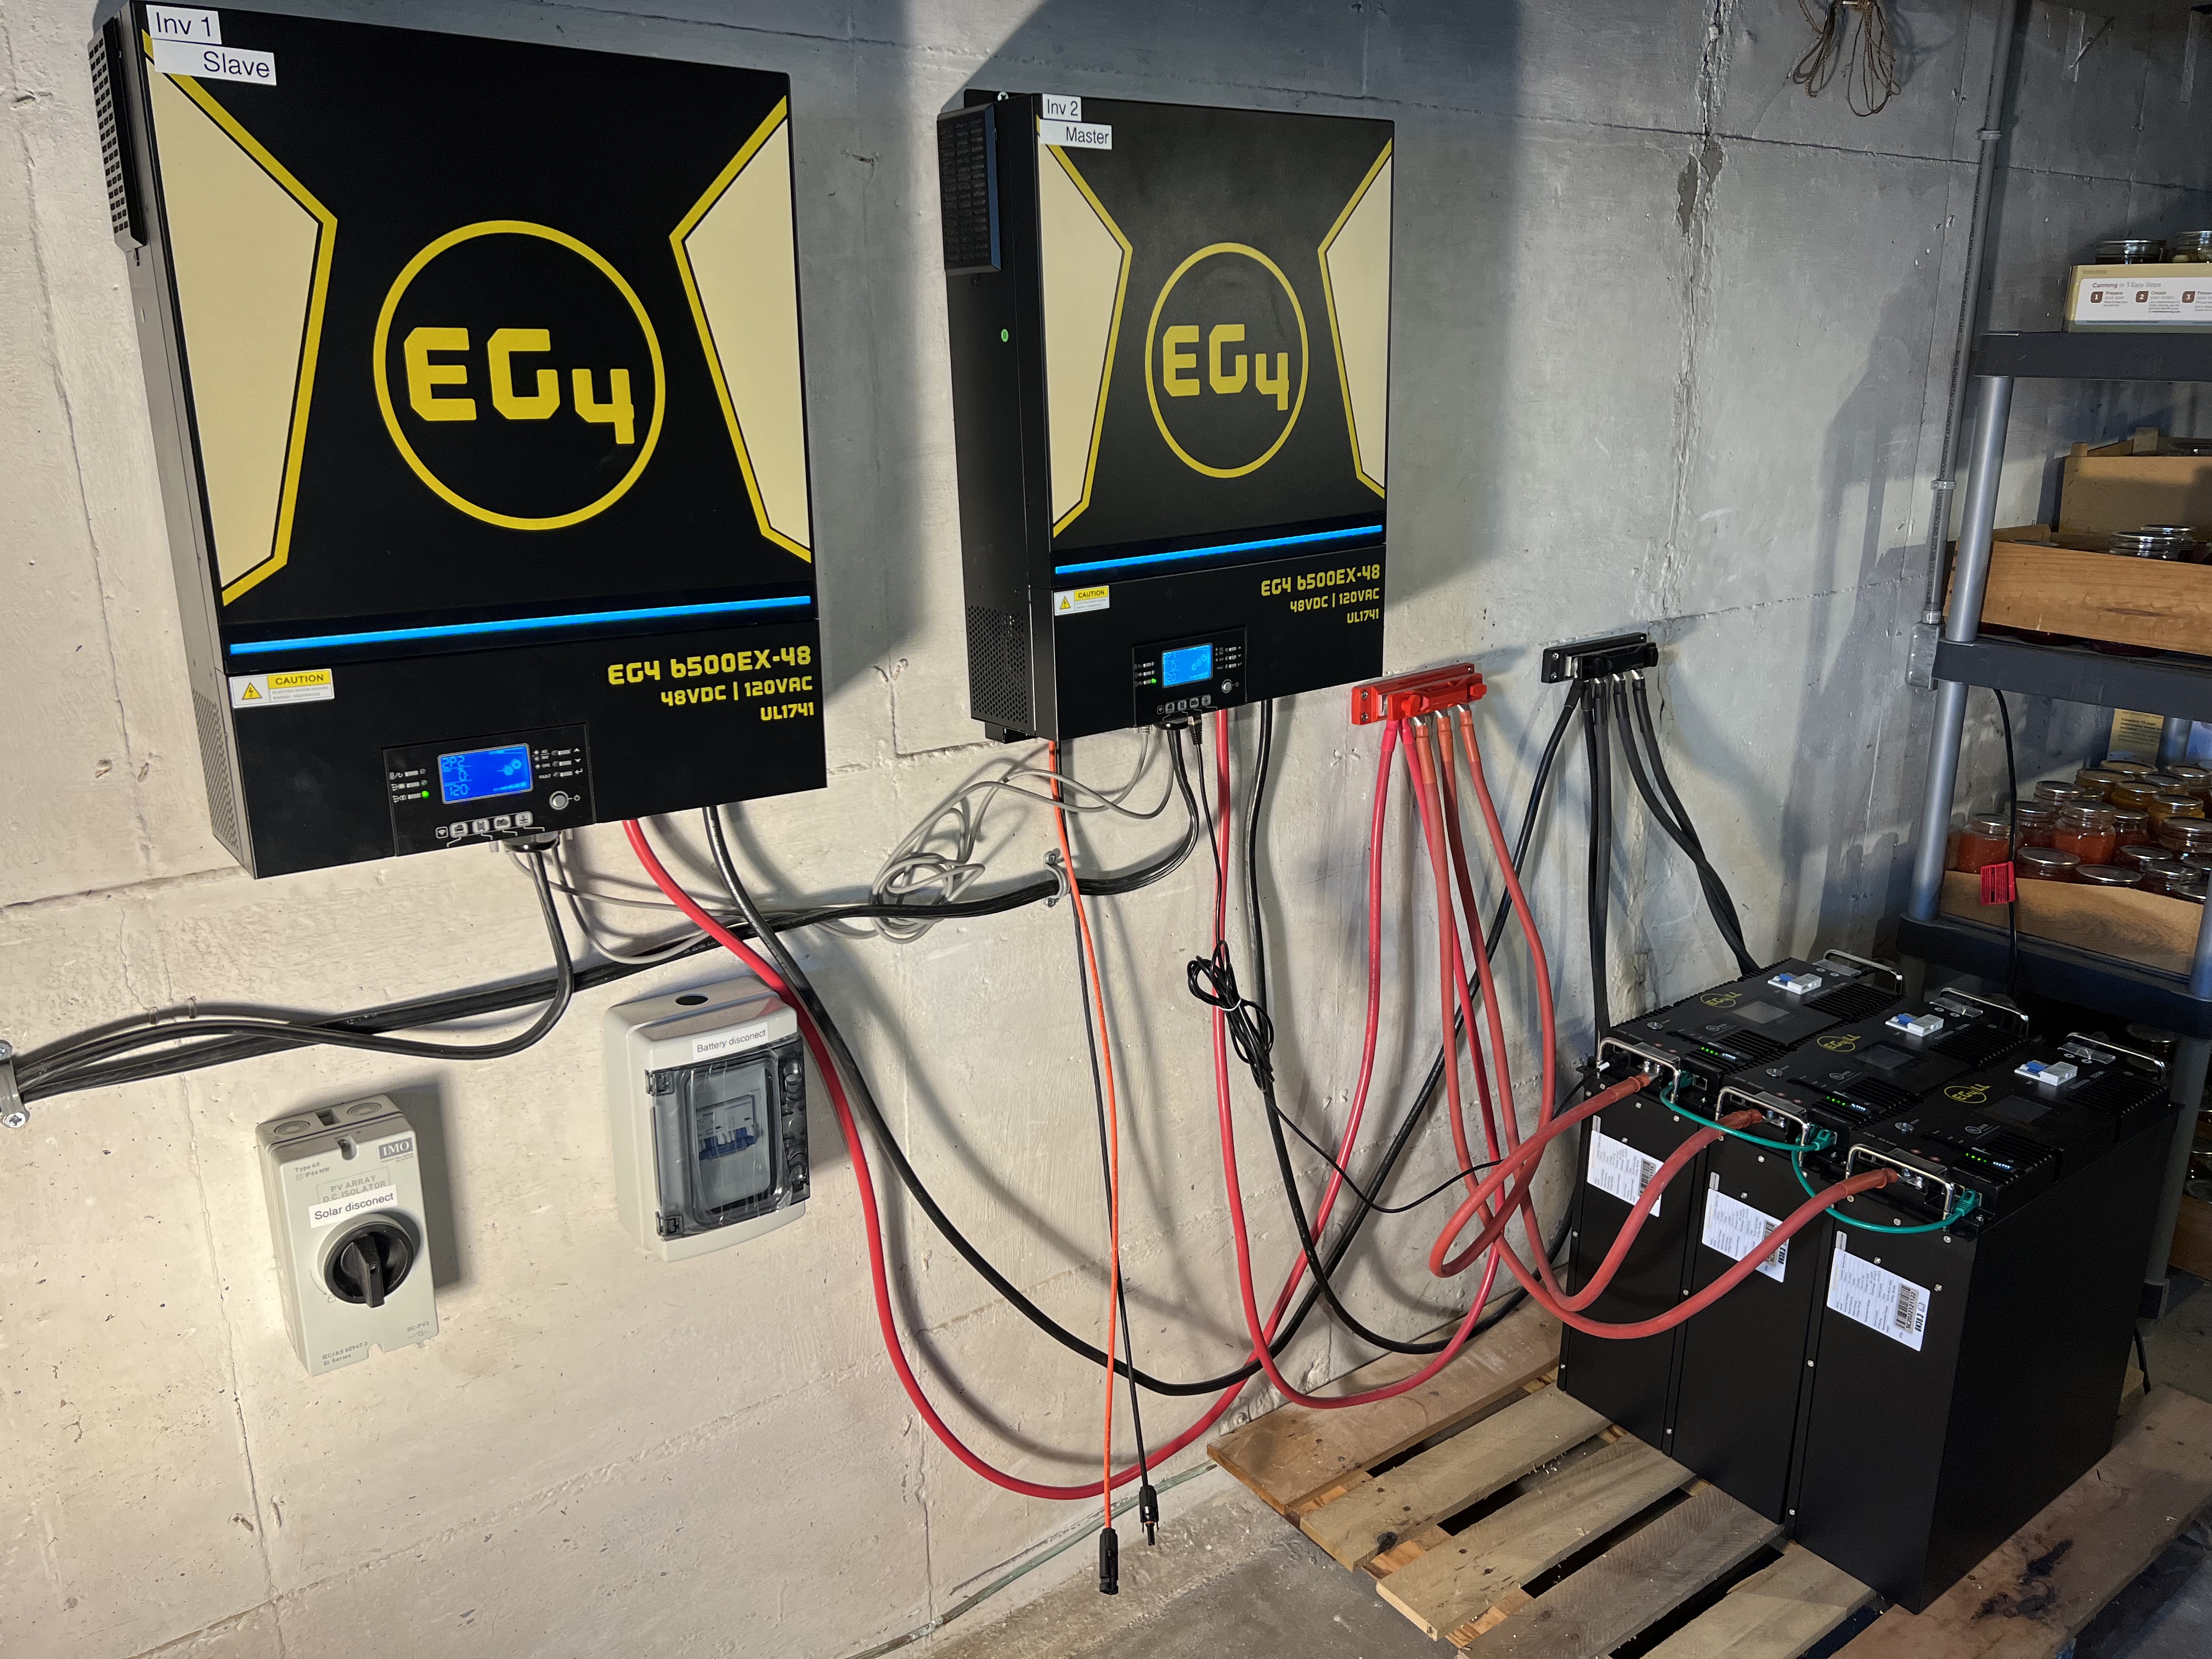
And, of course, two of these units can be paralleled together so that when combined they work as a single 240V split phase system, which is how I have mine configured at the moment. One inverter is set as the master and the other as the slave, and a setting in the menu has to be changed to make sure that the slave’s sine wave is 180 degrees out of phase with the other inverter. That took maybe all of a minute to configure.
And if the 13KW that two of these together make isn’t enough for you, you can connect up to six of the things if you need more power.
There are lots more options and settings and other things that I’m not going to get into because it would take forever and I don’t really care about a lot of them. If you’re interested in all of that you can download the manual from Signature Solar.
So, let’s talk cost. Personally I think that considering the capacity of these inverters and the things they can do they’re pretty inexpensive, $1,299 each. Since I wanted 240V I needed two of them. Signature Solar had a combo deal that included two EG 6500EX inverters, two PV cutoff switches, two battery disconnect switches (which you need to meet code) and some cables and a few other goodies for a bit less than $3,000, so that’s what I ended up buying.
I am not urging you to buy EG4 equipment by any means. These are just the ones I ended up getting because they suited my needs. There are a lot of different inverters on the market and most of them work pretty well. Some are better than others. But as you go shopping around you will find that a lot of different brands seem to have remarkably similar specifications, and even seem to look quite a bit alike except for the case. That’s because they are basically the same inverter, just packaged differently. I know of at least two other inverters, sold under different brand names, that are exactly the same as the EG4 6500 that I have. There are some minor differences, like the EG4 can handle higher PV voltages, but other than that they’re identical except for the case and graphics and they all come out of the same factories in Taiwan and Singapore.
Batteries
Batteries are the most expensive part of a system like this. 48V LiFePo batteries are expensive. But when the sheer energy storage capacity of these things is taken into consideration, along with their life span, they actually are very cost effective.
What I ended up getting were EG4LL, 48V, 5,120 Wh capacity server rack style LiFePo batteries. These are “smart” batteries with built in battery management systems and both RS485 and CAN communications capability and fancy full color LCD screens. They have a 10 year warranty and it’s claimed that after 7,000 charge/discharge cycles they’ll still have 80% of their original capacity left.
A word about battery safety. You’ve probably heard all kinds of stories about lithium batteries exploding, starting unquenchable fires and all of that. These are not those types of batteries. These are lithium iron phosphate, LiFePo, and they use a different chemistry. They do not explode, do not turn into raging infernos, etc. And just for the extra paranoid people out there (like me), these particular model batteries have their own fire suppression systems built in. I saw a demonstration where they took one of these batteries, piled a bunch of flammable material on it and started the sucker on fire. After burning for a few minutes, the suppression system triggered and the battery put the fire out. Cool, I said. I’ll take those, please.
The LCD screens let you monitor all kinds of stuff that I’m sure will interest someone. The only thing I really care about is if they work or not, and they do. But if there are problems you can even monitor the state of health of individual cells in the battery if you need to. If you want to save a few bucks EG4 also sells batteries that have the same capacity as these, but without the fancy displays.
The batteries have communications ports which allows them to be connected to the EG4 inverter which directly monitors the battery conditions so it doesn’t over charge them, charge them too fast, discharge the too fast, etc. If you have more than one, one battery is set up as the “master” which connects to the inverter, and the other batteries comm ports are daisy chained to the master battery. There are DIP switches on the front of each battery that you need to set so the communications system can figure out which one is which. Don’t worry, it’s easy. The batteries come with a booklet that has a chart showing exactly how to set the switches.
The batteries come with short (very short) battery cables designed to to connect them to the busbars in a battery cabinet. If you aren’t going to use a battery cabinet you’re going to have to buy or make your own cables to connect them to your own busbars. If you need to go down that route you need to remember that the cables connecting multiple batteries to a busbar need to be the same length and gauge. If the cables aren’t matched in length and gauge it means they aren’t going to have the same resistance. You want the load on each individual battery to be as evenly distributed as possible. That’s why you need to use busbars rather than just daisy chaining the batteries together. It helps to distribute the load more evenly.
And if you’re going to make your own, go get yourself a decent hydraulic crimping tool! I do not recommend one of those cheap crimpers that you whack with a big hammer. I don’t trust those things. You risk damaging the cable, damaging the lug, and not making a very good connection inside of the lug. A decent hydraulic crimper will set you back about $100 or so, which seems like a lot. but if you’re making cables for a power system that’s costing $10,000 or more, do you really want to cheap out on a crimping tool and risk making bad connections?
If you haven’t had to buy heavy gauge copper wire recently you’re in for a shock. Two 10 foot pieces of 4 gauge copper battery cable costs about $170 off Amazon. And while it is very nice cable and it comes with a bag of copper connecting lugs that’s still a heck of a lot of money. That’s another reason to go with a battery rack like the one I got. That big steel box may cost $500 but making or buying cables to hook the individual batteries to a wall mounted busbar is going to cost you several hundred dollars by itself.
The EG4LL batteries sell for $1,750 each. I have three of then for a total cost of $5,250. You can save a few bucks by going with batteries that don’t have all of the bells and whistles that these do,. The cheapest 48V server rack style LiFepo batteries that I’ve seen for sale are are around $1,500, so you could save yourself about $250 per battery by doing some shopping around.
So the running total right now for the system is about $3,000 for the inverters and $5,250 for the batteries, a total of $8,250.
But we’re not done yet.
Miscellaneous stuff
To put together a system like this a lot of other misc. parts are needed, and perhaps also some specialty tools like that crimper I talked about. I strongly recommend you get a decent torque wrench to make sure all of those electrical connections are torqued to the proper specifications. You don’t want to end up having to ship an inverter or battery back to the manufacturer, at your cost, because you snapped off a bolt or stripped out the threads on a connector trying to hook something up.
You also need some test equipment like a decent voltmeter and an amp meter. If you don’t already have all of that, you need to add that cost into the total price. Test equipment isn’t expensive and if you’re fiddling around with electrical equipment you need to have it anyway.
Let’s talk battery cabinet. The one in that photo came from Signature Solar and cost me about $500. It’s big enough to hold 6 batteries, has the busbars to connect to the batteries already installed, and it’s built like a freaking tank. It’s made of heavy gauge steel with a locking door, and has heavy duty wheels that can handle the weight because it can hold something like a quarter of a ton of batteries. And as I said it can save you enough money in cables to pay for itself.
Feel free to make your own if you’re handy that way. Just make sure it has adequate ventilation (batteries do get warm under normal operation) and that it can be secured somehow to keep people from fiddling around with it.
There are some safety items you absolutely are going to need. First you need battery cutoff switches between the inverters and the batteries so you can kill power to the inverters quickly in case of an emergency. Look at the photo up there. The two small gray boxes under the first inverter are first a PV cutoff switch and to the right of that the battery cutoff/circuit breaker. I only just got those mounted when I took the photo so they aren’t hooked up yet. The batteries have their own circuit breakers and I have a PV cutoff already in the system that you can’t see in this photo so I don’t have these hooked up yet. The final wiring job will have a PV switch and battery breaker for both inverters.
A decent PV cutoff switch is about $90. The breaker is about $70. I got two of each in the package deal I bought from signature solar. Total cost about $320 if you have to buy them separately.
Oh, and did I mention your solar panels need to be grounded? Yeah, they do. Almost all solar panels, at least the ones I’ve seen, will already have holes, often marked with a special grounding symbol, on the frames. Generally you daisy chain a grounding wire to every panel, then that wire goes to a grounding rod near the panels.
I should add that I already had a lot of the stuff I needed like spare wire, connectors, conduit, etc. laying around because I’m an amateur radio person and I’m constantly tinkering with antennas and fun stuff like that so I already had ground wire, grounding rods and other misc. bits on the shelf.
Now we come to the house side of things. You somehow need to get the power produced by those inverters into your house’s electrical system.
First you need to run suitably sized wiring from the inverters to your service panel. The EG4 manual recommends 6 gauge wire which is going to be sufficient to carry the amperage the inverters can produce. In my case I used 6/2 (6 gauge wire, 1 hot, one neutral, and one ground). That stuff ain’t cheap either. It runs about $3.50 per foot here. That’s why ideally your inverters will be reasonably close to your service panel. Depending on regulations in your area that cable may need to be run through conduit. Even the relatively short run I had to make ended up costing me close to $300 in wire for that, not including the cost of the conduit.
Now I am going to give the usual disclaimer here about using a licensed electrician to make any modifications necessary to the service panel that feeds electricity to your house. In a lot of jurisdictions it may even be illegal for you to make any modifications to your house’s electrical service.
It’s Money Time
Bob the Electrician
So here’s the total cost of this whole house off grid (sort of) alternative energy system, not including solar panels. This number includes the two inverters, three batteries, all of the cables, connectors, switches, electrical wiring, etc. It includes the crimping tool, a cable cutter, torque wrench, wiring to the house panel, circuit breakers, screws, bolts, etc. Prices are rounded. It does not include the cost of Bob the electrician who makes sure I don’t blow things up and keeps the inspectors happy.
Inverter combo deal including 2 EG4 6500EX inverters, two battery breaker boxes, 2 PV disconnect switches and some misc. bits and pieces: $3,000.
Three EG4LL 48V server rack style batteries at $1,750 each: $5,250
Battery cabinet: $500
Equipment total from Signature Solar: $8750.
Shipping: $250
Taxes: $450
total: $9,450
Wait, we’re not quite done yet.
Now we need to add in the misc. costs for wire, cables, connectors, a few speciality tools I had to buy. I won’t itemize all of that. That all added up to about $2,500 rounded to the nearest hundred bucks. Wire is crazy expensive right now, a transfer switch that is eventually going to be hooked into the system set me back almost $500, some circuit breakers for the electrical panel, conduit, fittings. Oh, and lunch for Bob is in there somewhere too I think.
Grand total, not including solar panels: $11,950.
My original cost estimates for this project, minus solar panels, was around $12K to $13K so estimates were spot on.
Now let’s talk solar panels. Solar panel prices are currently sitting at a bit more than $1 to $1.50 per watt. And a system this size is going to need a lot of watts to charge the batteries in a reasonable amount of time even without trying to run your house off solar as well. It’s going to take quite a bit of solar power to keep this system fed. There are 15 KWh of batteries to keep charged plus one would want to get as much solar power as possible to feed through the inverters directly into the house to use solar power directly, not just charge batteries.
I only have my original 800W of solar out there right now, but I just got in 1,320W of solar panels last week and if the budget permits I’ll be adding another 1,320W by the end of June and I’ll have more than 3KW of solar sitting out there.
To make a long story a bit shorter, total cost for this whole project, including solar panels, is going to be right around $15K
Now let’s talk about taxes. There is a federal tax credit for up to 30% of the cost of alternative energy projects, including solar. I’m not exactly sure of all of the details because that’s what I pay my accountant for (Hi, Eric, how you doing? Recover from tax season yet?) Theoretically I could get up to $4,500 in federal tax credits. I doubt if I will. Considering what the tax system is like in the US I’ll be surprised if I get anything at all. But let’s say I do. That would bring the cost of this down to $10,500. Ooo, nice. Personally I think that getting a solar power system that can run my entire house for ten grand sounds like a pretty good deal.
Is it really worth it though? Even if I get the tax breaks that is a hell of a lot of money and a hell of a lot of work. I talked about pay back times and other factors involved before so I won’t go into that here. All I can say at this point is that only time will tell. If nothing else we’ll have a whole house emergency power system we can fall back on during a blackout even if we don’t save a lot of money on the utility bill.
Oh, and I just heard that all of the electric utilities in the state are pushing for yet another rate increase of anywhere from 4% to 8%. So there’s that. And I have friends in the electric utility industry and from what I hear from them we could be looking at wide spread rolling blackouts if we get above average temperatures, so there’s that too… Hmm, maybe this was a good idea after all.
Final Thoughts
A few things struck me as we were proceeding with this project.
First is the cost. $15K is a lot of money but if you think about for a moment, is it really all that much? We’re talking about a system that can handle all of the electrical needs of an entire modern household, at least part of the time, for less than the cost of a decent used car. If you can snag the 30% tax credit it makes it look even more attractive.
Second thing that struck me was how ridiculously easy it was to put this system in. If I’d had all of the parts and bits I needed right off the bat I could have installed this whole system in an afternoon and still have had time to go play with the neighbor’s dog before supper. The inverters have become so sophisticated these days that it’s almost a plug-n-play system. You don’t need separate solar charge controllers, separate AC battery chargers, separate battery management systems, etc. Everything is built right in. If you can read a manual, are qualified to do basic electrical wiring, have some basic tools and test equipment, etc. just about any reasonably intelligent person can set this up. Of course there are a lot of, if you’ll excuse the term, idiots out there. Some of them are on Youtube. Start scrounging around on Youtube sometime searching for solar power systems and you’ll see what I mean. And that’s why cities, towns and counties have to have building codes and inspectors and permitting processes.
The third thing that struck me was that I’ve been going on and on and on about this system for this long when I should be going on and on and on and on about biking, nature, photography, gardening, amateur radio and the other stuff I normally bore you with.
So that’s it. It’s time to get back to our regularly scheduled programming. I’ll keep you up to date about the system but unless something major happens it will be more of a sidenote than anything else while I get back to the more important things in life, like screwing around out in the gardens, bothering people on amateur radio, etc.
grouchyfarmer.com is now written by an actual real human being, not an AI! Now featuring actual genuine typos, mysspelngs, and much, much more!
So, on Monday, May 1, this is what it looked like outside my front door at 5 AM.
Yes, that’s snow. Nice weather we get here. This is why I haven’t been talking about gardening and bicycling and drone flying and putting up photos of pretty flowers and all that stuff. We had two or three days of summer like weather in March with temperatures in the 80s, and ever since then it’s been like this… cold, wet, cloudly, and now snow. Welcome to Wisconsin. Sigh… The weather has since gotten a bit better. It’s still been so cloudy with occasional rain that we’ve been making pretty much zero solar power. Again, sigh… Of course I shouldn’t complain. I have a friend who lives about 100 miles north of here in the upper peninsula of Michigan and over last week or so he got 52 inches of snow.
What I wanted to talk about is that someone asked why I need two inverters bolted to the wall and not just one. Just one of those inverters can supply 6.5 KW of power, as much as my big Generac gasoline generator, and enough to run almost the entire house as long as we’re careful. So why do I need two of them?
Partly it’s a question of capacity. 6.5 KW is a bit close to the edge for us, so to speak, at least as far as normal daily life is concerned. We may complain about our electric bill but we do like appliances like our coffee makers, our convection oven, etc. With just one inverter there would be times we would be pushing over that 6.5 KW limit. Two inverters give us a comfortable cushion.
The biggest reason though is that we also need 240V power to run some of the appliances in the house. For that we need both inverters. Initially I’m not going to be hooking any 240 appliances into this system because I don’t have eno0ugh batteries and solar panels to handle it, but eventually that’s going to change so I wanted a system that could be switched over easily in the future.
WTF is 240V split phase?
The average person doesn’t know, and doesn’t need to know, what actually goes on in the electrical system of the house. As long as your toaster or computer or TV works when it’s plugged into the wall and the lights turn on when the switch is flipped, that’s all they care about. And for most people that’s fine. But if you want to switch your home to an alternative energy system you need to know what’s going on behind the scenes.
While most of the systems in your house run on 120 VAC, in all likelihood there are some that require more power than a normal 120V line can supply. Things like electric water heaters, clothes dryers, electric stoves, well pumps, etc. will often run on 240V, not 120. The amount of power these appliances require would overload the normal 120V wiring systems in the house. So let me explain what’s going on without this getting complicated.
Well it’s going to get complicated anyway but let’s see what I can do.
What you have coming into your house is two, 120V AC power lines, not one. The two lines can be combined inside your circuit breaker panel to give you 240V to power more power hungry appliances like HVAC systems and clothes dryers.
If you took the front panel off of the main circuit breaker panel in your house it would looks something like the one in the photo below.
Now you’ll notice a couple of things right away if you look at that photo up there carefully. Note that there are two rows of circuit breakers, not one. There is a reason for that and I’ll come to that in a minute.
The next thing I want you to look at is right at the top center of that picture. You’ll see three thick wires coming in from the top. One is black, the 2nd is marked with red tape, and the third runs off to the right of center and is marked with white. Those three lines are what comes in from the service panel attached to the outside of your house and which, in turn, is fed from the utility company. The black wire and the red are the two 120V lines coming into the house and the white is the neutral line.
In your panel are two metal strips called busbars that the two hot wires (sometimes called legs because why not) connect to. Each busbar runs the length of the panel. The circuit breakers in the panel connect to those busbars to get the power that they then send out to the wires that lead to the outlets, lights, etc. in your house.
The circuit breakers on the left side of the panel get their power from L1, and the ones on the right get their power from L2.. Each busbar provides 120V.
So how do you get the 240V? Look at the top of the right row of breakers and you’ll see what looks like two breakers that are joined into one by a bar that connects the two switches together. That’s a 240V breaker.
Well, sort of. It doesn’t actually give you 240V. What it does is tap into both of the busbars at the same times, and lets you run two, 120V hot wires to whatever device that breaker breaker powers. The appliance that circuit energizes can combine both to provide 240V or use the individual 120V lines to power individual circuits in the appliance.
So if you want to design an alternative power system to run your whole house through your existing electrical system, you need a system that provides 120V to both L1 and L2, a 240 split phase system as they call it. And no, I can’t just feed 120V from a single source into both busbars at the same time because L1 and L2 are 180 degrees out of phase with one another and that is important. Or so they tell me.
Okay, so what’s with this phase stuff? Well it gets even more complicated and there is a hell of a lot of misinformation out there about what’s generally called “240V split phase”. There are people out there who will try to tell you that you need 240V split phase to power two phase motors, only there really aren’t any two phase motors out there and there haven’t been in many, many years. Or they’ll tell you you need split phase for electronics which is total BS because almost all modern electronics run off DC not AC…
Okay, look, the reason you have split phase coming into your home… Oh, hell, let’s look at what they’re talking about first of all.
AC stands for alternating current, and it’s called that because it, well, alternates. It doesn’t provide a steady positive voltage the way DC does. It alternates from plus to minus at 60 cycles per second. If you were to hook an oscilloscope up to an AC power line what you’d see on the screen is something like what you see in the picture over there on the left.
If you could look at both L1 and L2 at the same time on an oscilloscope it would look something like the picture over there on the right. The two are 180 degrees out of phase.
Why do we even use this system? It would take me pages and pages to explain all of that so I’ll leave it to you to go scurry over to Wikipedia or somewhere and find out for yourself.
So you have two, 120V lines coming in your house and they are 180 degrees out of phase with one another. Sort of. Kinda. And that’s important for, well, reasons, all right? And the two lines can be combined to give you 240V to power bigger appliances. Or not.
Are you confused yet? I am.
But let’s get back to my setup here. Each of the inverters will supply 1 of the two hot lines needed to get 240. And the two inverters “talk” to each other over a communications line so their sine waves are 180 degrees out of phase when in the split phase mode. Which is important for, well, for reasons. Or so they tell me. That’s what we’re stuck with.
But at the moment I don’t want to run any of my 240V appliances off this system. First of all that equipment sucks up huge amounts of power which would drain my batteries fast. The second issue is that my central air conditioning system quite possibly would require more amperage than my batteries can supply. EG4 recommends having at least 5 batteries in order to supply enough amperage to start up a big HVAC system like mine and I only have 3 at the moment.
To make a long story a bit shorter, I have two inverters because I’ll probably almost certainly need a system that can provide more load capacity than a single inverter would give me, and I eventually may want to expand the system to get 240V if I ever get enough batteries and solar panels up to support it.
But I’ve bored you long enough with this. let’s get on with it…
Catching up
One of the things I ordered for this system was a battery cabinet to hold the batteries that has its own built in busbar system for connecting the batteries, and which is also lockable to keep people from fiddling with things they shouldn’t. That was on backorder and I got an email from Signature Solar telling me I could either wait, or they could ship me a slightly different model cabinet. Like everyone else they’re still having supply chain issues. I told them I’d take the different model and that should be here Monday. I jury rigged things together so I could test the inverters and charge the batteries but it can’t stay that way. Once the cabinet arrives I can get the batteries properly configured and start putting everything together.
I have more solar panels on order because my 800 watts of solar is woefully inadequate to keep 15 KWh of batteries charged. Those are supposed to be coming May 15 so I’ll need to build frames to hold all of those.
Gardening Stuff
The weather hasn’t been very good but we’ve managed to get some work done out in the gardens. Once things warm up and the skies clear up we’re going to be really busy. We’re taking out a crumbling stone wall and replacing that, moving two of the raised beds to a new location and a bunch of other stuff going out there. MrsGF has had her indoor greenhouse going down in the basement for weeks already starting plants that will get transplanted outdoors as soon as the weather permits.
Artsy/craftsy stuff
The brewery called me the other day, asking if I’d make more drinks coasters for them. A couple of good friends opened a brewpub, something they’d dreamed of doing for years. So they bought a building with an existing tavern that had enough room for them to put in their brewery and then… Then Covid hit. And somehow they still managed to pull it off and even managed to pay the bills during that whole mess. And now they’re doing pretty well.
Anyway a while back I found some super cheap plain drinks coasters made from wood and some from paperboard and for the heck of it I fired up Photoshop and made some graphics, putting their logo on one side and an allegedly humorous illustration on the other and then used the laser engraver to burn it into the coasters. i thought they looked a bit on the unprofessional side but they were fun to do so I did a few. I never thought they’d actually use them in the bar. But they did, and apparently the customers loved them. And stole them. Which was okay because it’s good PR for the brewery. So I’ve done dozens, maybe a couple of hundred of these things over the last couple of years and I just got a request for more so I got that going on. People are easily amused, I guess.
But enough of this. I need to get going here. I’ve probably put you to sleep already with all of this. I know I’ve nodded off a couple of times myself…
This is what I woke up to the other morning. Sigh… It’s March. It should be getting warmer out. Instead we get this???
The weather here in Wisconsin can get interesting, to say the least. Mostly it’s fairly pleasant up here, but sometimes things get weird. Like blizzards in May. Or the Great Frog Storm of 1956. (That one was scary.) This winter has been remarkably mild with very little snow. Well very little snow until now. I think we got more snow in the first 2 weeks in March than we did during the rest of the winter combined. Now we’re under a storm warning for tomorrow and could get another 5 – 8 inches of snow. Sigh…
But let’s get on with this. I’m sure you have better things to do than listen to me rambling along. I know I do. (Looks at calendar… Well no, it seems I don’t have better things to do. Never mind.)
I thought I was done talking about solar and power systems and all of that for a while. I should have known better because here we go again. That transfer switch I was talking about last time is now installed and working. The kit had everything necessary and installing it is pretty simple. It took maybe an hour to install the whole thing. (Do I really need to include the disclaimer telling you not to go fiddling around with your house’s electrical service because you can get killed if you don’t know what you’re doing?)
Circuit tracers aren’t hugely expensive, this is the one I have and it sells for about $50. If you have kids they make great circuit tracers. “DAD! What did you do??? The Playstation shut down and I didn’t save my game!!!”
It took some time to track down what breakers powered what. A variety of electricians have been in that panel fiddling with things in the years we’ve lived here and not all of them were careful about labeling what they hooked to what, it seems. I was upset by that because these guys are supposed to be professionals. You don’t just shove a new breaker into a panel, hook it to something and leave it unlabeled. Or, even worse, change an existing circuit and then not note down what was changed. I ended up spending a good hour with a circuit tracer running around the house testing outlets and lights before I could even start installing the transfer switch. Fortunately only two or three were mislabeled but that was still concerning. I got out my little label making thingie to make nice, neat labels, only to find my label making thingie didn’t work. (Yeah, it’s been one of those weeks so far. The label maker, the mislabeled circuits, a crimping tool designed to crimp MP4 connectors doesn’t actually crimp things…)
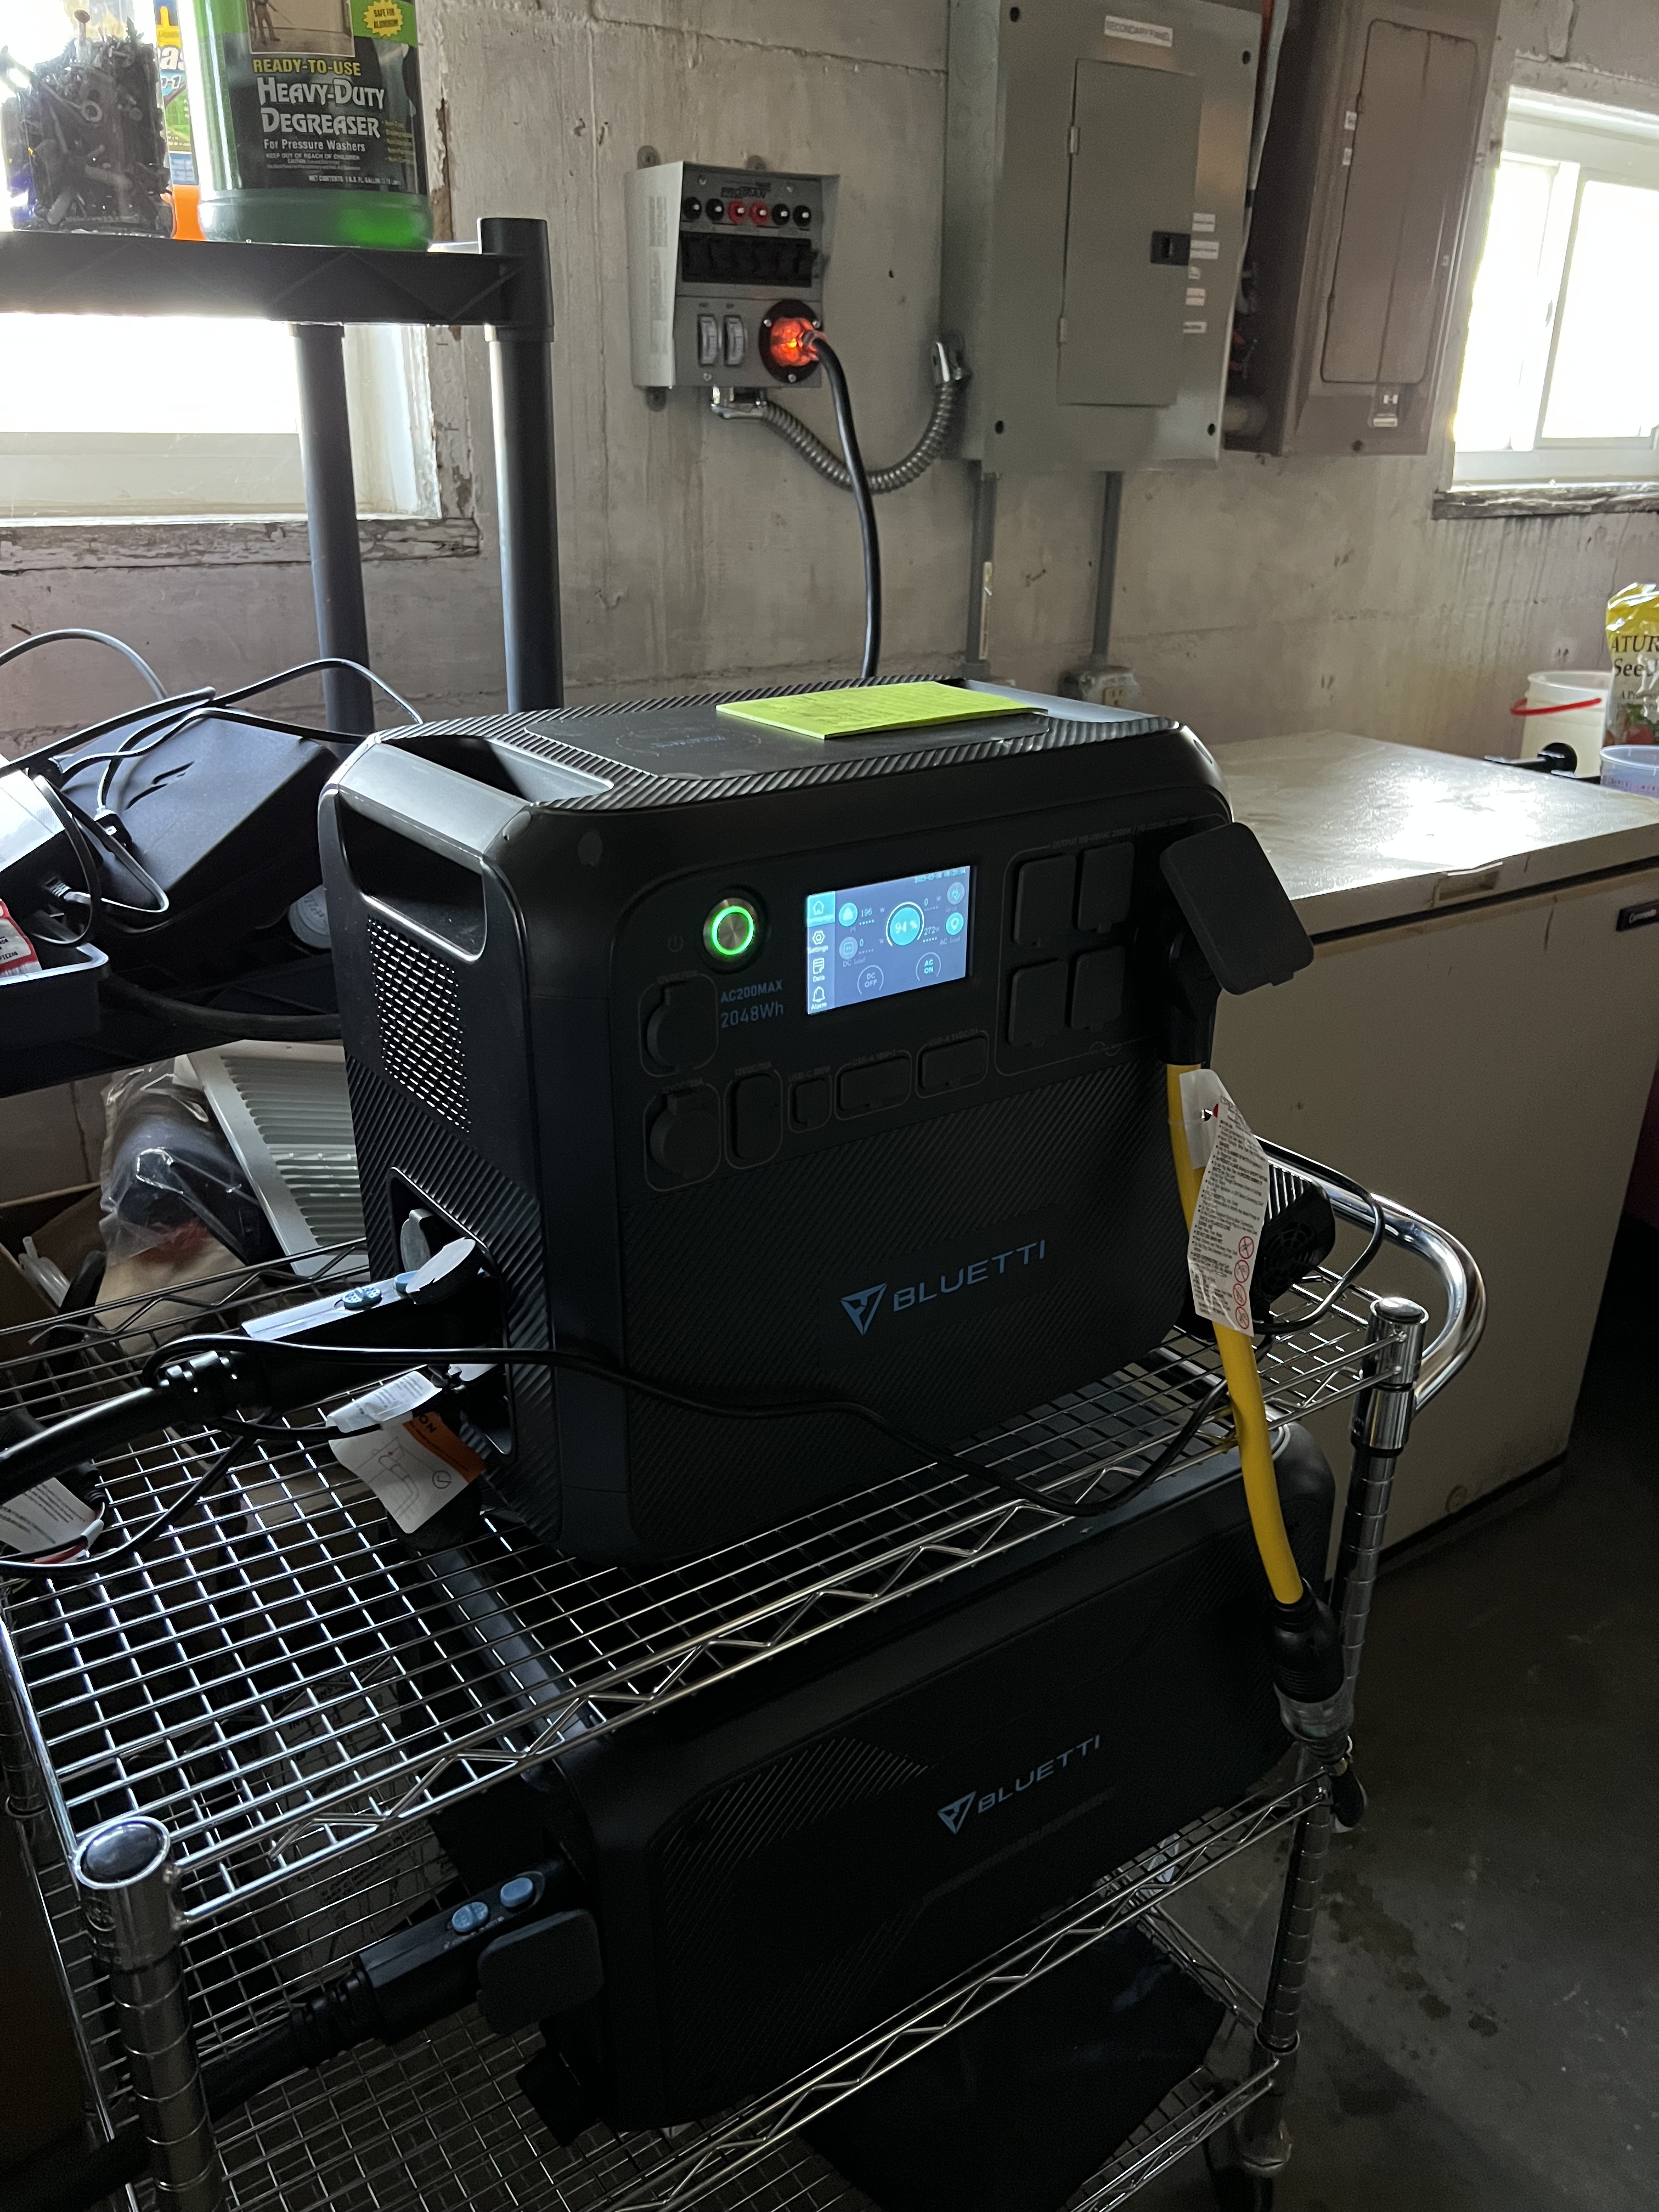
With the transfer switch set up I can change between grid power and the Blutetti with just the flip of a switch. And the transfer switch doesn’t care where it gets power from so I can plug in either the Bluetti or our big Generac gas powered generator.
Planning and Research Problems
If you’ve been following this discussion that started with the Bluetti solar generator thing you know MrsGF and I have decided to put in a relatively large solar power system that can handle much of our electrical needs. We aren’t going “off grid” as they call it because with the weather we get here in Wisconsin it would be difficult, even impossible, to rely on solar for all of our electrical needs. But we could make a significant dent in our electric bill if we manage to pull this off.
But there are problems.
Now we could do something like look at some of the “plug ‘n play” systems from Bluetti, Ecoflow, Generac and others but all of those have serious issues. When it comes to the solar generator people like Bluetti and Ecoflow, the problem is that while they have some pretty nice systems that are fairly easy to install that can handle almost the whole house, you’re locked into those companies for the entire lifetime of the system. You can only use their batteries, their accessories, their adaptors, etc. If something goes wrong with the system the only thing you can do is pack the whole thing up and ship it back to the company which will, maybe, you hope, fix it and maybe, you hope, actually ship it back to you and that it will actually work when it arrives. And that will take weeks at least, maybe even months. And during that time your entire solar energy system is shut down. And let’s be honest, all of the systems from those companies are breathtakingly overpriced when you look at what you actually get for your money.
There are problems with the big brand names like Generac and Tesla as well. Once again you’re at the mercy of a single vendor for all of your equipment. You might be lucky and be in an area that is served by an installer/dealer who can help you when something goes wrong, and something will go wrong eventually, but even so you’re still tied to a single vendor for everything. And even worse, the systems from these companies are eye wateringly expensive for what you get.
And then there are the problems with almost all of the commercial “solar contractors” out there.
If your goal is to gain some independence from the grid you aren’t going to get it from most of the commercial solar contractors out there. What most of them are selling are systems intended to generate power that is sold directly back to the utility, not to make you independent from the grid. They have little, if any, battery backup capability. And with a system like that you are entirely at the mercy of the utility company. They could decide tomorrow to change the rates, add in bogus “connection fees”, even shut you down entirely.
So if you want a system that gives you some independence from the grid, that doesn’t lock you into a single vendor who could very well disappear tomorrow, want to do it as economically as possible, and want a system that is relatively easy to repair when things go wrong, you’re pretty much stuck with trying to build it yourself.
Which brings me to…
The Great Solar System Build
Oh, brother, talk about hyperbole. Sheesh…
Over the next few weeks (or months, because I’m not only lazy I am also a procrastinator of the first order) I’m going to document in excruciating and incredibly boring detail our efforts to build a reasonably large home solar power system from the ground up, complete with system specifications and why we chose those specifications, the search for equipment, dealing with various vendors, issues with wiring and building codes, etc, etc, etc.
For those of you who find this kind of thing eye wateringly boring, well, you have my sympathy. So posts about the solar system will be prominently labeled with a GSSB tag in the title so you can skip those parts and just drop in to look at photos or read the other nonsense I babble about here.
So far so good, but there have been some curious issues so I thought I’d throw this out there quick.
I was looking at the thing sitting there the other day and I said to myself, Self, it’s kind of silly having that $2,000 box sitting there doing nothing possibly for months waiting for a power failure. You should do something with it.
So I did. I took my entire radioshack/office/mad scientist lab off-grid with it. Well, sort of off-grid. My solar panels haven’t arrived yet so I still have to charge the AC200MAX off the grid but I wanted to see if it would work, and yes, it did. Quite well, with a couple of glitches.
Making the switch over was simple because all of my sensitive electronics are all plugged into UPS systems that include meters that tell me many things about the power coming into them, brown out protection, surge protection, etc. (I very strongly urge people to always, always keep their electronic equipment plugged into one of these instead of plugging directly into the mains. I lost a very expensive gaming computer due to multiple brownouts/power surges during a storm a couple of years ago. These things aren’t cheap but they can keep you from losing thousands of dollars of equipment.)
So I unplugged the UPSs from the wall and plugged them into the Bluetti and, well, everything just worked just fine.
Then I noticed that the meter on one of the UPSs was showing the voltage coming out of the Bluetti was shifting +- 2 volts, about 118 VAC to 120VAC. That was curious.
Something odd going on with the inverter in the AC200? Bad plug on it maybe?
I switched the flickering UPS to a different plug on the Bluetti. Did the same thing. I plugged it into the wall outlet. It showed a stead 119V.
Hmmm…
I got out my meters and started checking things. My Fluke definitely showed that the AC coming out of the Bluetti was shifting +- 2 volts.
Now I should point out that a volt or two fluctuation in the current coming into my house from the grid happens rather often. In fact the electrical service coming into the house can go from a high 0f 122V to a low of 110V during the day.
That bothered me, though. I put the scope on the Bluetti and it showed the AC coming out was at a virtually perfect 60 Hertz sine wave, so that was okay.
I shut everything down. I started up the Bluetti again and the voltage fluctuation was still there. I did a ‘restore to factory defaults’ on the device and restarted it and tried it again. The fluctuation was still there.
And then later it just went away. I ran my entire office/lab/radioshack off it for two days, and the power fluctuations just went away. Why? No idea. Did it just need to, oh, stabilize somehow, to ‘burn in’? No idea. All I know is that all day yesterday the voltage coming out of the Buetti was an almost perfect 119V.
Then there was the light issue. I replaced the overhead fluorescent lights in there with LED versions a year or two ago. They give better light and use a fraction of the energy. I plugged one of those into the Bluetti and it flickered rapidly. Sigh…
I got out the meter again and expected to see the voltage fluctuation had gotten worse, but the meters were showing a solid 119V. I put the scope on it again. A perfect sine wave. Okay, now what was going on?
I plugged in a different LED light. That one worked perfectly. I scrounged up several more LED lights. All of them worked fine. Only my overhead tube lights flickered. As far as I can tell the problem is only with that specific light and no others.
Okay….
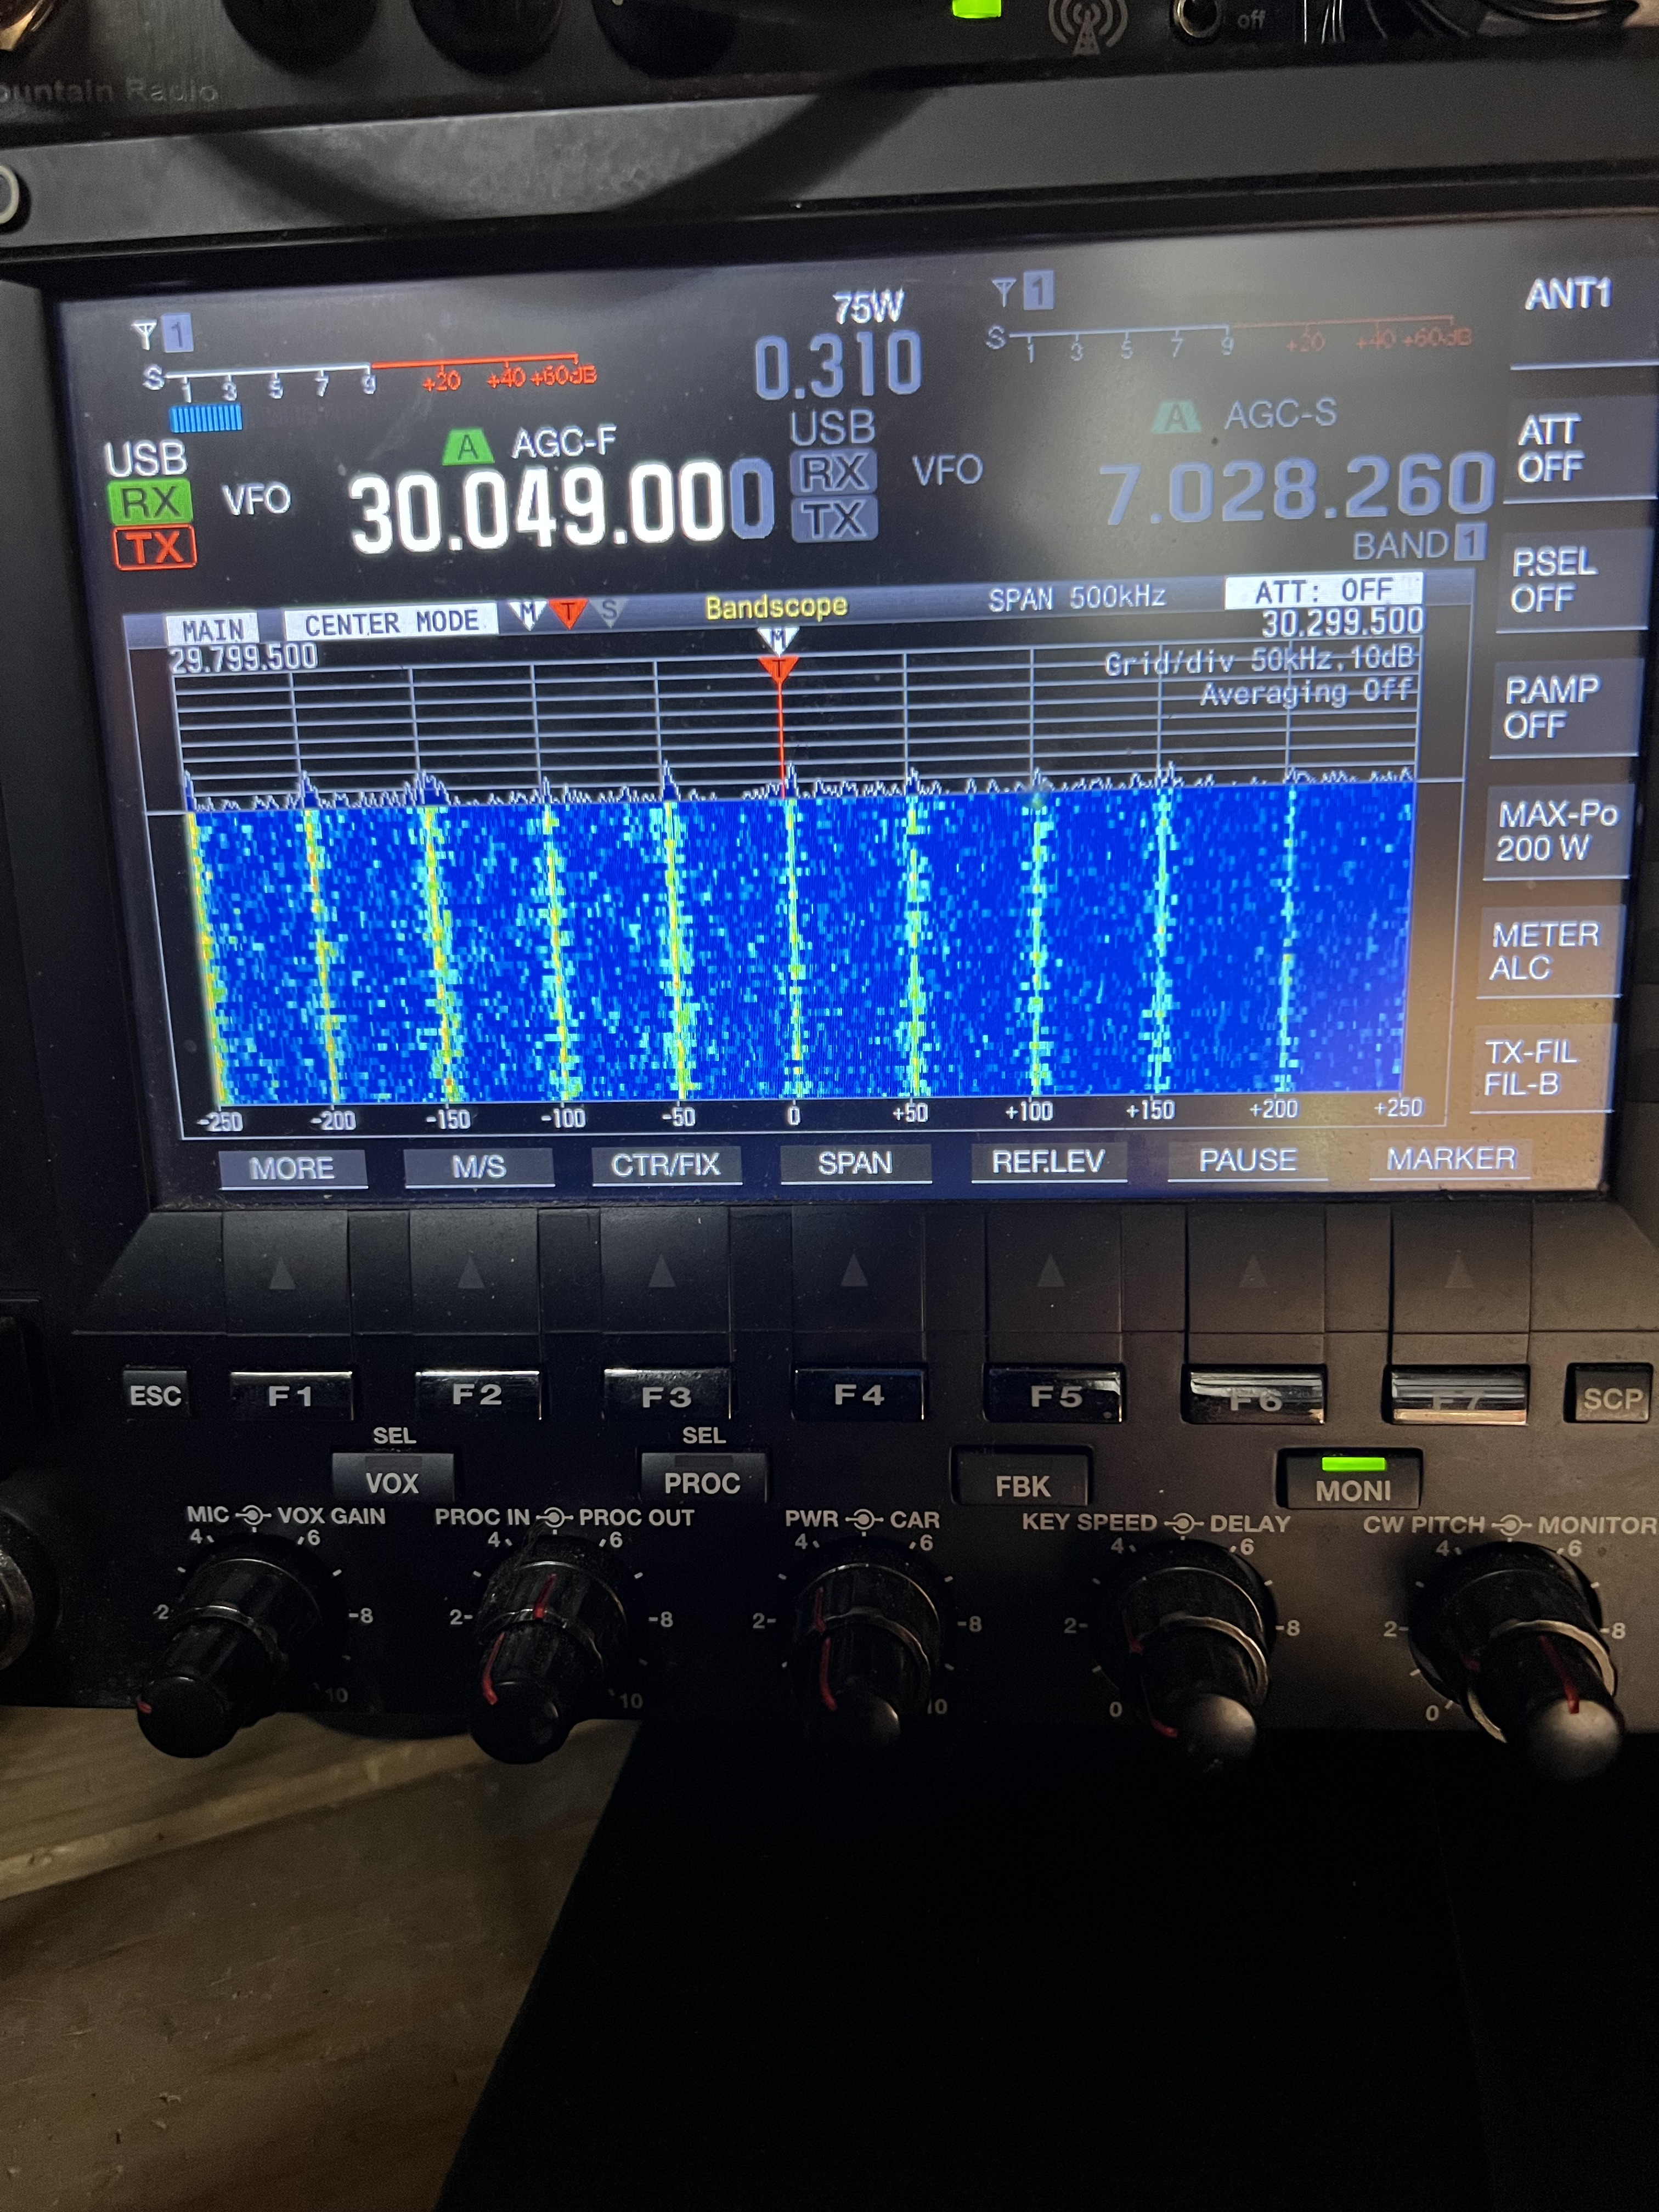
Now let’s talk about radio. I’m an amateur radio operator as you probably know if you’ve been reading this blog for a while. Solar power systems and these battery inverters can be troublesome when it comes to causing RFI (radio frequency interference). So I was anticipating some problems, and I found them. This is what the scope on my Kenwood TS-990 shows when I’m running it off the Bluetti.
See those vertical lines? Those are not supposed to be there. They represent spikes of radio interference that appear at regular intervals throughout almost the entire HF range.
Now if you’re an amateur radio operator and that image up there just sent you into a panic, it isn’t as bad as it looks. At least not in my particular case. Yes, those spikes are nasty, but with my particular AP200Max none of those spikes appear in any of the amateur radio bands. Whether that will be the case with other units I don’t know. But in my case the situation is tolerable.
There is some more or less generic RFI coming off the thing that seems, in my case anyway, to be concentrated on 40 meters. 30M was completely clear, no RFI at all. 20M was decent, 17, 15, 12, 10 meters were all good. On 40 there was some significant RFI but not enough to prevent me from operating. And engaging the noise blanker on the transceiver knocked a lot of that out.
What the RFI situation will be like once I hook in the solar panels, well, we’ll just have to wait and see. But if necessary I could run my whole radioshack off the Bluetti with very few problems.
I did send a complaint in to Bluetti describing the issues I had with the light flickering, the voltage fluctuations and the RFI issues, including that photo up there showing the RFI problem. I got a canned response back that they would respond within 48 hours, so we’ll see.
Overall the test running my office/radioshack was successful. I discovered that I actually use surprisingly little energy in there. Typically less than 300W, which rather surprised me because that’s including a gaming laptop, two monitors, the Kenwood TS-990, big stereo speakers and a few other goodies. I didn’t try running larger loads like my soldering equipment, the 3D printer or the laser engraver. And, of course, when actually transmitting with the TS-990 the wattage went up considerably.
Coming Up
I have 4, 100W solar panels coming that should be here by the end of the month. I picked the cheapest ones I could find and I’m not expecting much out of them, but it should be enough to be able to test charging the Bluetti off solar. Well, if we ever get sunlight, that is. My eventual goal is to get semi-permanent solar panels up on the garage roof, as much of it as I can afford and fit up there. The roof faces straight south and it is already at nearly the perfect angle, and that location should provide me with solar through almost the entire day now that the trees around the garage are gone. I’d like to get at least 800 – 1,200 watts of solar up there this year.
The other thing I did was buy one of the expansion batteries for the AC200Max, the 3,000Wh one. That should be here by the end of the month as well That will push the capacity of the system to up over 5,000 watt hours. So watch for a review of that in the near future.