Yeah, that title is probably a lie. I’ll probably talk more about it in the future as I gain experience with this. I’ll certainly let you know if I run into problems. And you’re probably getting tired of reading about as I am of writing about it so let me wrap this all up.
The good news is that the damned thing actually works. I got tired of waiting for some miscellaneous parts to arrive to do the final installation and cobbled together a messy looking but safe wiring configuration so I could get on with testing the inverters. That may look like a mess down there, but it is, frankly, a lot better looking than some of the wiring I’ve seen people turn out on Youtube and other places.
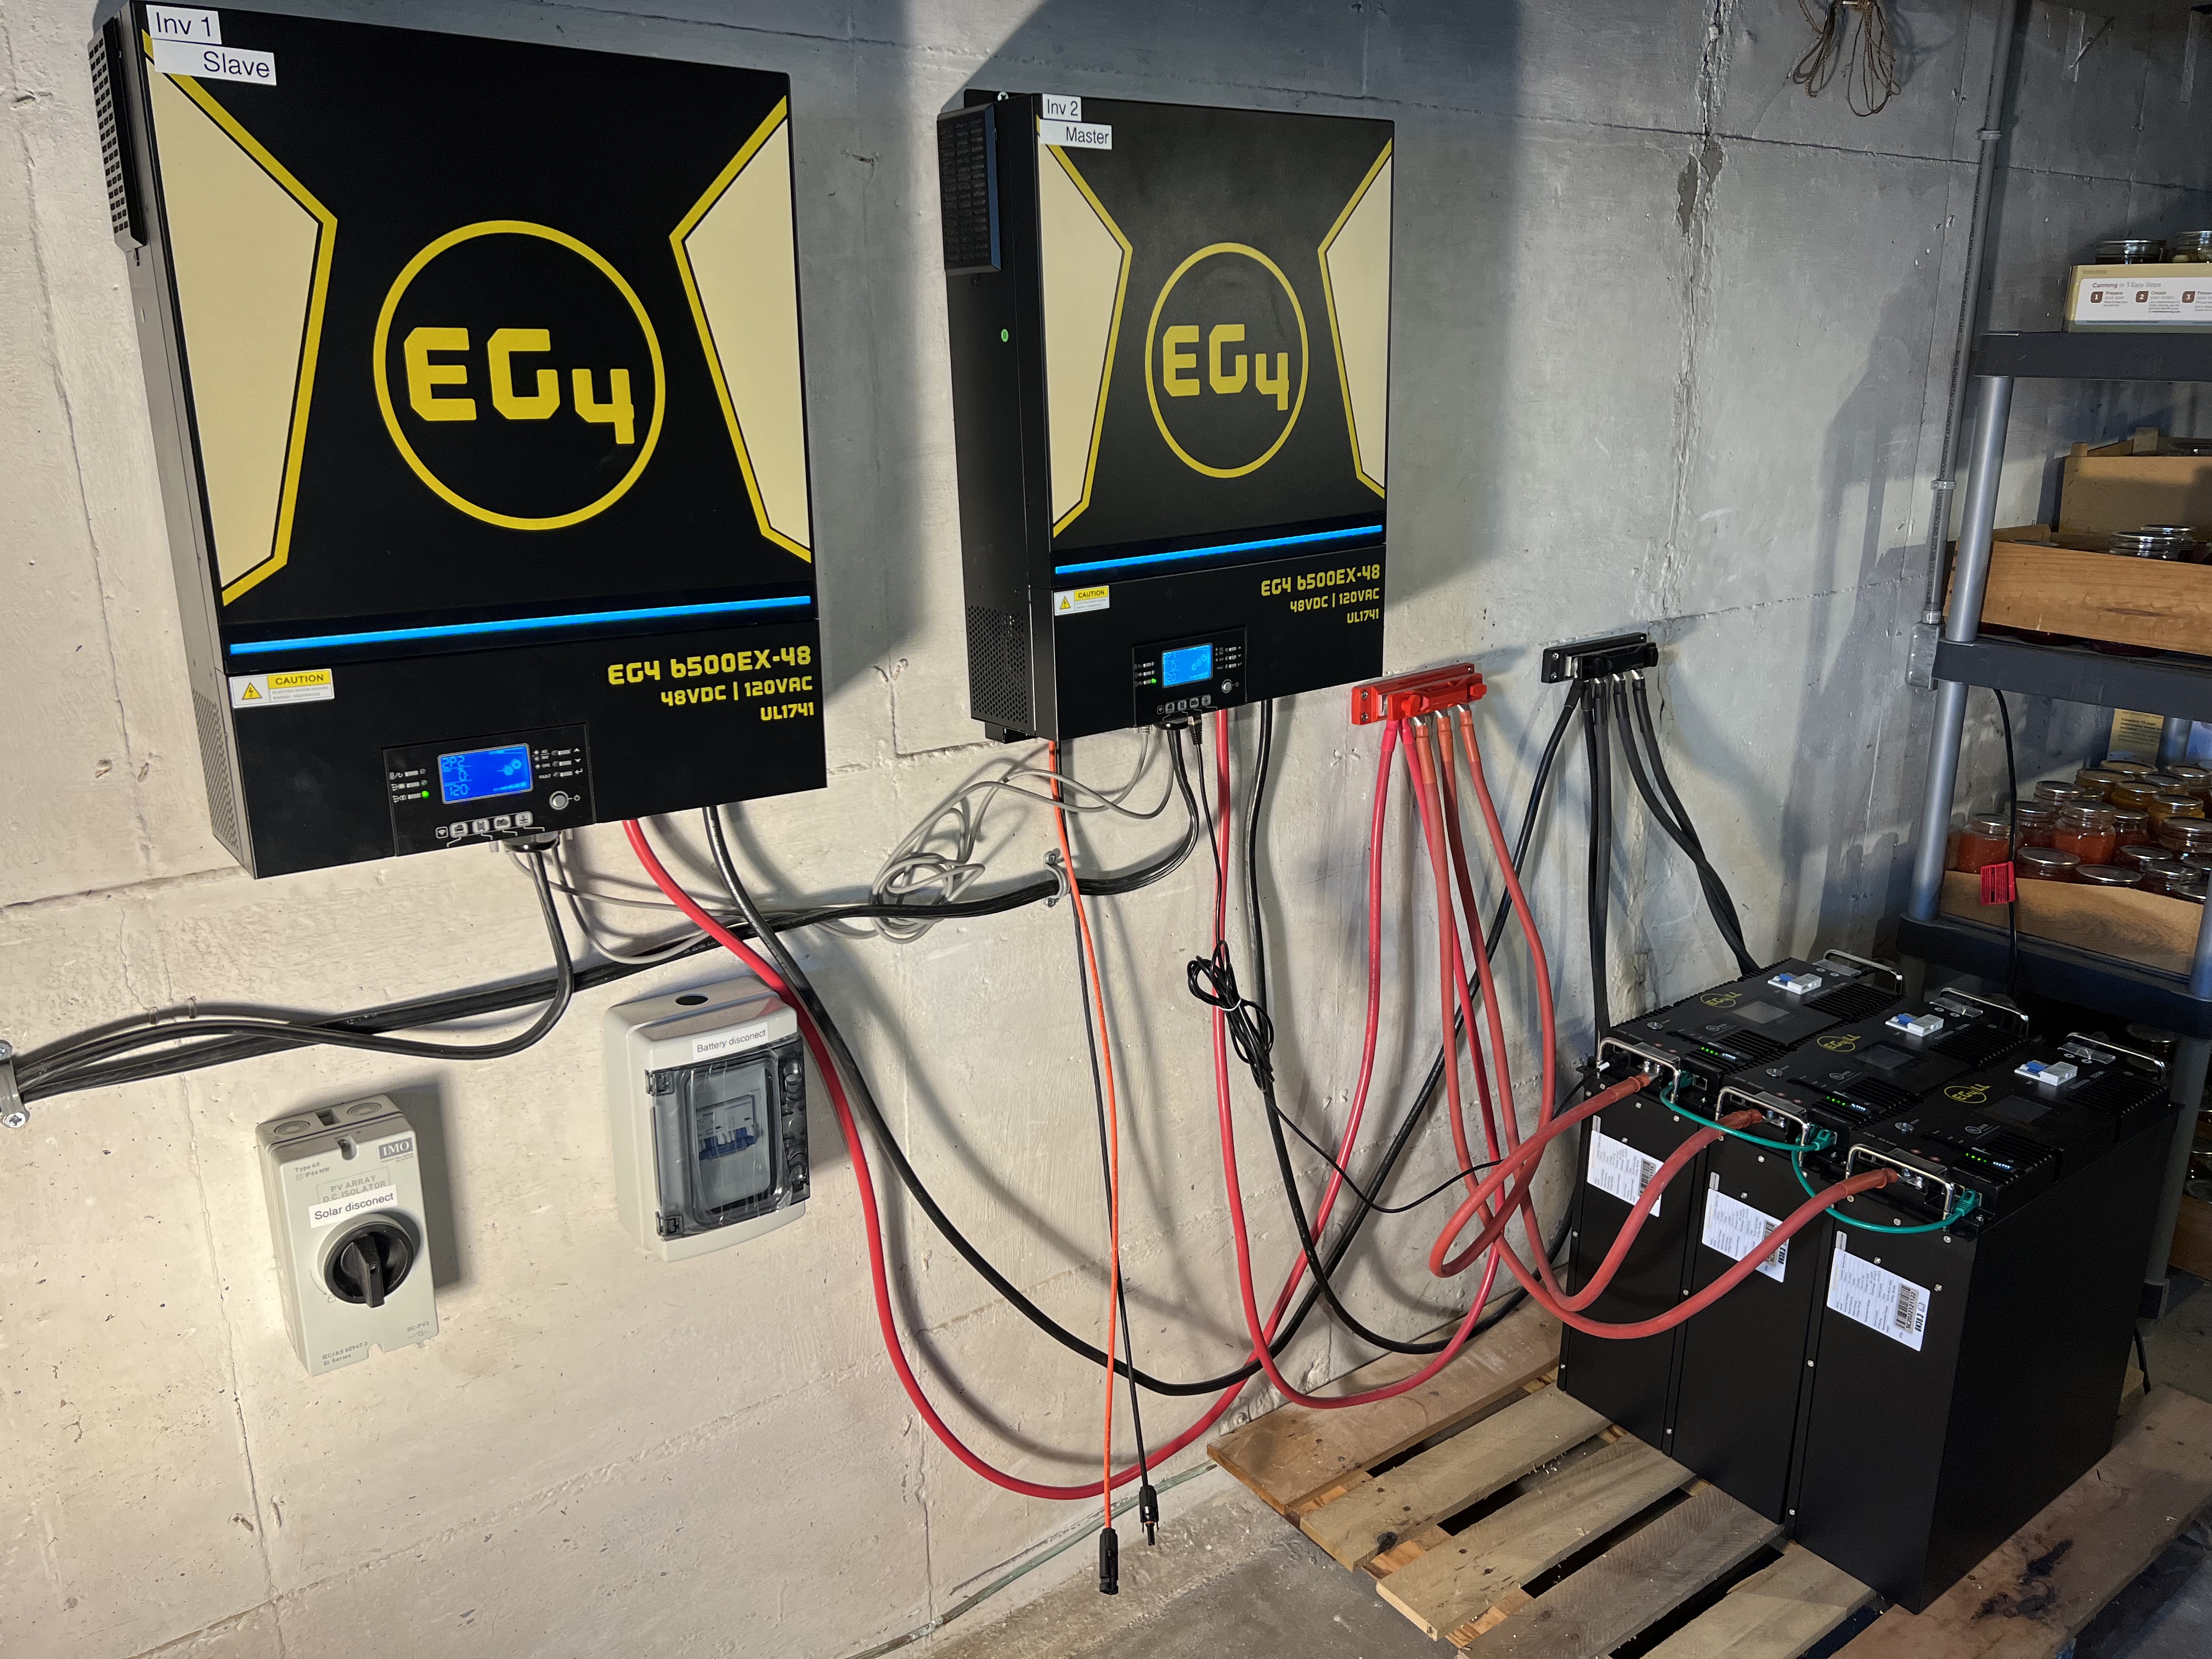
But it is a mess that works and, believe it or not, is safe. And the battery cabinet is here now so today this whole thing is going to get torn down and put back together the right way and will meet building codes, etc.
I fired the sucker up. I went through the “commissioning” procedures in the manuals to set the two inverters up to run in 240V split phase, rebooted everything and it all started up and, well, damn. It actually worked! I had the entire house was running off-grid, running from the inverters, batteries and solar panels. Everything in the house was working just as it did running off the grid. Lights, microwave, coffee maker, even the 240V appliances like the stove and clothes dryer. Just for the heck of it I fired up my big table saw in the wood shop. The lights flickered a bit when it first kicked in, but they do that even when I’m running off grid power. End result is I ran the house for the rest of the afternoon off the two inverters with no problems at all before shutting it down and pulling the plug, so to speak, so I could start prepping to put in the battery cabinet.
So, it works! I actually put together something that works? Wow…
So for those of you who are interested in all the technical stuff and some observations about the equipment, let me get on with us. Some of this I’ve mentioned before but I want to make sure I covered everything for those of you who are interested in putting together a solar power system yourselves. And yes, I’m going to include the actual retail cost of all of this as well along the way. So so be warned this could get long.
So let’s start with the inverters.
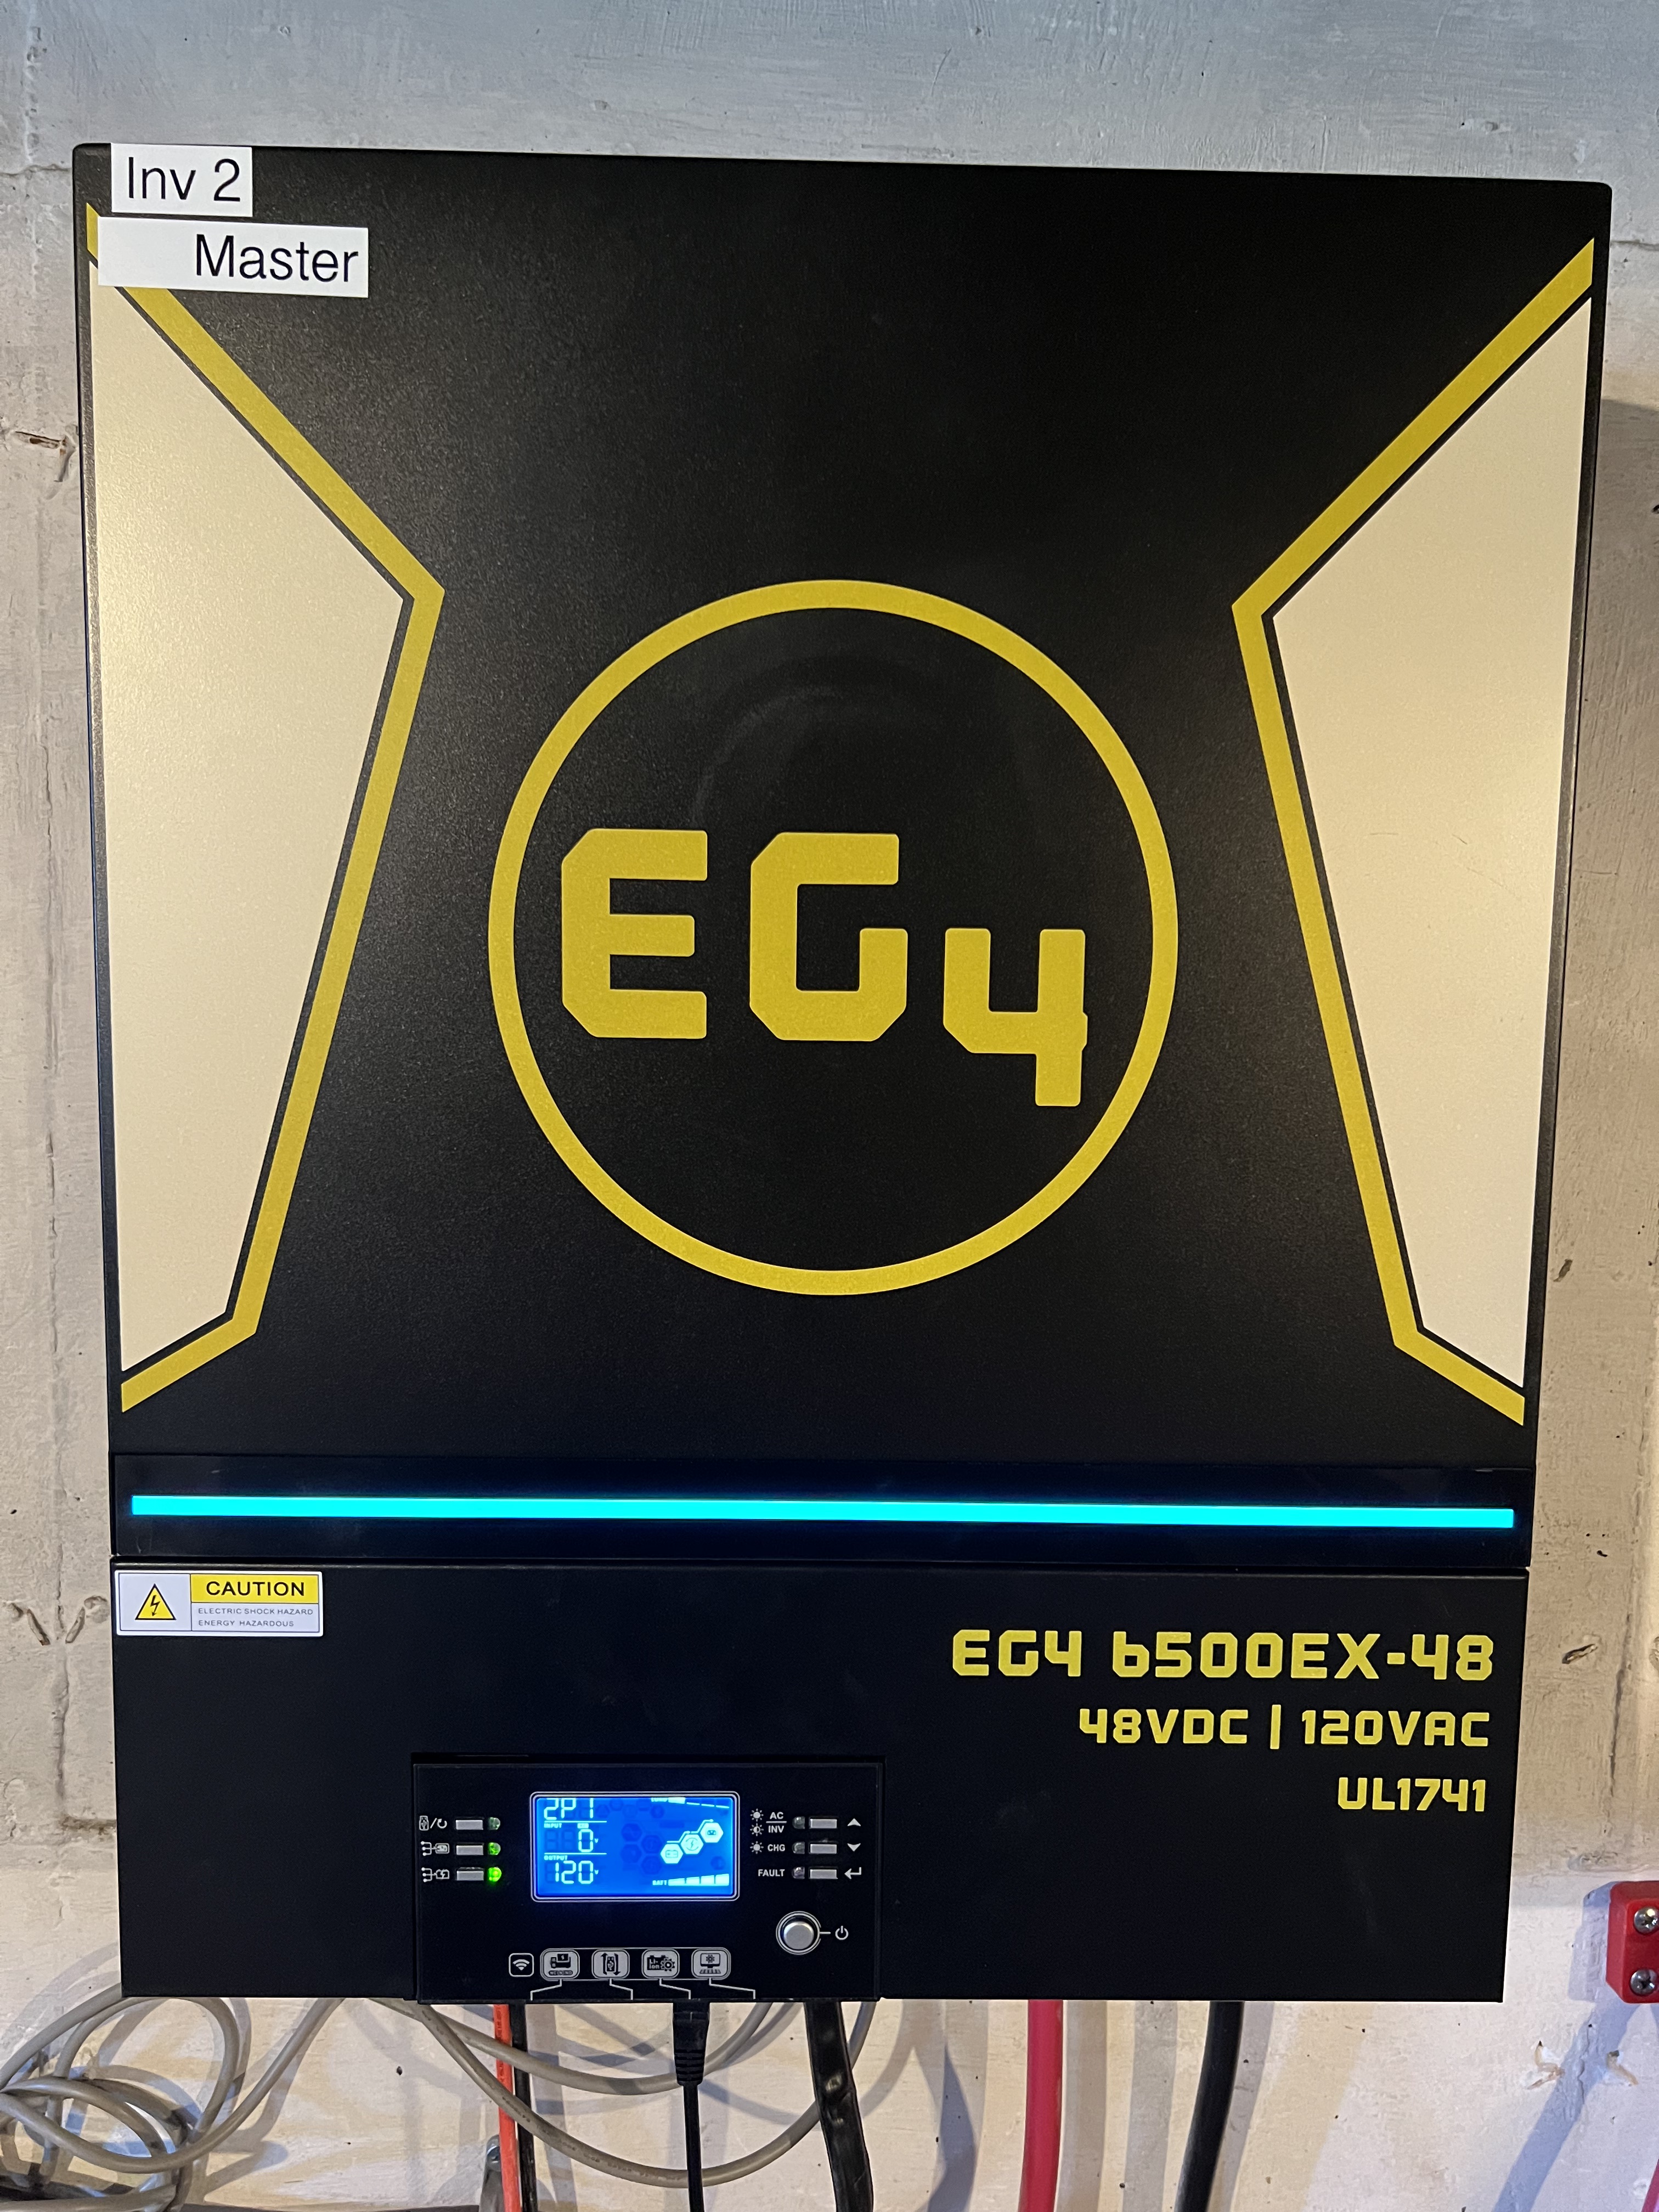
What I have are two EG4 6500EX all in one inverters. Each one can handle a sustained load of 6,500 watts with a surge capacity of 13,000W for up to 5 seconds. When some equipment (like my table saw or sump pumps) first start up they can demand huge amounts of power for a brief time, so that’s why that surge capacity is important. Both of them together give me 13KW load capacity, more than enough to run the entire house.
Each inverter has two MPPT solar charge controllers. Each of the two chargers can handle up to 4,000 watts of solar panels at 80 to 500 volts. And I can tell you that they absolutely have to have at least that 80V before they’ll start charging the batteries. Anyway that’s some pretty hefty solar charging capacity. If I’d max out the capacity of both inverters I could feed about 16KW of solar power into these things.
If the inverter is connected to grid power it can charge the batteries off the grid, or off solar, or off both, or prioritize one source over another. And I’m told these things, if hooked to the grid, will pass through grid power to your house, and switch to battery/solar power in case of a blackout, and do it in 10 ms. I don’t have mine hooked to the grid and don’t plan to so I’m not going to be able to test that.
The battery chargers, both solar powered and grid powered, can be configured to deal with just about any kind of 48V battery system you might have, ranging from old fashioned lead acid batteries up to state of the art LiFePo batteries like the EG4LLs I have. You can set maximum and minimum voltages, rate of charge, you name it. In my case I just told it I was using EG4LL batteries and it automatically sets itself up properly. It also has battery communications as well to talk to the battery management systems most LiFePo batteries have these days. And I should add that the inverters are UL listed as well so they should be able to pass inspection.
And, of course, two of these units can be paralleled together so that when combined they work as a single 240V split phase system, which is how I have mine configured at the moment. One inverter is set as the master and the other as the slave, and a setting in the menu has to be changed to make sure that the slave’s sine wave is 180 degrees out of phase with the other inverter. That took maybe all of a minute to configure.
And if the 13KW that two of these together make isn’t enough for you, you can connect up to six of the things if you need more power.
There are lots more options and settings and other things that I’m not going to get into because it would take forever and I don’t really care about a lot of them. If you’re interested in all of that you can download the manual from Signature Solar.
So, let’s talk cost. Personally I think that considering the capacity of these inverters and the things they can do they’re pretty inexpensive, $1,299 each. Since I wanted 240V I needed two of them. Signature Solar had a combo deal that included two EG 6500EX inverters, two PV cutoff switches, two battery disconnect switches (which you need to meet code) and some cables and a few other goodies for a bit less than $3,000, so that’s what I ended up buying.
I am not urging you to buy EG4 equipment by any means. These are just the ones I ended up getting because they suited my needs. There are a lot of different inverters on the market and most of them work pretty well. Some are better than others. But as you go shopping around you will find that a lot of different brands seem to have remarkably similar specifications, and even seem to look quite a bit alike except for the case. That’s because they are basically the same inverter, just packaged differently. I know of at least two other inverters, sold under different brand names, that are exactly the same as the EG4 6500 that I have. There are some minor differences, like the EG4 can handle higher PV voltages, but other than that they’re identical except for the case and graphics and they all come out of the same factories in Taiwan and Singapore.
Batteries
Batteries are the most expensive part of a system like this. 48V LiFePo batteries are expensive. But when the sheer energy storage capacity of these things is taken into consideration, along with their life span, they actually are very cost effective.

What I ended up getting were EG4LL, 48V, 5,120 Wh capacity server rack style LiFePo batteries. These are “smart” batteries with built in battery management systems and both RS485 and CAN communications capability and fancy full color LCD screens. They have a 10 year warranty and it’s claimed that after 7,000 charge/discharge cycles they’ll still have 80% of their original capacity left.
A word about battery safety. You’ve probably heard all kinds of stories about lithium batteries exploding, starting unquenchable fires and all of that. These are not those types of batteries. These are lithium iron phosphate, LiFePo, and they use a different chemistry. They do not explode, do not turn into raging infernos, etc. And just for the extra paranoid people out there (like me), these particular model batteries have their own fire suppression systems built in. I saw a demonstration where they took one of these batteries, piled a bunch of flammable material on it and started the sucker on fire. After burning for a few minutes, the suppression system triggered and the battery put the fire out. Cool, I said. I’ll take those, please.
The LCD screens let you monitor all kinds of stuff that I’m sure will interest someone. The only thing I really care about is if they work or not, and they do. But if there are problems you can even monitor the state of health of individual cells in the battery if you need to. If you want to save a few bucks EG4 also sells batteries that have the same capacity as these, but without the fancy displays.
The batteries have communications ports which allows them to be connected to the EG4 inverter which directly monitors the battery conditions so it doesn’t over charge them, charge them too fast, discharge the too fast, etc. If you have more than one, one battery is set up as the “master” which connects to the inverter, and the other batteries comm ports are daisy chained to the master battery. There are DIP switches on the front of each battery that you need to set so the communications system can figure out which one is which. Don’t worry, it’s easy. The batteries come with a booklet that has a chart showing exactly how to set the switches.
The batteries come with short (very short) battery cables designed to to connect them to the busbars in a battery cabinet. If you aren’t going to use a battery cabinet you’re going to have to buy or make your own cables to connect them to your own busbars. If you need to go down that route you need to remember that the cables connecting multiple batteries to a busbar need to be the same length and gauge. If the cables aren’t matched in length and gauge it means they aren’t going to have the same resistance. You want the load on each individual battery to be as evenly distributed as possible. That’s why you need to use busbars rather than just daisy chaining the batteries together. It helps to distribute the load more evenly.

And if you’re going to make your own, go get yourself a decent hydraulic crimping tool! I do not recommend one of those cheap crimpers that you whack with a big hammer. I don’t trust those things. You risk damaging the cable, damaging the lug, and not making a very good connection inside of the lug. A decent hydraulic crimper will set you back about $100 or so, which seems like a lot. but if you’re making cables for a power system that’s costing $10,000 or more, do you really want to cheap out on a crimping tool and risk making bad connections?
If you haven’t had to buy heavy gauge copper wire recently you’re in for a shock. Two 10 foot pieces of 4 gauge copper battery cable costs about $170 off Amazon. And while it is very nice cable and it comes with a bag of copper connecting lugs that’s still a heck of a lot of money. That’s another reason to go with a battery rack like the one I got. That big steel box may cost $500 but making or buying cables to hook the individual batteries to a wall mounted busbar is going to cost you several hundred dollars by itself.
The EG4LL batteries sell for $1,750 each. I have three of then for a total cost of $5,250. You can save a few bucks by going with batteries that don’t have all of the bells and whistles that these do,. The cheapest 48V server rack style LiFepo batteries that I’ve seen for sale are are around $1,500, so you could save yourself about $250 per battery by doing some shopping around.
So the running total right now for the system is about $3,000 for the inverters and $5,250 for the batteries, a total of $8,250.
But we’re not done yet.
Miscellaneous stuff
To put together a system like this a lot of other misc. parts are needed, and perhaps also some specialty tools like that crimper I talked about. I strongly recommend you get a decent torque wrench to make sure all of those electrical connections are torqued to the proper specifications. You don’t want to end up having to ship an inverter or battery back to the manufacturer, at your cost, because you snapped off a bolt or stripped out the threads on a connector trying to hook something up.
You also need some test equipment like a decent voltmeter and an amp meter. If you don’t already have all of that, you need to add that cost into the total price. Test equipment isn’t expensive and if you’re fiddling around with electrical equipment you need to have it anyway.

Let’s talk battery cabinet. The one in that photo came from Signature Solar and cost me about $500. It’s big enough to hold 6 batteries, has the busbars to connect to the batteries already installed, and it’s built like a freaking tank. It’s made of heavy gauge steel with a locking door, and has heavy duty wheels that can handle the weight because it can hold something like a quarter of a ton of batteries. And as I said it can save you enough money in cables to pay for itself.
Feel free to make your own if you’re handy that way. Just make sure it has adequate ventilation (batteries do get warm under normal operation) and that it can be secured somehow to keep people from fiddling around with it.
There are some safety items you absolutely are going to need. First you need battery cutoff switches between the inverters and the batteries so you can kill power to the inverters quickly in case of an emergency. Look at the photo up there. The two small gray boxes under the first inverter are first a PV cutoff switch and to the right of that the battery cutoff/circuit breaker. I only just got those mounted when I took the photo so they aren’t hooked up yet. The batteries have their own circuit breakers and I have a PV cutoff already in the system that you can’t see in this photo so I don’t have these hooked up yet. The final wiring job will have a PV switch and battery breaker for both inverters.
A decent PV cutoff switch is about $90. The breaker is about $70. I got two of each in the package deal I bought from signature solar. Total cost about $320 if you have to buy them separately.
Oh, and did I mention your solar panels need to be grounded? Yeah, they do. Almost all solar panels, at least the ones I’ve seen, will already have holes, often marked with a special grounding symbol, on the frames. Generally you daisy chain a grounding wire to every panel, then that wire goes to a grounding rod near the panels.
I should add that I already had a lot of the stuff I needed like spare wire, connectors, conduit, etc. laying around because I’m an amateur radio person and I’m constantly tinkering with antennas and fun stuff like that so I already had ground wire, grounding rods and other misc. bits on the shelf.
Now we come to the house side of things. You somehow need to get the power produced by those inverters into your house’s electrical system.
First you need to run suitably sized wiring from the inverters to your service panel. The EG4 manual recommends 6 gauge wire which is going to be sufficient to carry the amperage the inverters can produce. In my case I used 6/2 (6 gauge wire, 1 hot, one neutral, and one ground). That stuff ain’t cheap either. It runs about $3.50 per foot here. That’s why ideally your inverters will be reasonably close to your service panel. Depending on regulations in your area that cable may need to be run through conduit. Even the relatively short run I had to make ended up costing me close to $300 in wire for that, not including the cost of the conduit.
Now I am going to give the usual disclaimer here about using a licensed electrician to make any modifications necessary to the service panel that feeds electricity to your house. In a lot of jurisdictions it may even be illegal for you to make any modifications to your house’s electrical service.
It’s Money Time

So here’s the total cost of this whole house off grid (sort of) alternative energy system, not including solar panels. This number includes the two inverters, three batteries, all of the cables, connectors, switches, electrical wiring, etc. It includes the crimping tool, a cable cutter, torque wrench, wiring to the house panel, circuit breakers, screws, bolts, etc. Prices are rounded. It does not include the cost of Bob the electrician who makes sure I don’t blow things up and keeps the inspectors happy.
Inverter combo deal including 2 EG4 6500EX inverters, two battery breaker boxes, 2 PV disconnect switches and some misc. bits and pieces: $3,000.
Three EG4LL 48V server rack style batteries at $1,750 each: $5,250
Battery cabinet: $500
Equipment total from Signature Solar: $8750.
Shipping: $250
Taxes: $450
total: $9,450
Wait, we’re not quite done yet.
Now we need to add in the misc. costs for wire, cables, connectors, a few speciality tools I had to buy. I won’t itemize all of that. That all added up to about $2,500 rounded to the nearest hundred bucks. Wire is crazy expensive right now, a transfer switch that is eventually going to be hooked into the system set me back almost $500, some circuit breakers for the electrical panel, conduit, fittings. Oh, and lunch for Bob is in there somewhere too I think.
Grand total, not including solar panels: $11,950.
My original cost estimates for this project, minus solar panels, was around $12K to $13K so estimates were spot on.
Now let’s talk solar panels. Solar panel prices are currently sitting at a bit more than $1 to $1.50 per watt. And a system this size is going to need a lot of watts to charge the batteries in a reasonable amount of time even without trying to run your house off solar as well. It’s going to take quite a bit of solar power to keep this system fed. There are 15 KWh of batteries to keep charged plus one would want to get as much solar power as possible to feed through the inverters directly into the house to use solar power directly, not just charge batteries.
I only have my original 800W of solar out there right now, but I just got in 1,320W of solar panels last week and if the budget permits I’ll be adding another 1,320W by the end of June and I’ll have more than 3KW of solar sitting out there.
To make a long story a bit shorter, total cost for this whole project, including solar panels, is going to be right around $15K
Now let’s talk about taxes. There is a federal tax credit for up to 30% of the cost of alternative energy projects, including solar. I’m not exactly sure of all of the details because that’s what I pay my accountant for (Hi, Eric, how you doing? Recover from tax season yet?) Theoretically I could get up to $4,500 in federal tax credits. I doubt if I will. Considering what the tax system is like in the US I’ll be surprised if I get anything at all. But let’s say I do. That would bring the cost of this down to $10,500. Ooo, nice. Personally I think that getting a solar power system that can run my entire house for ten grand sounds like a pretty good deal.
Is it really worth it though? Even if I get the tax breaks that is a hell of a lot of money and a hell of a lot of work. I talked about pay back times and other factors involved before so I won’t go into that here. All I can say at this point is that only time will tell. If nothing else we’ll have a whole house emergency power system we can fall back on during a blackout even if we don’t save a lot of money on the utility bill.
Oh, and I just heard that all of the electric utilities in the state are pushing for yet another rate increase of anywhere from 4% to 8%. So there’s that. And I have friends in the electric utility industry and from what I hear from them we could be looking at wide spread rolling blackouts if we get above average temperatures, so there’s that too… Hmm, maybe this was a good idea after all.
Final Thoughts
A few things struck me as we were proceeding with this project.
First is the cost. $15K is a lot of money but if you think about for a moment, is it really all that much? We’re talking about a system that can handle all of the electrical needs of an entire modern household, at least part of the time, for less than the cost of a decent used car. If you can snag the 30% tax credit it makes it look even more attractive.
Second thing that struck me was how ridiculously easy it was to put this system in. If I’d had all of the parts and bits I needed right off the bat I could have installed this whole system in an afternoon and still have had time to go play with the neighbor’s dog before supper. The inverters have become so sophisticated these days that it’s almost a plug-n-play system. You don’t need separate solar charge controllers, separate AC battery chargers, separate battery management systems, etc. Everything is built right in. If you can read a manual, are qualified to do basic electrical wiring, have some basic tools and test equipment, etc. just about any reasonably intelligent person can set this up. Of course there are a lot of, if you’ll excuse the term, idiots out there. Some of them are on Youtube. Start scrounging around on Youtube sometime searching for solar power systems and you’ll see what I mean. And that’s why cities, towns and counties have to have building codes and inspectors and permitting processes.
The third thing that struck me was that I’ve been going on and on and on about this system for this long when I should be going on and on and on and on about biking, nature, photography, gardening, amateur radio and the other stuff I normally bore you with.
So that’s it. It’s time to get back to our regularly scheduled programming. I’ll keep you up to date about the system but unless something major happens it will be more of a sidenote than anything else while I get back to the more important things in life, like screwing around out in the gardens, bothering people on amateur radio, etc.