
There’s no way to get around the fact that table saws are expensive. If you’re buying new, you’re looking at around $500 for a decent contractor style saw, up to several thousand dollars or more for a high end cabinet style saw. Can you buy used? You bet, and you can save a significant amount of money doing so, and even come up with some pretty good deals. But you need to be really, really careful when buying used because it’s easy to end up with, frankly, a piece of junk that may look good but is really completely worn out and will require expensive repairs before it can even be used. But I’m not going to get into used equipment in this, I’m going to stick with new saws.
Of course the first question is do you really need one? These things are big and expensive, so can you get along without one? That’s a question only you can answer, really. I’ll just say this – if you’re doing any kind of semi-serious woodworking, the table saw is pretty much the workhorse of any woodshop. It’s used for cutting boards to length, ripping boards to width, trimming panels, framing cabinet doors, making tenons, dadoes… The list goes on and on. If you think you need one, you probably do.
So let’s say you’ve decided you do need one. Before you max out the credit card, there are a few things you need to think about before you ever buy one. Things that most people don’t seem to think about until it’s too late.
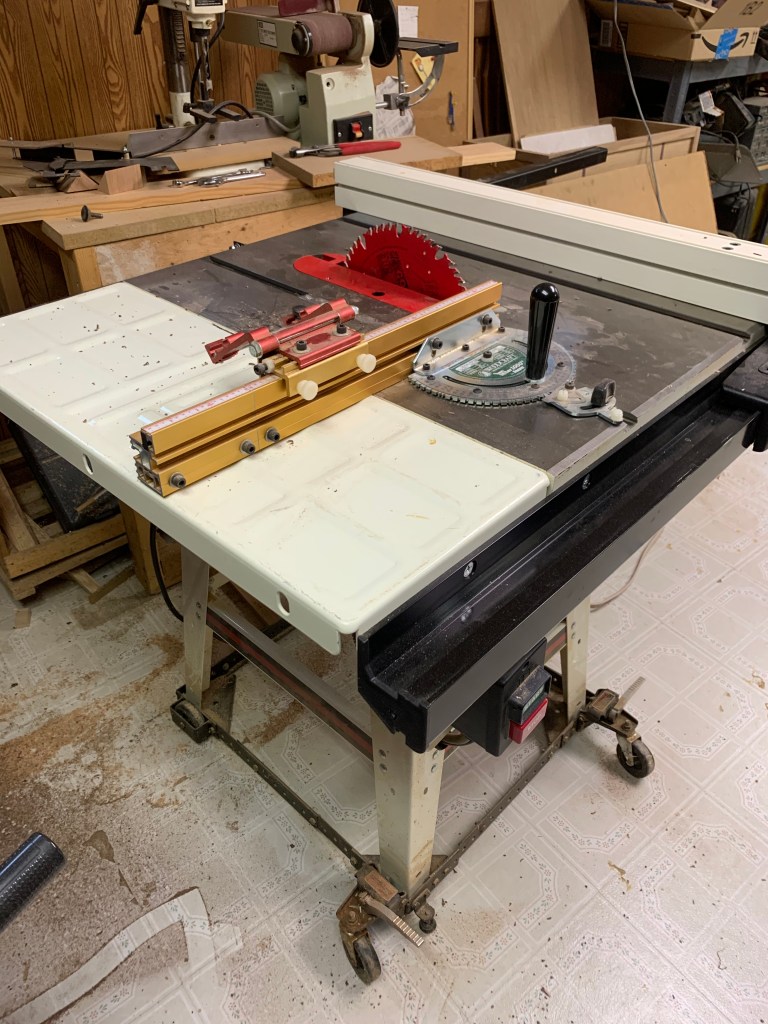
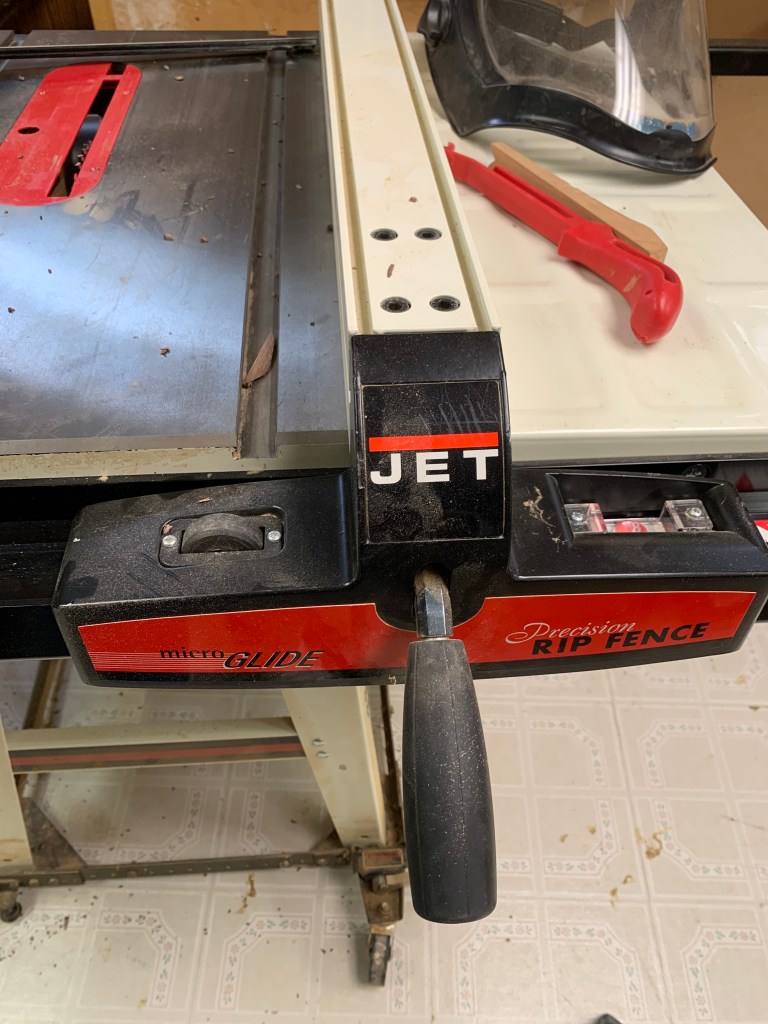
First thing to think about is the amount of space you have. These saws are big. They take up a lot of floor space. That’s my 15 year old Jet saw in that photo up there. It is 3 feet deep and 5 feet wide. So it is physically large. Plus you need enough clear space around it so you can work safely. If you want to rip a 6 foot board, for example, you need at least 6 feet in front of that saw, and 6 feet behind that saw, in order to slide that board through the saw. So you really need a minimum of at least around 14 – 15 feet. Cross cutting isn’t quite so bad. You’re almost never going to try to cross cut a board more than a few feet long.

Now most of us don’t have a lot of space to work in. I certainly don’t. My shop is a spare room down in the basement. It’s a good sized room, but if I didn’t have my big tools on wheeled bases so I can move them around there is no way I could fit everything in that room and still have room to work. Wheeled bases like the one on the left under my saw can be really helpful. But they do have drawbacks. They have to be sturdy enough to handle the weight of the tool, which can be hundreds of pounds. They absolutely must have lockdown levers you can work with your foot like mine do because you do not want that tool moving when you’re using it. So they can help, but you’re almost always going to be better off if you don’t need to add wheels. These tools ideally should be bolted directly to the floor because that makes them safer to use and helps to reduce vibration. But most of us don’t have ideal conditions, so you do what you need to.

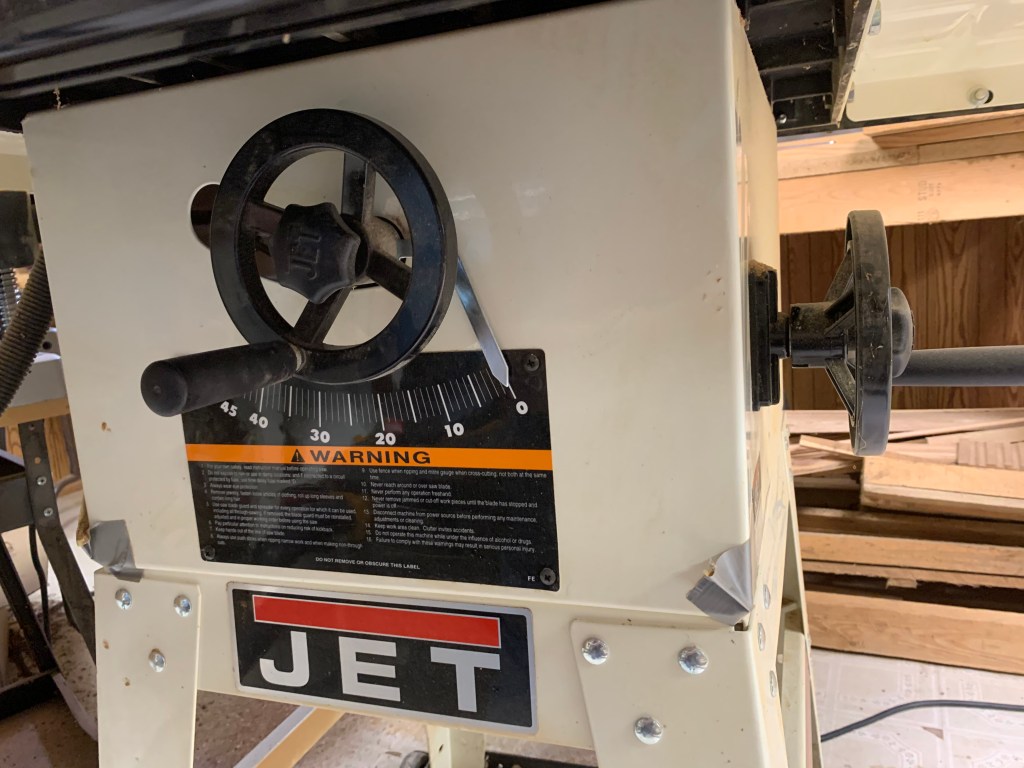
The second thing you need to be concerned with before you buy a saw or any big piece of electrically powered equipment is your electrical service. Can the electrical service in your home, garage or wherever handle the load that will be placed on it by that saw? Look at the specifications of the motor on my saw in the photo up there. It draws 18 amps. But the average electrical circuit in most houses is only rated to handle 15 amps. Go look in your service panel, the circuit breaker box of your house. Chances are good that all the breakers, except the ones feeding an electric clothes dryer, central air system or electric stove, are going to be 15 amp. So just plugging that saw in and turning it on is going to exceed the rating of the average household electrical circuit. If you try running that saw you’re probably going to be tripping the breaker on a regular basis and in extreme cases even causing the wiring to overheat.
My house was completely rewired from top to bottom when we bought this place and we installed separate service panels specifically to feed the garage and my workshop so they could handle the extra load. I have 20 amp circuits feeding the outlets in the shop, not the normal 15 amp, so it can handle this kind of thing.
So before you buy a table saw or other big power tool, make sure your electrical service can handle the load. If necessary talk to a professional electrician about improving the capacity of your system. If heating up a cup of water in your microwave makes the house lights dim, you really, really need to talk to someone about doing some upgrades before you try to bring in a big power tool. I’m not telling you to rewire your whole house, but having a separate 20 amp circuit run to your work area is something you should consider if your equipment is a power hog like mine.
The third thing you need to be concerned with is just getting the thing home and into your workshop area. These saws are big and heavy. How are you going to get it delivered to your location? How are you even going to get it off the delivery truck? How are you going to get it into your workshop? How are you going to get it assembled? Getting my equipment into my basement workshop was a royal pain in the butt that involved hand carts, in one case a cart used to normally transport big vending machines that I had to rent with a powered stair climber built into it. And that’s not counting the bruises, strained muscles, smashed fingers and considerable amounts of foul language.
Sidenote: 120V versus 240V. If you look at the motor up there, you’ll see it can be rewired to run on 240V instead of 120. A lot of tools in this classification will have motors like that. Some will even require 240 only. Why? I won’t go into the technical details but generally speaking a motor runs more efficiently on 240 and there are advantages to going that route. But do you need to? Probably not. First you almost certainly aren’t going to have a 240V circuit in your house, and having one added is going to cost a significant amount of money. And second, you probably don’t need it anyway. Unless you are running a commercial production shop or something like that, the average woodworker isn’t going to need to jump to 240V tools.
SO let’s get on with this and talk about actual saws. Choosing a saw can be a bit overwhelming because there dozens of different types and brands on the market, each with it’s own advantages and disadvantages.
There are three basic types of table saws; contractor saws, hybrid saws, (which I think is actually a ridiculous and misleading thing to call them) and cabinet saws. To confuse things even more, I’m seeing what are really hybrid saws being marketed as contractor saws, and hybrid saws that look like cabinet style saws. I really think that classification system should be scrapped entirely and we should be using things like the saw’s capacity, but let’s ignore that.

Contractor saws are generally smaller, more compact, and often come with folding stands and wheels to make them easier to move around, and you’ll often find them at job sites being used by, well, contractors (duh). Once upon a time contractor style saws were, well, to be brutally honest they were almost all pretty much junk. But wow, have things changed in the last twenty years or so. Oh, the really cheap ones are still pretty much junk. But the better quality contractor saws are now damn near as good as the other types of saws. They’ve become more powerful, much better made and genuinely good. If you look at the major brand names and the higher priced models, well if I didn’t have my Jet I wouldn’t mind having one of these. The only real drawbacks are that they are still a bit less durable because they have to be light weight to be more or less portable. And because they have to be small, they don’t have the capacity of the full sized table saws. But that smaller size and lighter weight can be a genuine advantage for those of you who don’t have a lot of room for a saw. And the smaller capacity can be gotten around by building your own stand with infeed and outfeed extensions, side wings, etc.
Makita, DeWalt, Delta and a few other manufacturers make some pretty darn nice contractor style portable saws. They’re definitely worth looking at, especially if you have a tight budget. But as with any of this equipment, research, research, research! Get online and read reviews, evaluations, get on YouTube and look at the videos. Make notes about things you like and dislike. After all, even these “cheap” saws are going to set you back around $400 – $500 or more for a really good one.

I’m going to do something I probably shouldn’t and toss the whole classification of cabinet saws out the door and forget about ’em. Why? Because cabinet saws are big, heavy, and securely bolted to a concrete floor once they’re put in place. They take up a lot of room. They often require 240V power. They generally require a fixed and high power dust collection system. And they’re expensive. You can expect to drop at least $2,500 or much, much more on a decent quality cabinet saw. And I think that’s utterly ridiculous because that saw isn’t going to work any better for the average woodworker than a $1,000 saw will.
And let’s just junk that whole “hybrid” classification too while we’re at it because it’s just silly and I have no idea why people started using that term anyway. And no one seems to actually adhere to the mostly nonexistent standards of that classification system anyway.
No matter what you call ’em, this style saw is a full sized table saw with a pretty hefty motor, usually 120V but often the motors can be rewired for 240 if you want, good sized tables that will handle just about any normal sawing job you need to do. And generally it has an open frame holding it up like my Jet up there in that photo and not a fully enclosed cabinet base, although as I noted, some are now coming with enclosed cabinets. It’s going to have a 10″ saw blade, a tilting arbor, hand wheels on the front and/or side to raise and lower the blade and to change the angle of the blade, a pretty good quality rip fence, a miter gauge that is most likely a piece of junk and should be replaced with one that is actually accurate and safe, and, of course, safety gear designed to keep you from cutting off bits of your body while using the saw, like anti-kickback devices, a riving knife, shield over the blade, etc, and a flat (hopefully) machined heavy steel or cast iron table with side wings to support larger pieces of wood.
Speaking of safety, I’m going to be talking about SawStop saws at the end of this just to give you a heads up
And no matter which brand you look at, they are all basically pretty much the same. I’m sure DeWalt, Jet, Delta, and the other major brands would argue with that, but when it comes right down to it they are. They’re all going to have similar features, have similar build quality, similar capacity, similar size, weight, everything. Personally I have a lot of Jet equipment, and I like it a lot, but I’m not going to tell you to run out and buy Jet because Jet’s saws aren’t going to be any better or worse than those being sold by Delta or Shop Fox or the other brands. And they’re all going to cost about the same as well, with no more than a couple of hundred bucks differences in price between saws with similar specifications.
So I’m not going to recommend a specific brand or even a specific model. Instead I’m going to talk about what you need to look for, and the things you may need to add or replace once you do buy it.
Stuff you should look for
The table should be nice and flat, well machined, and smooth so wood will slide easily over it. If it has table extensions as my saw does (those white plates on either side of the plain metal table) they should be absolutely flush with the surface of the main table
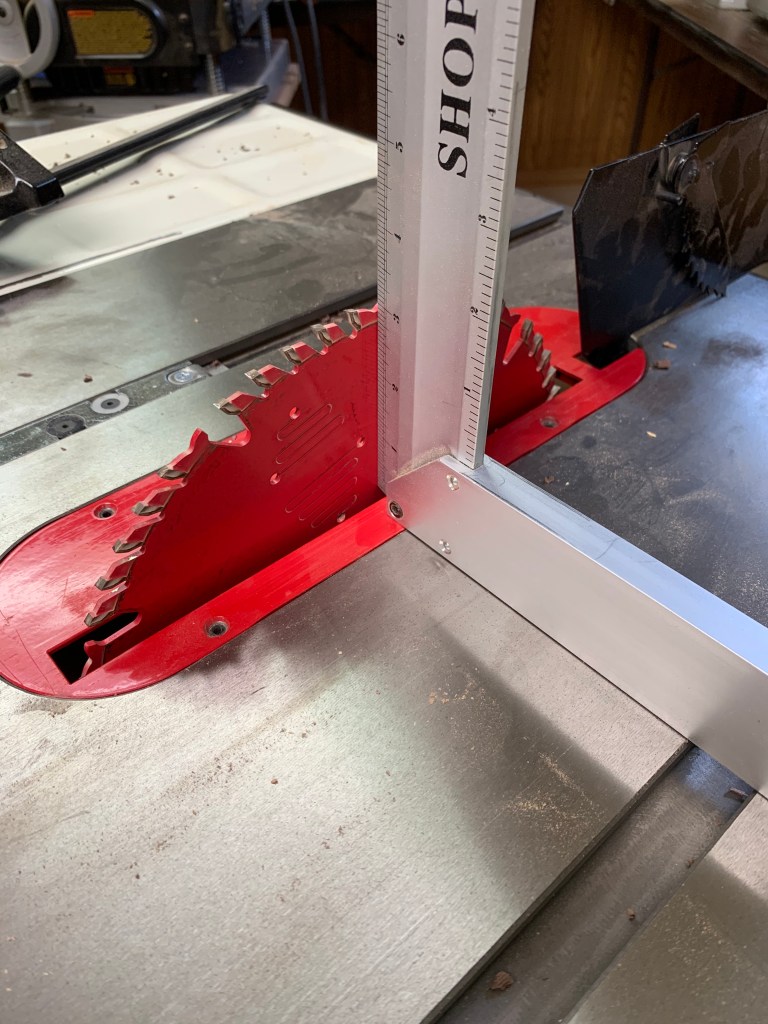
When the angle of the saw blade is set to 0, the table should be at exactly a 90 degree angle to the table. This is easy to check. Just raise up the saw blade and put a square on the table and butt it up to the blade. If it isn’t you should be able to do some fiddling to get it to that point. Hopefully you won’t have to.
The hole in the table the saw blade comes through is called the throat, and the removable plate that fits around the blade is the throat plate. It should be perfectly flush with the surface of the table, and there should be some way to adjust it to make sure it is flush. If you look at mine, you’ll see the throat plate has leveling screws recessed into the plate itself to allow it to be adjusted. If it isn’t perfectly flush with the table you can have the wood catching as you slide it through the saw and that can be dangerous.
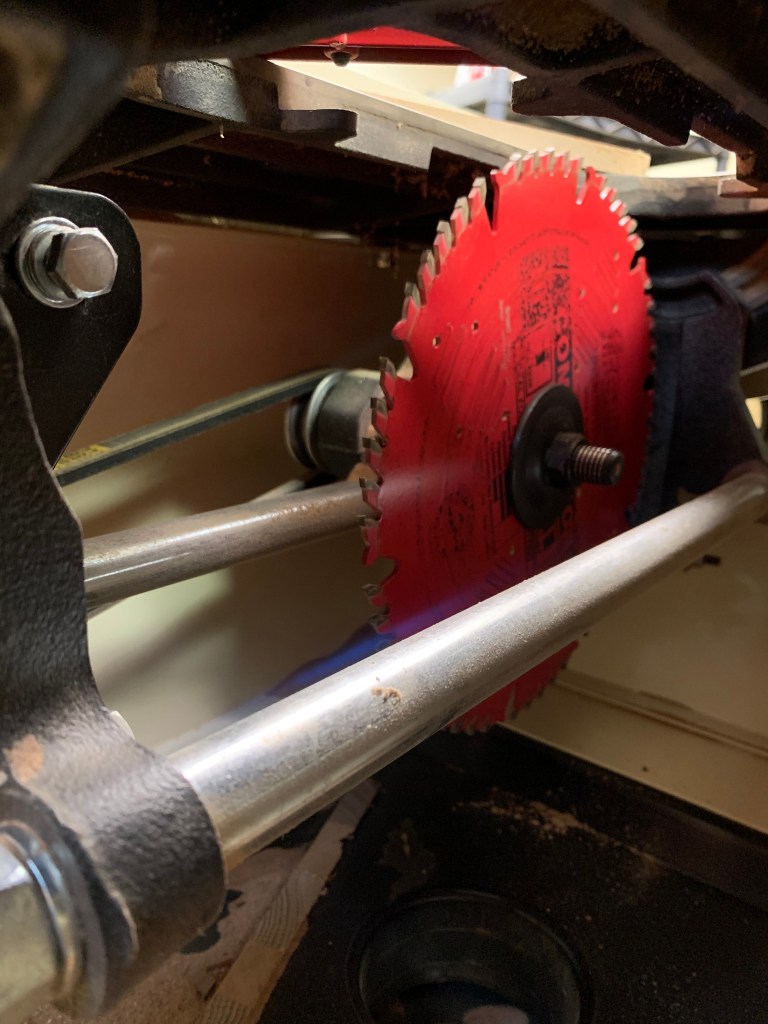
The arbor is the shaft that the blade itself is bolted to which, in turn, is mounted on an assembly that permits the arbor and blade to be raised and lowered and tilted. The arbor should look and feel sturdy. There should be absolutely zero play when you try to move it, especially not in the bearings nor in the lifting and tilting mechanisms. Reach in there and grab the saw blade (carefully) and try wiggling it back and forth. The saw blade may flex, but ignore that. If the arbor, the bearings, the shafts, anything under there wiggles, moves, shifts position, makes clicking noises, anything that doesn’t seem quite right, avoid that saw like the plague. If any of that equipment down there isn’t absolutely perfect, you’ll never get that saw to work right.
The threads on the shaft should look relatively, oh, robust, shall we say? The pulley on which the drive belt rides should be perfectly square to the shaft itself. If it isn’t it is going to cause vibration problems.
Oh, and how easy is it to get at that arbor? You’re going to have to change that blade sooner or later. You may also want to swap the blade out for specialty blades as well. So you want to be able to have relatively easy access to the arbor to replace the blades.
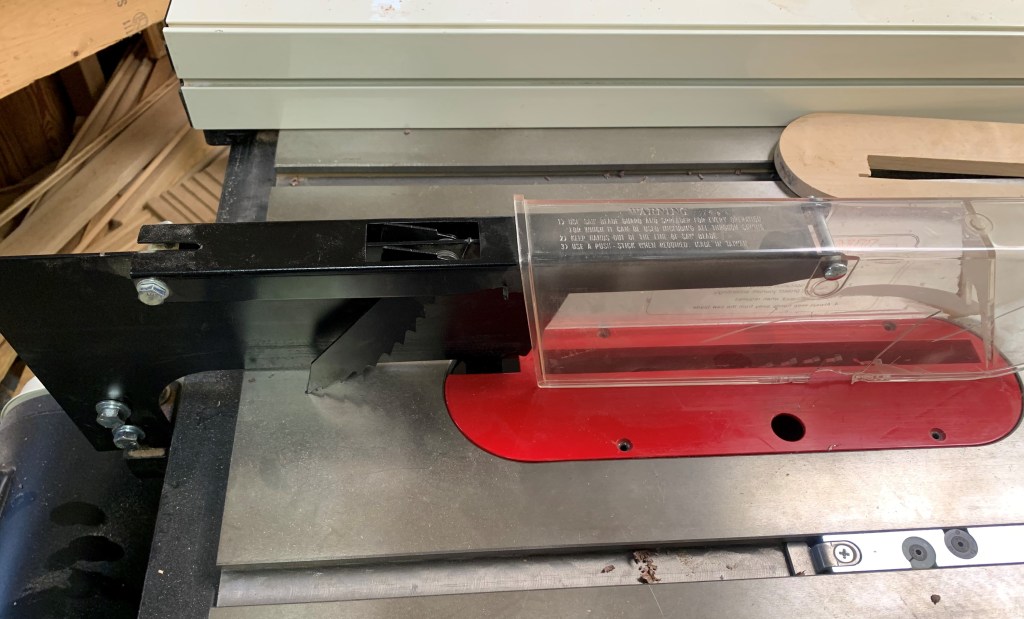
Then there is the safety equipment. All saws will come with at least the minimum, which is some kind of splitter or riving knife to keep the wood from pinching on the blade, anti-kickback devices of some kind, and a shield over the blade.
You would think that the most dangerous thing about a saw is that spinning blade, and it is indeed very dangerous, but what can be even more dangerous is what is known as kickback. When the fibers in wood are cut, this can, oh, disturb the balance of forces in the piece of wood, so to speak. Internal stresses that were balanced before, become unbalanced when the fibers are cut, causing the wood to move, and squeeze around the saw blade, pinching against it. This can cause the wood to be launched at high speed directly back at the person using the saw. This isn’t just painful, it can literally be lethal. Some years ago a guy at a factory in Fond du Lac got killed when a piece of wood kicked back on the table saw he was using. So when I tell you that you never, ever take the safety gear off your saw, I mean you never, ever take the safety gear off your saw.
If you look at that photo up there you’ll see what looks like a wing with teeth just to the left of the throat plate. That’s an anti kickback pawl. There are two, one on each side. I would much rather have a riving knife, but that wasn’t generally available when I bought this saw. Riving knives are now considered to be one of the best ways to avoid kickback, and if you can get that on the saw you’re looking at, do it.
The rip fence: Once upon a time, when you bought a table saw generally the first thing you did was throw away the rip fence it came with and bought a good one. Seriously, they were often that bad. Fortunately those days are long gone, and the rip fences on modern saws, at least the better saws, are generally pretty good, even outstanding, and possibly nearly as good as the aftermarket ones.
Unless someone sets the saw up for you, you will almost always have to fiddle with it to get it properly aligned and square, but that’s generally not a difficult job.

A couple more things about rip fences. First, many, like mine, have distance indicators that supposedly show you the distance between the fence and the blade. Mine even has a dopey little magnifying lens built in and a “micro adjustment wheel”. And, well, yeah, don’t rely on any of that guff to actually work. Just get out your handy tape measure and actually measure the distance from the fence to the blade. Remember the old adage: measure twice, cut once.
Second, some people, even people who really should know better get freaked out when they find out that the back end of a lot of these fences don’t lock down when you push down on the locking lever. The front does, but the back doesn’t, and actually it will flex a bit if you push on it hard at the back. They believe this makes setting the distance between the blade and the fence inaccurate somehow. And wow, some of them get weird, even a bit obsessive about it and think this is the most horrible thing ever, and because it isn’t locked down their cuts aren’t going to be accurate.
And I suppose it would be a problem if there were any actual pressure against the back end of the fence. But there isn’t. Or shouldn’t be.
Think about it for a minute. The only thing you should really care about is the area of the fence that lies in front of the blade and the point at which the wood is in contact with the blade. That is what controls the distance between the fence and the blade, not the back of the fence. The back of the fence doesn’t do anything except provide a smooth route out of the saw for the wood and keep the board straight. It has nothing to do with the actual cut. There should be very little force against that fence in any case, and most of that force is going to be before and at the point the cut is actually being made. That is where accuracy is an issue. Not at the back end of the fence after the cut has been made.
If that fence is deflecting, then you do have a problem because it shouldn’t be. If it is, that means there is something mechanically wrong with your fence or its lockdown mechanism, or you are pushing the wood against the fence with way too much force. That fence is there to be a guide. Period. You shouldn’t be putting any kind of significant pressure against it as you guide the wood through the saw.
In fact, there are valid reasons not to lock down the back of that fence, IMO. The primary one is safety. There is no such thing as a perfectly aligned saw. If that fence is locked down tight at both ends and can’t give a bit at the back, and the saw blade isn’t absolutely, perfectly, 100% aligned with that fence, and the wood isn’t absolutely straight with perfect grain, under the right circumstances it’s going to cause the wood to bind up between the back of the blade and the fence and this is not a good thing. Having a bit of deflection at the back of the rip fence can be a good thing.
Now that being said, some saws come with fences that do lock at both ends, and you can get a lot of aftermarket fences that do, and people like them and even think they are absolutely necessary. I think they’re wrong, but well, hell, I think so-called “american cheese” should be banned because it is neither American nor cheese, and that hasn’t happened yet, so there you go. And don’t get me started on “Canadian bacon” or “English muffins”…
Oh, wait, I’m getting off topic, aren’t I? What was I talking about? Oh, yeah, saws. Let’s see, where did I leave off… Okay, I finished that up, what’s left? Oh, miter gauge.
A miter gauge is a special device you use to measure those funny hats that bishops wear…

Oh, all right, I admit it, that was a really horrible joke but I couldn’t help myself. A miter gauge is, well, one of these things over there on the left. It’s a type of guide. You butt the hunk of wood up against it and then push it forward into the saw. It sits on a long rectangular shaft that slips into a groove ground into the table of the saw. In theory, it keeps your wood at the proper angle as you feed it into the blade. Normally you keep it locked at 90 degrees, but you can adjust it so you can make angled cuts as well.
Note that I said “in theory”. That’s because most of these are, frankly, junk. They’re usually way too small to adequately support the wood you’re trying to cut, hard to adjust, the angle settings are inaccurate, and they are just generally not very well made all the way around. I mean, come on, look at mine over there. The pointer is basically a roofing nail they soldered into a hole and bent over for heaven’s sake.
Don’t worry, though, I’ll talk about miter gauges in detail when I get to the “optional stuff” section of all of this coming up soon.
Very soon, I hope, because you’re probably getting just as bored with this as I am by this point.

Now I was going to show you a picture of the on/off switch on mine saw but I seem to have lost it… Oh, wait, there it is. Here we go, that’s it over on the right. I will not pull any punches here. That switch totally sucks. It isn’t the “Start” button that’s the problem, it’s that “Stop” button. It’s in an awkward position. I have to fumble around for it if I’m not at the right angle to directly see it. It’s wobbly and I have to fiddle with it to get it to work. It’s potentially dangerous, even, because in an emergency you need to shut that damn saw off RIGHT NOW because you need to pick up the finger you just cut off and get to the ER so you don’t want to have to be standing there fumbling around trying to find and then push the damned button. You want a nice, big, easy to find and easier to push OFF button. Granted I could retrofit this thing with a much better kill switch, so to speak, but, well, I’m lazy, I’m cheap… Well, you get the idea. Most modern saws come with much better switches than this one has. Or should.

Finally let’s talk about dust. Table saws are really good at turning very expensive wood into great, heaping piles of sawdust, and you need a way of dealing with it. One of the advantages of cabinet saws is that most of that dust is confined in the cabinet where it can be easily sucked up with a dust collection system.
Dust collection on saws in this class is pretty much, well, to be honest it’s pretty much a joke. Mine makes an attempt at it. It has a plastic plate that bolts to the bottom of the saw body with a big hole in it to attach a vac or dust collection system. But since the whole back end of the saw is open (has to be because the motor mount and belt run through there) I get dust flying everywhere whether I bother to hook up the vac to the port or not. True, having the vacuum on helps a lot, but it still chucks a lot of dust out the back. It isn’t as bad as, oh, a big power sander or a lathe, but these saws do produce a significant amount of dust and you need to be prepared to deal with it. Breathing this stuff is most definitely not good for you. And if your shop is inside of your house, it’s going to get everywhere. Be prepared to change your HVAC system filters a lot. A dust collection system would be nice, but most of us don’t have the money or space to stick in an expensive dust collection system. I certainly don’t. My dust collection system is a big shop vac and a 21 inch fan in the shop window sucking the stuff out of the house before it can get into everything.
There are a lot more things about table saws I could get into but these are some of the important things and I imagine you’re getting just about as bored as I am by this time, so let’s get on with this.
Money, money, money… So much money…
So, what is a decent table saw in this class going to cost? Well if you thought that spending $500 on a contractor style saw was bad, you might want to go take a lie down before I drop some of these prices on you. When I bought my Jet about fifteen years ago, I spent somewhere between $500 to $600. That was a lot of money. Well, still is a lot of money. My model saw isn’t made any more, but to get one with capabilities you can expect to pay somewhere between $1,100 to $1,500. A Jet in the same class as the one I have looks like it is selling for over $1,400. Yeah, that $500 contractor style saw is starting to look a bit better, isn’t it? I knew these things had gone up drastically in price since I bought mine, but it wasn’t until I started doing some research to write this that I realized that they’d doubled in price in the last fifteen years. Ouch.
Can you get cheaper ones? Sure. Should you consider the cheaper ones? Definitely. But be very, very careful out there.
If the price sounds too good to be true, it is. Stay away. I’ve seen saws with silly, even ridiculous brand names that I’ve never heard of before selling for just a couple of hundred bucks. There is a reason why that saw is selling for $700 less than a Delta or Powermatic or Shop fox or the other well known names, and that reason is that it is a piece of junk. You cannot make a 10 inch table saw of any kind of decent quality and sell it for $200. I’m sorry, you just can’t. Even if you find reviews online claiming that these things are the best thing ever, don’t believe it. Stick with recognizable brand names and buy from reputable retailers. Delta, Shop fox, Rigid, DeWalt, Jet, Grizzley, Milwaukee, Bosch, SawStop, Powermatic all make pretty darn good saws.
What about used? You can get some really good deals on used table saws, but be careful. You can pick up a real gem at a good price, or you can get burned. But do your research first. There are forums and articles and videos galore out there with advice on what to look for when buying used, so go do some digging.
Oh, one final note before I move on. I want to talk for a minute about so-called benchtop saws. If all you’re doing is, oh, cutting up 2″x2″ square bits of wood to make pen blanks or building HO scale models, one of these might be useful, but generally speaking they’re utterly useless for any kind of serious woodworking.
Options
Now, let’s talk optional equipment and addons and other goodies people will try to sell you after you have a saw. Let’s get back to that crappy miter gauge first.

Like I said, most of them aren’t worth much. If you’re doing work that requires accurately cutting angles and doing it safely, you’re going to want an aftermarket miter gauge like the one in the photo over there on the right. That is an Incra 1000SE. I’ve had it for a lot of years now but it is still in production. It is very, very accurate, easy to use, extendable, with built in hold down. The thing is just nice. Everything is adjustable so you can fine tune it to ridiculously tight tolerances. If you make fine furniture, picture frames, do cabinet making, anything that requires very accurate cuts, you need to consider throwing away the miter gauge that came with the saw and getting something like this. Kreg makes one that’s just as good as Incra’s and sells for a bit less.

And I’ll warn you right now it ain’t cheap. That thing is selling for around $190 right now. And you probably don’t need one as elaborate or accurate as this one is. I make furniture and picture frames and boxes and other things that require highly accurate cuts. I’d still encourage you to look into upgrading the miter gauge, though. There are much less elaborate versions that are significantly better than the ones most saws come with that sell for under $75.

Dado saw blades: Well, first what’s a dado? Basically it’s a groove cut in a length of wood that will make a place to stick another piece of wood, like cutting slots in the carcase of a bookcase that the shelves will sit in. Rather than trying to chisel all that stuff out and probably screwing it up (I know I would) you get out your trusty dado blade, put together a stack with the right blades and shims to get the proper thickness, bolt it onto your saw, run the boards through, instant slot. Neat, clean, fast. Well, sometimes it’s neat, clean and fast. In actual use it’s a bit more difficult than that, but if you need to cut long grooves in wood, a dado blade comes in very handy. That’s my Freud in the photo up there. A set like that costs around $130 – $140. Do you need one? Heck, I don’t know. If you need one, you need one. If all you need to do is cut a slot in two boards, get a cheap one. If you need to make a lot of dadoes, get the more expensive, better quality ones. They’ll make a better cut with less chipping.

And if you do get a dado blade, you’re going to need a different throat plate for your saw because it ain’t going to work with a 1/2 inch stacked dado cutter. You don’t need to buy one, though. You’re a woodworker, remember? Make your own. I do. All you need is a bit of hard maple (oak or ash would work too), a thickness planer, a jigsaw or scroll saw, and some sandpaper. Get a nice bit of hardwood. Use the thickness planer to shave it down to the thickness you need. Slap your existing throat plate onto the board and trace out the outline, then cut it out with a scroll saw and sand it down to get the fit right. Lower the saw all the way down. Slap the new throat plate into place, move the rip fence over the top of the new plate to hold it down, and with the saw running very slowly raise the blade up to cut through the new plate. Instant custom throat plate. Well, okay, not instant, but you get the idea.

Push sticks – Do I really have to tell you that you do not want to get your fingers anywhere near a saw blade spinning at about a gazillion RPM? I don’t? Good. You need push sticks to hold down and push the wood you are cutting. I buy ’em, make ’em myself, whatever. They’re easy to make, but they’re also really cheap to buy. I must have a dozen or more laying around because I keep misplacing the darned things. I have some I made for specific uses, like cutting larger panels that have fancy hand grips. Of course I couldn’t find them when I wanted to take a picture.
Stuff people will claim that you need but you really probably don’t

Special drive belts: If you start scrounging around on the internet or through woodworking magazines and the like sooner or later you’re going to run into an “expert” who will claim you need a special drive belt for your saw, specifically something called a “link belt”. They will claim that your standard V-belt is an abomination that is causing nasty vibrations, thumps and bumps and, oh, heck, I don’t know, probably causing the ice caps to melt, tuna to go extinct and my hair to fall out for all I know. Personally I think it’s a crock. I’ve used saws that were equipped with belts like these and I didn’t notice any difference at all in vibration, noise or anything else when compared with similar saws using normal V-belts.
Expensive aftermarket rip fences: Go back and read my comments about rip fences earlier. Most modern table saws in the price range I’m talking about here already come equipped with pretty good fences. I don’t see any need to “upgrade”. If you’re saw has a poor rip fence, by all means look into replacing it. There are good ones out there. Again, do some research.
Anti-vibration gubbins that bolt to your blade or arbor or on the legs of your saw: For a while I was seeing these things advertised all over the place, but it seems to have faded a bit in the last ten years or so. The claim was that your saw blade is a weak, wimpy thing that shakes and rattles and vibrates and is hurting the accuracy of your saw. Yeah, sure it is. If you have a decently made, good quality saw blade, no, it isn’t. And if you have a cheap, crappy, badly made saw blade, these things aren’t going to help in any case. Basically the ones I’ve seen are little more than big washers that do literally nothing. Clamping a big steel washer to the side of your saw blade is going to do nothing to balance that blade. And since the majority of the blade isn’t supported by that thing, it is still going to flex and shake if it isn’t well made.

Specialty jigs: There are a lot of companies out there who will gleefully sell you all kinds of jigs that are supposed to make life easier for you. I have to be honest and admit I’ve fallen for it and bought some of them. Learn from my mistakes. Most of them aren’t worth it. I make a lot of mortise and tenon joints for furniture, and I went and bought one of those things over there on the right, a special jig for making tenons. I dropped, oh, heck, it was probably around $130 or so on that sucker. Does it work? Uh, well, sort of? To be fair, yeah, it does. But here’s the problem. It takes so long to get it set up, takes so many test cuts to make sure the depth and width is set properly, that by the time I got the thing set to accurately make the actual tenon, I could have cut a half dozen of them using just my dado cutter and miter gauge. Seriously.
That’s the biggest problem with these jigs for making speciality cuts, they work but often are so fiddly and take so long to get set up that you’re better off not bothering and doing it by hand, especially if you only have to make a few cuts like that.
Of course on the other hand I did drop over $400 on my mortising machine and I wouldn’t give that up for anything. But if you’d ever had to make dozens of mortises the old fashioned way with a drill, wood chisels and a mallet, you’d know why.
SawStop saws:
The last thing I want to talk about are SawStop saws. I will say right up front that I like Sawstop saws. A lot.
The SawStop system consists of an electronics package together with a gadget that is something like the disc brake system on a car, only more so, and a drop system. Electronic sensors constantly monitor the saw. If it senses that you just shoved your finger into that saw blade, it instantly stops the saw and drops the blade down through the table. The demonstrations are undeniably impressive. They usually take a hotdog or piece of raw chicken and just barely touch the blade and Bang! It happens so fast that the saw just barely nicks the sausage or chicken before it stops and drops.
The system is, well, damn, it’s impressive. Look at the brief demo below.
I have worked with SawStop saws and they are very, very nice. We had them at the school district in the high school technical/engineering department. They are very, very safe. They work exactly like they show in that video. The merest touch of skin and BANG!, the saw shuts down virtually instantly.
But you’re going to pay for that safety. The cheapest one I’ve seen is $1,400 for their portable job site style saw. A “contractor” style saw goes for $1,700 (All things considered, that’s not really that bad of a price), and the cabinet style saws can run over $4,000.
So the safety system is impressive, but how does it work as an actual saw? Like I said I’ve used these things and they’re very good. The quality all the way around was well above average. They were accurate, powerful and pretty much top of the line saws.
Would I buy one? In a heartbeat. That’s how much I like them. If I personally was shopping for a table saw, the first one I’d be looking at is one of the Sawstop saws, probably that “contractor” style one for $1,700 or so. If I ever need to replace the Jet I have now, it will be a Sawstop that takes its place. No, I am not getting paid to say that. I like the saws that much.
The system isn’t cheap, obviously. If it does trip, the guts of the thing have to be replaced. There is a cartridge type thing you have to replace that will cost you about $70, plus the saw blade will have to be replaced. So let’s say it’ll cost you about $200 total to replace the cartridge and blade if it trips.
And it does have false alarms occasionally. We had it trigger when trying to cut pressure treated lumber, green lumber, things like that. But the false alarms were very rare. If I had one I’d buy a spare cartridge or two to have on hand just in case.
And here’s the thing you have to ask yourself, how much are your fingers worth? Spending $200 to replace a cartridge and saw blade is a hell of a lot expensive (and less painful) than a trip to the ER.
That’s it for now. Next time thickness planers and jointers and whatever else I can shovel in before I get bored.

I really enjoyed this article!
I have a DeWalt table saw very similar to the photo in your article, but without the wheeled stand. It is small as you describe, but it’s very portable and light so I can easily carry it in my truck. It has a 10 inch blade and plows through anything I need to shove through it. The fence and the miter guide are not as well made as the rest of the saw. I think I paid about $400 for it in 2016, and I think another $50 for the non-wheeled stand. It punches well above its weight and I’m very satisfied with it.
You mentioned sawdust. Oh wow, these saws produce a holy hell amount of it! Many of the newer models (including my DeWalt) have a port to plug in a vacuum hose and clear the sawdust as it is produced. At least in the case of my saw, I can verify this feature really works and makes cleanup waaayyyy easier. Only trace amounts of dust are missed by the vac. Keep in mind that adding a vacuum will also add to the electrical demand, and many of these shop vacs can pull quite a bit of current themselves.
Regarding safety: I suggest wearing hearing protection when using these tools. They can produce dangerously high levels of noise. Hearing loss is permanent. Get a pair of $5 Harbor Freight ear muffs and save yourself a lifetime of disability.
Although I don’t buy cheap tools myself, many contractors prefer them. My uncle is a retired siding/windows/gutters guy. He said he always bought cheap power tools because they tend to get stolen and/or abused. He figured if he had to drop $150 once in a while (vs. $500+) for a power tool, well, that’s just the cost of doing business. He does have a point. He would buy cheapie $300 Harbor Freight generators with the full expectation they would get beaten to death or stolen within 2-3 years. They are in essence throwaway items.
My dad has a Craftsman table saw he bought I think in the 1960s or early 70’s. It’s huge. It’s heavy. I mean, HEAVY. The table is thick steel. It easily weighs several hundred pounds and I’m guessing 4 feet by 4 feet square. The motor has been replaced several times but everything else on that saw is original and 100% working. It has a million stories behind it.
Thanks again for the great article. I appreciate your insights.
LikeLike
I agree completely. Some of those portable contractor saws are really, really nice, well worth the money. They’ve improved a lot in the last 15 or 20 years. And yep, the dust is horrible from some of these. Some are better than others. Mine is pretty much horrible even if I have the vac hooked to it.
Good point about the noise, too. Some of these tools are really loud. My thickness planer really howls and I wear hearing protection when I use that. The saw I have isn’t too bad. My favorite hearing protection are those electronic ones designed for shooting sports.
I never thought about problems with theft. Yeah, that can be a serious problem for contractors so I can understand why they’d go with the cheapest tools they can.
Damn, I miss Craftsman. Oh, the brand is still around but the quality just isn’t there any more. Back in the 70s Craftsman was about the only tools we bought because they had a reasonable price, were good quality and had a lifetime warranty. Now for hand tools I generally stick with Stanley. Pretty reasonable cost and I’ve yet to break one of their wrenches or other tools.
LikeLiked by 1 person
I think my dad has had that Craftsman saw since before I was born. I’m not even sure if he bought it new. It has more metal in it than many modern cars! I’m going to ask him about it and maybe write an entire blog article of my own based on that old saw.
Craftsman is still around of course, but they ain’t what they used to be. They still have a lifetime warranty, except back in the old days you never needed it. And many other brands have lifetime warranties too, so I guess it’s a zero-sum game. The Menards MasterForce brand is very good, I’d say better than Craftsman. I have several MasterForce hand tools and get great performance from them. Readers outside of the upper Midwest probably never heard of Menards but you can order online. Highly recommended.
LikeLike
I almost forgot about Masterforce. They do have good tools. I’d agree that they’re better than Craftsman. Around here Menards is probably *the* place to go for anything related to home improvement. If I need speciality tools I’ll go to Wood Craft but for general purpose tools, it’s probably going to be Menards.
LikeLiked by 1 person