

Making just about anything out of wood means that you are going to need to cut the wood into the correct size and shape for it to be useful. For centuries the only tools carpenters had for cutting and shaping wood were hand saws, wood chisels, and hand planes. And those three hand tools are still essential today. While I use power tools whenever I possibly can (I may be crazy but I’m not stupid) I still use good old fashioned hand versions of those tools all the time.
I’m going to keep this as simple and cheap. You can spend thousands of dollars on hand tools, a lot of them speciality items that you’re probably never going to use or will use only rarely. What you really only need is one saw, three different size chisels, and one or maybe two hand planes. All of the ones I’m going to recommend are reasonably cheap, except for the one hand plane, and you can probably get along nicely without the expensive one. Yes, I have a lot of speciality tools, and I have some tools that are pretty damned pricey, but when it comes down to it the ones I use most often and couldn’t live without are these few.
Saws
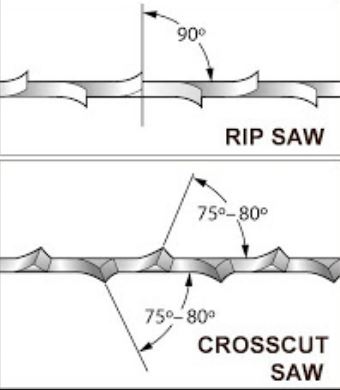
Saws are a basic tool that have been around since at least the time of the ancient Egyptians. They have evolved a lot over the years but it is basically a metal blade with a series of teeth cut into the edge. The teeth are set at a specific angle and ground in a specific way so they not only cut wood, but also drag the cut wood out of the kerf (the slot left by a saw as it cuts through wood). Without the teeth being set and ground properly, the saw would become jammed in the kerf. The set of the teeth (how far out from the blade of the saw they extend) determines how wide the kerf will be. How the teeth are set and ground also determines if the saw is for ripping or cross cutting. A rip saw is designed to cut with the direction of the grain, while a crosscut saw cuts across the grain. Don’t worry about that, though. You don’t need to have two types of hand saws. I certainly don’t. If I have to rip a board lengthwise I’m going to use my table saw or a circular saw with a guide, not a hand saw. Trying to rip a board down the middle with a hand saw is not something most people want to do. But I will grab a hand saw to whack off five inches of a 2X4 that’s too long rather than go trying to find where I left my circular saw.

So you’re ready to get a handsaw, you run down to the local hardware store, and you grab one of these over there in the photo on the right because, well, it’s a saw, right? A good old fashioned more or less generic Stanley saw. And it will work. Not very well, but it will work. But all things considered, a saw like this will probably work reasonably well for you.
But there is a problem with that saw. The same problem shared by all western style saws. As I said, they don’t work very well.
The problem with western style saws is that they cut on the push stroke. Think about that for a minute. You’re wielding a tool made of a thin, floppy piece of metal, and trying to push it through a piece of wood. What happens? If the saw binds in the kerf or if you move the handle of the saw just a tiny bit left or right while pushing, the saw binds up, comes to an abrupt stop, and the metal blade bends. If you’re lucky that’s all that happens and when you pull back the blade will straighten. If you’re not lucky, you now have a permanently bent saw. This is not a good thing.

Then I discovered Japanese style saws a few years ago and the only thing I use my western style saws for these days is hanging on the wall and serving as a home for spiders. The Japanese saws are simple, elegant, razor sharp, cut on the pull stroke, and generally are so much easier and nicer to use that I haven’t touched one of my western style saws since.
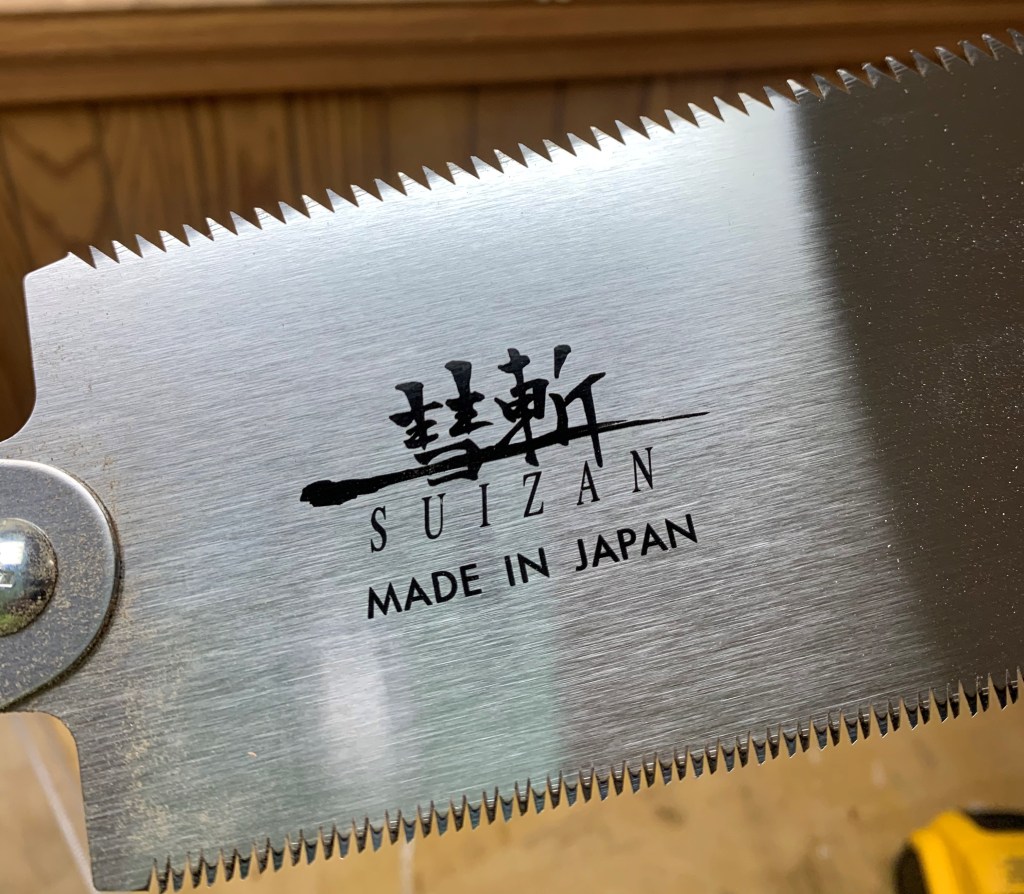
My favorite is from a Japanese maker called Suizan. This one is has a blade a bit less than 10 inches long, has coarse teeth on one side and fine on the other, is razor sharp. It is my all around utility saw here in the shop and the one I use almost all the time. It is a joy to use. It’s not that expensive, either, about $39, and the blade alone can be bought for about $20. Can you get them resharpened when they start to dull? You probably could, but at only $20 for a replacement blade I suspect that having one resharpened would cost more than buying a replacement. Just chuck the old one in recycling and bolt on a new one.
Speciality Saws

I’m going to mention these saws even though you most likely aren’t going to need any of them. At least not unless you’re a really, really high end carpenter turning out very detailed, complex projects. If you’ve done any research at all about woodworking you already know that there are a lot of speciality saws out there like tenon saws, dovetail saws, “gentleman’s” saws, back saws and I don’t know what all else. What about those? Just pretend they don’t exist. Seriously. Oh, they have their place. If, that is, you’re working someplace like Colonial Williamsburg where you have to abandon modern technology and are trying to recreate the past. In the real world, the one you and I live in, no, you don’t need ’em. Do you know when I last cut a dovetail by hand? Maybe twenty years ago just to see if I could do it. If I have to cut dovetails for a joint I use a jig and a router. And as for the other speciality saws? Don’t need ’em. Look, I build full sized wardrobes, cabinets, boxes, chests, make my own hardwood panels for tables, build bookcases, tables, arts and crafts furniture, have made hundreds of mortise and tenon joint and all that fun stuff, and I have never needed one of those speciality hand saws.
Chisels
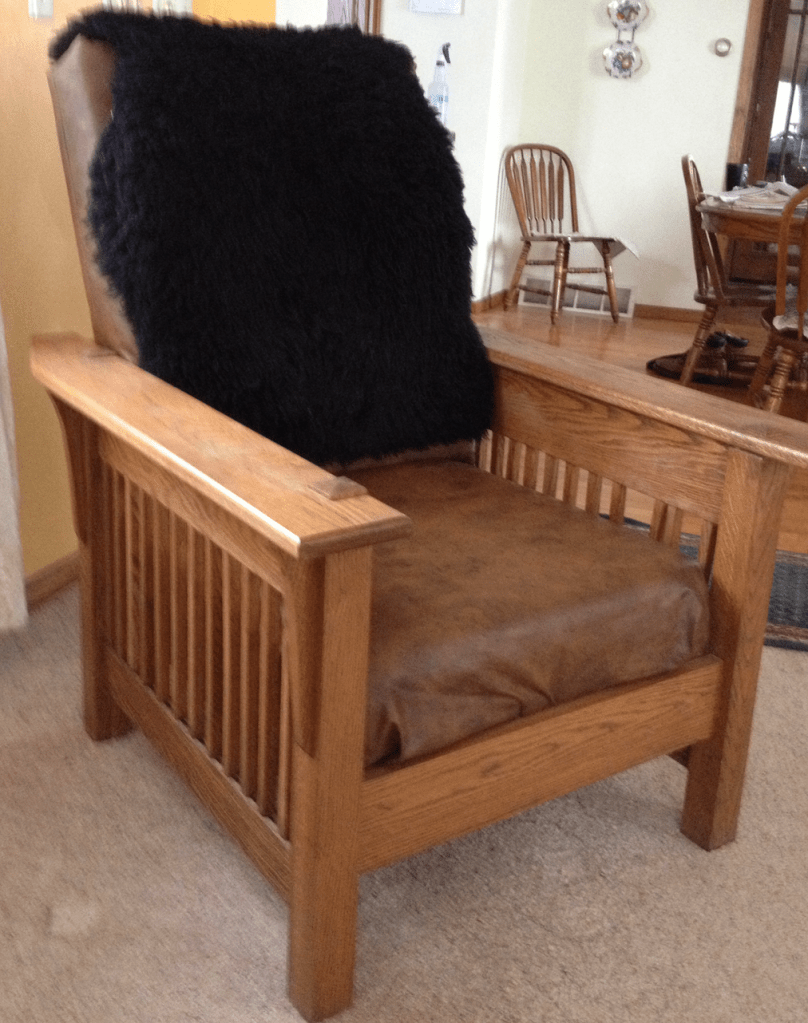
So, why do you need chisels? See that chair over there on the left? That’s one of mine. There isn’t a single screw or nail in that chair. It’s put together entirely with mortise and tenon joints. A lot of mortise and tenon joints. And while most of them were cut with power tools, the final fitting of the joints was done using wood chisels. Whenever you’re trying to fit bits of wood together you’ll find situations where you need to trim just wee bit off to get something to fit, and often the best tool to use for that is one of these:

Now the set with the wooden handles I have is darn near 20 years old at this point, and back then I paid about $120 or so for those, a pretty hefty chunk of money back then. These are Woodcraft brand and I just looked and they don’t seem to carry these any more. A comparable set I did find over there though was going for… Wait, seriously??? $230??? For a set of six chisels? Well, I suppose with inflation and all that, that’s something I should have expected.
What I’m about to tell you would probably give some woodworkers a stroke, but forget about fancy matched sets, things like “Sheffield steel” and “hand forged” and all that guff. You don’t need a fancy boxed set of over priced chisels. You don’t need six, you could probably get away with two, a one inch and a half inch, and maybe a one-quarter inch. For most people those three are all you’ll probably ever need. Of all the chisels I have, the 1 inch and the 1/2 inch are the ones I use about 95% of the time.
And here’s another thing. One of those chisels up there is not like the others. Way off on the left is that nasty looking one with the black handle. Guess what? The reason it looks nasty is because that one lives on the workbench and gets used for everything. It’s a Stanley brand, looks nasty, has a cheap, dented and stained plastic handle, and I paid a whopping $1 for it at a garage sale. Yeah, a buck. And guess what? It works just as good as the high end Sheffield steel ones to its right. Oh, it doesn’t feel quite as good in my hand, it looks awful, but it holds an edge almost as well as the expensive ones. And because it was so cheap I’m not afraid to whack it with hammers, use it to open paint cans, scrape glue or whatever.
So don’t get all goofy about chisels the way some people do. Just go get yourself two or three cheap Stanley’s off the wall at the local hardware store.
The woodworking “elite” will have a fit about this, but when it comes down to it a chisel is, well, a chisel. What matters isn’t the brand, what the handle is made of or any of that. What matters is if it can be sharpened easily and can hold an edge while being used. Period.
But I’ll be honest, I still love those Woodcraft ones and I think they are much, much better. But whether that is because they really are better, or I just think they are, well, I’m not really sure.
Sidenote: I talk about the Stanley brand hand tools quite a bit in this because it is a brand just about anyone who has ever been in a hardware store will recognize, not because I have stock in the company or something like that. I know a lot of people badmouth Stanley hand tools and I’m not sure why. They’re cheap, usually of decent quality, and generally better than the more generic brands that seem to pop up and then vanish almost overnight every few months.
Planes
The other cutting hand tool I want to talk about is the handplane.
Planes get complicated real fast because there are dozens of different types of special purpose planes out there. But you really don’t need to worry about any them. While there are some really neat speciality planes, generally when it comes to those speciality needs you’re going to resort to using power tools like a router, shaper, jointer or planer. But the two most basic types of hand planes can be very useful.
A hand plane is, well, basically it’s a wood chisel held in a special frame. The frame holds the plane iron (the cutting bit) it at a specific height and angle so it doesn’t cut too deep and helps to direct shavings up away from the throat of the plane and out of the way of the cut. It lets you smooth off high spots on a piece of wood, trim the edges of a board, trim the edge of a door that doesn’t fit, shave off sharp corners, that kind of thing.
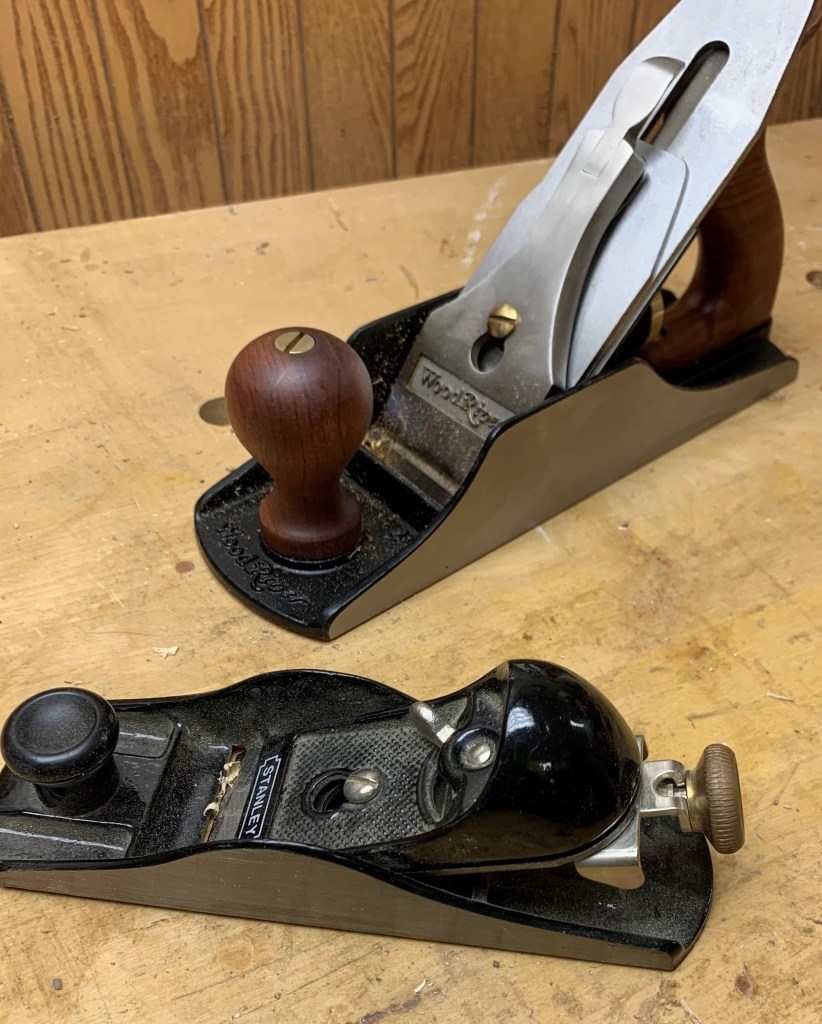
The one on the bottom is my favorite. That is a Stanley block plane (sheesh, there’s Stanley again). Block planes are a bit different from a standard bench plane (that’s the one with the wooden handles in that photo). The blade is set at a lower angle, with the bevel up, and it is designed to cut end grain easily and do light touch up work, take off sharp edges, and work across the grain instead of with the grain. It’s small enough to use with one hand, fairly lightweight and easy to use. This one lives full time on my workbench and it gets used a lot. I use it for cleaning up tenons, knocking off sharp edges and things like that.
They’re handy and reasonably cheap. Dear lord, don’t buy into the hype and pay a hundred bucks or more for one of the fancy ones block planes!. The Stanley works quite nicely, thank you very much, and you can get one for about $30 off Amazon. Yes, you’ll need to do some tinkering with it to get it to work really well, although out of the box is generally isn’t horrible. You’ll definitely need to sharpen the blade and perhaps flatten it. And you may need to flatten the sole of the plane. But that’s easy enough to do with some wet/dry sand paper glued to a sheet of glass. And there’s no need to get obsessive about it and get out your micrometers and all that. Close is good enough for a block plane.
If you do get a plane, I recommend you go out on the internet and look at a short 7 minute video at Fine Woodworking’s website about how to properly “tune up” a plane. (https://www.finewoodworking.com/2013/09/26/handplane-tune-up-tips) Most hand planes will need to be checked over and have some work done to them before they work really well. It isn’t that hard to do, doesn’t take long, and that video goes through the basics pretty well. If you know what you’re doing you can take even take a not very good hand plane and make it work at least reasonably well.
The other plane up there is my Wood River #4 1/2 bench plane.
So, what’s a bench plane do, and do you need one? Basically this is what you’d call a smoothing plane. It’s used to smooth the surface of wood, take down high spots, smooth rough areas and things like that. The #4 is the most common size, usually about 9″ long and with a blade that’s about 2″ wide. I find the #4 a good, all around size. But I prefer the 4 1/2 personally.
So what’s with the 1/2 bit? The 4 1/2 is longer, about 10″, the blade is a bit wider, and it is considerably heavier. I work with mostly hardwoods like white oak and ash, and since I build furniture I work with some lengthy pieces of wood. The 4 1/2 is heavier, meaning it’s easier to keep enough downforce on it to keep a cut going even in hardwood. It’s slightly wider so it covers more territory. And the way I have this one set up and tuned up I have virtually zero tearout. It is smooth and slick and cuts through hardwood like butter, peeling off shavings so thin you can almost read through them. I love this plane. I used this plane to smooth down a white ash table top that was two and a half feet wide and almost four feet long. If it can handle that, it can handle anything.
But do you need one? While they can be nice to have, probably not. Not for a newcomer to woodworking. Nor is something like this an impulse purchase because this is the most expensive hand tool in the whole bunch. The Wood River up there currently is selling for about $200. Granted the Wood River is a high quality hand plane. There are more expensive ones on the market but I did a lot of research before buying this one and the Wood River line of hand planes is just plain good across the board. (oh, wait, that was a pun, wasn’t it – plane, plain. Feel free to wince if you like.)
What about the cheap ones? You can pick up generic bench planes for not much more than that Stanley block plane. But almost all of those aren’t worth the effort it would take to recycle ’em. I have a few of those cheap models, and no matter what I do to them to try to properly tune them up, they’re so badly made with such poor tolerances and poor materials they’re pretty much hopeless.
What about used planes? Well, good luck in finding one at a decent price. Old hand planes have become collectors items, and collectors have driven the price of old planes through the roof. If you do find one chances are good it’s been used hard and will be in bad condition and won’t be good for anything except as a display piece.
In my opinion you probably won’t need a bench plane unless you start to get into building high end stuff. For most of us, all you really need is that $30 block plane.
Sharpening Stuff
Sooner rather than later you are going to need to sharpen this stuff. Chisels get dull, plane irons get dull, saws get dull, and when that happens they don’t work well and can even be dangerous. A mentor of mine once said that more people get hurt by dull tools than sharp ones, and he had a very valid point. Unfortunately nothing seems to generate more hot air, bluster and nonsense than the topic of sharpening. Entire books have been written about sharpening, there are hundreds of hours of video floating around out there, and to be frank, a lot of it is pure nonsense. Some people get ridiculously obsessive about sharpening, often to the point where I don’t see how they ever actually get any work done because they’re spending all their time trying to get the perfect edge on their tools rather than actually doing any work.
Saw Sharpening
I don’t recommend sharpening saws yourself. It requires special tools and skills and generally isn’t worth the effort. Use a sharpening service. Or better yet start using the Japanese style saws like the Suizan up there and when it goes dull just recycle the blade and buy a new one. As I said before, $20 for a replacement blade is probably going to be cheaper than trying to get it resharpened. And the blades last a long, long time.
Chisel and Plane Sharpening
This is something you can do for yourself, and you’ll have to do it because chisels and plane irons get dull pretty quickly depending on what you’re doing with them.
There is a lot of silly stuff floating around on the internet about sharpening, and most of it isn’t worth bothering to read or listen to. I don’t think I’ve ever seen a subject where people get more weird and obsessive than sharpening. This is going to irritate a lot of people, I imagine, but when you find these guys talking about getting mirror polish on the bevels, sharp enough to shave with, and all that guff, it’s just that, guff. It doesn’t matter! The goal isn’t producing a chisel or plane iron that you can shave with, it’s creating an edge sharp enough to cut wood and staying sharp during a reasonable amount of use. I’ve seen Youtube videos of guys spending twenty bloody minutes to get the perfect edge on a chisel. But guess what? The very first time they actually use that chisel the edge is already starting to dull and it doesn’t cut wood any better than my chisels do. And it takes me maybe 30 seconds to sharpen mine.
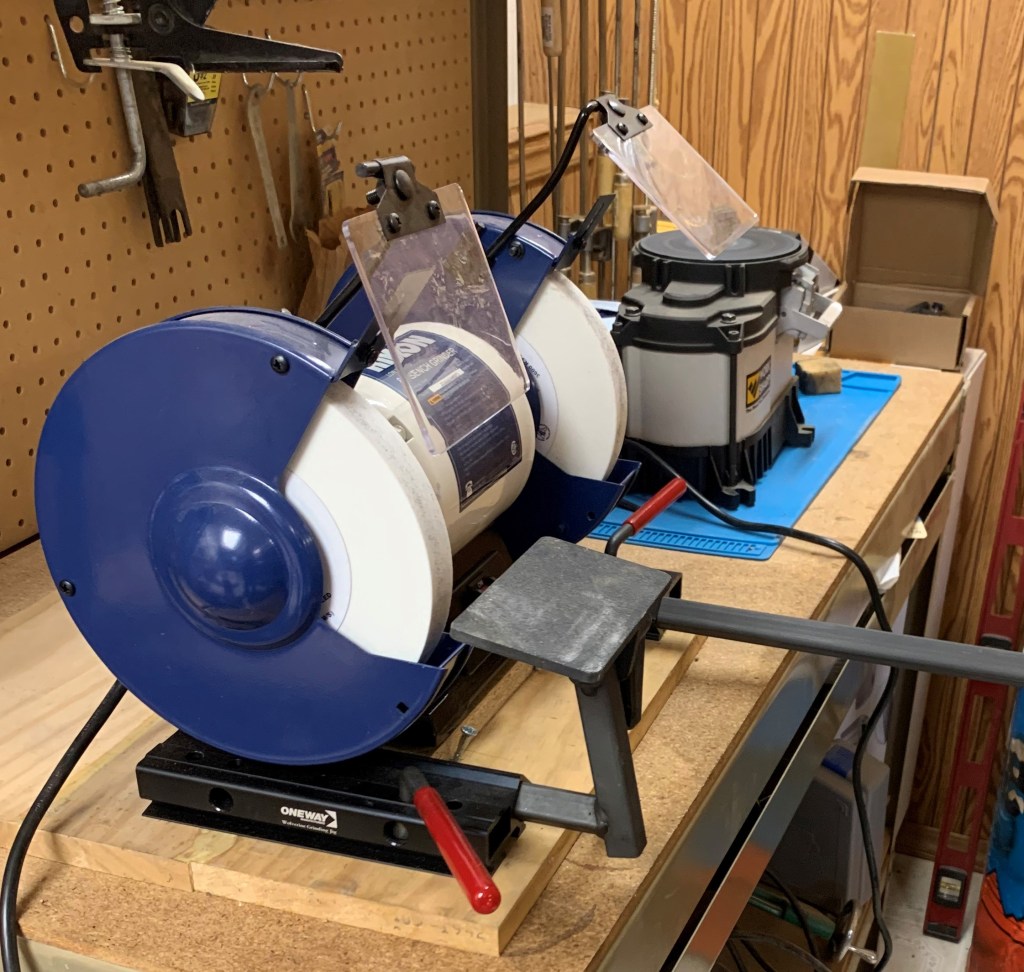
Don’t get me wrong. Sharpening your tools is incredibly important, and it’s something I have to do so often that I have a workbench setup exclusively for that purpose. And you’ll notice that there isn’t a single leather strop, expensive sharpening stone, exotic honing oils or or diamond hones or any of that other stuff sitting around there. Just two power grinders, the Rikon with the white abrasive wheels for my lathe tools, and the Work Sharp sharpening wheel I use for chisels and plane irons.
Let’s look at a really bad drawing of the parts of a chisel.

When sharpening a chisel (or a plane iron) there are three things we’re concerned with; the angel of the bevel, the cutting edge and, believe it or not, the back side of the chisel. You’d think that the only important thing when sharpening a chisel is getting that cutting edge sharp. But that’s only one third of the whole process. All three of those determine how well the chisel will cut wood. Sounds complicated but it takes me a half minute or less to do it.

Here’s a short video of me down below sharpening my $1 garage sale special Stanley chisel, and doing it in less than half a minute. How? I cheat of course. I use a machine. In this case it’s a Work Sharp sharpening system. And yes, it works just as easy and fast as it shows in the video once you get it set up. I admit it isn’t cheap. It goes for about $200 over on Amazon. But the darn thing just works. I don’t know how much time and effort this thing has saved me in the years I’ve owned it. I’ve had this one for, good grief, must be ten years or so now. It is one of the very few sharpening tools I own that actually lives up to its advertising.
Let’s see if this video thingie actually works and take a look at me actually sharpening a chisel, in this case my beat up old $1 garage sale Stanley.
Egads, looks like it did upload the video. Okay, let’s go through this.
I blackened the backside of the chisel and the bevel to make it easier to see what actually happens. First I put the back of the chisel flat down on the sharpening wheel and hold it in place to make sure the back of the chisel is perfectly flat. Once I do that, I put it in the guide underneath and slide it up onto the underside of the wheel, which also has an abrasive on it. The guide holds it at the correct angle for the bevel. Then when it was finished sharpening I got a piece of scrap oak and sliced some end grain to see how sharp it was. Which was pretty darn sharp. It doesn’t slice through end grain like a hot knife through butter, but it’s pretty darned close to that. You couldn’t shave with that chisel, but I don’t want to shave with it, I just want it to cut wood, and it does quite nicely, thank you. And it took – what? Less than 20 seconds to sharpen it?
But, GF, you say, I don’t want to drop $200 just to sharpen a chisel. Good for you. I don’t blame you at all, and you don’t have to. You can do it by hand with a piece of glass, some wet/dry sandpaper and one of these.

As the label says, that’s a honing guide made by Veritas. It, along with the gadget to help you set the correct bevel angle, will set you back about $70, or a bit less if you shop around. When set up properly it will hold your chisel or plane iron at the proper angle. Then you get out a piece of glass, stick some wet/dry sandpaper to it, and use the guide to hold the chisel properly while you move it back and forth across the sandpaper. You start with maybe, oh, 240 grit paper, and work your way up to 1,000 grit. That should give you and edge that’s more than sharp enough for general woodworking.

It works reasonably well, and I sharpened chisels like this for a long time before I got the Work Sharp rig.
That’s it for this time. In part 3 I’ll look at tools where the prices do get pretty high pretty fast, power tools.

Great post. I’m saving a copy of this one.
LikeLike
Thanks! Feedback is always appreciated. I’m glad you found it helpful
LikeLike
This was a really interesting read! I am relatively new to wood working, and when I first set myself up with my basic tool kit I was completely overwhelmed with all the opinions and options! A post like this would have been most useful! Since then I have handled tools of varying price ranges, and have come to recognise that sometimes the cheaper tools simply do the job, and whilst it can be a pleasure to handle the high end tools, as a newbie undertaking basic projects, I probably overspent on a few items. You learn!
I did start off with a Japanese saw, very similar to your own and it has served me brilliantly! As for block planes, they are the one tool that always seemed so expensive and daunting that I never actually added one to my tool kit! Yet the number of times I wish I had one at hand! I shall look into your recommendation, though I curious, I believe they come in different sizes? What would be a general purpose size? Thanks!
LikeLike
Thanks for your comments. I always appreciate feedback from people. 🙂
The Stanley block planes are generally of decent quality. They’re small, light, and useful for shaving off a door that doesn’t fit or cleaning up a tennon. They’re about 6 inches long, 2 inches wide, fairly light weight. You should be able to get one for about $40 or less. It definitely will need to be “tuned” by sharpening the blade and flattening the sole, but that’s easy to do with some wet/dry sandpaper glued to a sheet of glass. Block planes are more simple than a bench plane, easy to use and fairly cheap.
If you want something bigger like a No. 4 bench plane, they’re certainly useful. Whenever I’m making furniture I use mine for smoothing boards and when I glue larger panels together that won’t fit through my electric planer. They’re bigger, about 10 inches long, and considerably heavier. And a *lot* more expensive for a good one. The Wood River 4 1/2 is perfect for me, and is very well made, but it’s expensive, about $200. There are really cheap ones on the market like the Great Neck for about $50 but my experience with the cheap ones is that they’re such poor quality they aren’t worth it. With the larger size planes like the No. 4 size, they look simple, but aren’t. Unless they’re machined to very close tolerances, made of good steel and well machined, they just aren’t going to work, so that means the good ones are fairly expensive.
Tools are one of those areas where people can get a bit overwhelmed by the choices, the price ranges, etc. And there’s always the temptation to buy speciality tools you don’t need or need only very rarely. I bought into the hype about biscuit joiners when they turned up oh, 15 or so years ago. I was making a lot of hardwood panels for tables and wardrobes at the time and thought it would be great for glueing up panels and bought a high end one and tried it. Turned out that they didn’t work very well, the joints weren’t any stronger than a normal glue joint, they were hard to get aligned properly, and actually made things more complex without helping anything. I went back to making standard glue joints and I have a $200 tool sitting there gathering dust.
When it comes to hand tools, I’ve found that while the high end, expensive tools can be fantastic, often “good enough” quality, inexpensive tools are, well, good enough to get the job done.
One more note about hand planes – if you do get one look at that youtube video link I posted in the blog. It shows how to take a plane apart, flaten the sole and set it up. There are some really good resources out there if you look around. They can show you how to properly set it up, something that can seem intimidating at first but once you learn how it makes using them a lot easier
LikeLike
Thanks for the prompt, and detailed, reply! Yes! I saw that you mentioned the biscuit joiner in a recent post which was another interesting read! I have just watched the video and it was very informative, an excellent recommendation, it definitely seems less daunting now. 🙂
LikeLike
I’m glad the video helped. Hand planes seem a bit intimidating when the experts start talking about tuning it up, adjusting the chip breaker, the frog, mouth size and all that stuff but they’re really pretty simple and sharpening and preparing them for use is dead simple, and cheap. All you need is a sheet of glass and some wet/dry sandpaper, and a cheap guide to hold the plane. And a little block plane is even more simple.
Biscuit joiners, I can see why they might be useful for some people. They do make it easier to align the boards when gluing up a panel, but I’ve never run into a situation where they actually did anything useful when working with real wood. If you’re using good quality glue, properly prepare the edges and clamp it properly, I’ve never had even an edge glued joint fail. The wood will blow out before the glue joint will. Normally you can’t edge glue something like particle board and biscuits might be helpful there, but I’d be nervous about that. Particle board is fragile, and biscuits work by swelling up in the slots as they absorb the glue. I’d be afraid of the material around a biscuit blowing out as the biscuit swells.
LikeLiked by 1 person