
Ha! You thought I was going to get bored with this and there wouldn’t be a part two, didn’t you? Well there is a part two, so let’s get on with this, shall we?

Almost any kind of fiddling around with electronics of any sort is going to require soldering sooner or later. Soldering is the joining of two or more bits of metal together via the application of heat and solder, a metal which has a lower melting point than the two bits of metal being joined. The solder serves two purposes: First it physically joins the two parts together. Second, it provides electrical continuity, a path for electricity to flow. It requires the use of a heat source, i.e. a soldering iron or pencil, and the solder itself.
Solder is usually an alloy of lead and other metals, or one of the newer lead free solders that generally include antimony, copper, silver, zinc and/or other metals to replace the lead. Silver solder, a mixture of silver and copper, is widely used in reflow and wave soldering, and often for hand soldering as well. Because of the health issues related to lead, many manufacturers are moving to the use of lead free solder. Lead based solder is still widely available and is still legal, but I would not be surprised if it is phased out entirely in the fairly near future.(1)
Now I’m not going to launch into a tutorial on how to solder. There are hundreds of the things floating around out there on electronics web sites, YouTube, etc. Some of them actually know what they’re talking about. I’m going to talk about the equipment you need to actually do it. And the first item is a soldering iron.
A soldering iron or soldering gun or soldering pencil is the essential tool. It is the device

that actually generates the heat that is required to melt the solder. Oh, look, there’s a soldering iron over there on the right. The big can thing is, by the way, a blow torch. My, isn’t it a handsome thing, all 19th century looking and steampunky and all that.
Well it is a soldering iron, but not exactly the kind we’re interested in, now is it? I think we’re interested in something a bit more modern and which won’t burn down the house if you actually try using it the way this one could. So let’s look at this one instead, shall we?

This is a cheap Radio Shack soldering pencil from a hobbyist soldering kit that I picked up for… Well, I forget what I paid for it but it was under $30. And with Radio Shack going bankrupt (yes, again) if there are any RS stores in your area you might want to run out and see what kind of deals you can pick up. It came with a clip on heat sink, needle nose pliers, side cutters and a few other goodies. RS has been selling this same basic kit for something like 40 years. The soldering pencil is cheaply made and often doesn’t last very long, but if you’re just looking for a cheap way to solder a few joints this will get the job done.
If you’re going to do any kind of serious electronics work, though, you’re going to need something like this over here on the right. That’s my Weller variable temperature soldering station with a digital readout for the temperature. It is a lot more money than the RS special, going for around $140 or so,

but I’ve had this one for about 5 years now and it’s still going strong and works quite well.
Two things you want to look for – a variety of different tips for different soldering jobs, and variable temperature. You need different tips for different types of soldering, from needle sharp tips for small components to spade type tips for desoldering. And the temperature control is, I feel anyway, essential. Different formulas of solder have different melting points. You want it hot enough to adequately melt the solder while at the same time not too hot to avoid damaging the equipment you’re working on.
A couple of other things before we move on here. You see a couple of other items in that photo, a thing that looks like a rather odd syringe, and a golden ball full of what looks like hair.
The ball thing is actually a tip cleaner. The ball holds steel wool. The hot tip is rammed into the steel wool, cleaning it of accumulated solder, flux, etc. Some kind of tip cleaner is essential. A dirty soldering tip does not conduct heat well, and heat is what it’s all about. The cleaner the tip, the better.
The blue and chrome gadget is what is generally called a solder sucker, a tool for removing rather than applying solder.

I find that I’m often using my soldering equipment for removing solder rather than applying it. You’ll find you have to desolder components from a circuit board before you can make a repair or modification. The only way to do that is by melting the existing solder and removing it somehow.
The sucker works by applying a vacuum which sucks up the solder. There are different types. Some use rubber squeeze balls, some use a piston powered pump like this one, others, much more expensive, have electric vacuum pumps. The other way is to use solder wick or braid. This is a metal braid, usually coated with some kind of flux to attract liquid solder better. The braid is pushed down onto the cold solder with the tip of the soldering iron when then heats everything up and the braid absorbs the liquified solder.
If you do a lot of desoldering, you might want to get an actual desoldering system. But for most of us good old desoldering wick or a solder sucker is good enough.
Let’s move on to one final item in this discussion about soldering, and that’s this puppy,  the ubiquitous soldering gun. These things are designed to apply a lot of heat to large objects, quickly, and as such they are virtually useless for most electronic soldering jobs. They’re too big, too awkward, apply too much heat. Using one of these on a circuit board is sort of like using a 12 gauge shotgun to hunt mice. You can do it, sure, but there isn’t going to be anything left of your quarry when you’re done.
But there are times you need something like this. Especially if you’re trying to solder PL-259 connectors. Your average soldering pencil just doesn’t supply enough heat quickly enough. By the time you’ve heated the connector up enough to solder it, you’ll discover you’ve also melted about two inches of the insulation on the coax as well.
Now there are other things I haven’t touched on that are related to soldering, but which I’m not going to get into. Like SMD. SMD stands for Surface Mount Device. Discrete components (even entire IC chips) are now often mounted not via good old fashioned through-hole connections, but on solder pads on the surface of the board. While this is great for robotic assembly systems, it’s not good for people who want to try to repair the blasted things or have to otherwise work with SMD technology. Dealing with resistors, capacitors, diodes and other components that are about the size of a quarter of a grain of rice and mounted on the surface of a board on solder pads, well, it isn’t exactly a great deal of fun. Working with SMD can be done, but it takes practice, a steady hand, and a pretty good magnifying lens, preferably with a built in light.
Then there is the question of fumes. There is no denying the fact that some of the fumes given off by solders and fluxes when heated are not healthy for you to breathe. Even some of the plastics that the components are made from can give off fumes that are toxic. If you’re just soldering a joint or two it isn’t bad, but if you’re doing a lot of it, you’re going to want to look into a good venting system or a fume extraction device of some sort.
Now let’s look at power.
Power. As in electrical power of course. You need it.

Now with most devices you just plug the thing into a wall socket and turn it on. But sometimes things are that simple. Once you get into amateur radio and/or electronics, you will quickly find out that different devices have different power requirements. Odd ball voltages, weird batteries that no one carries, and odd power connector plugs. Sometimes very odd power plugs.
Now a lot of amateur radio equipment runs on 12 volt DC. My Kenwood TS-2000 transceiver requires 12V, my antenna tuner runs on 12V, my big dummy load runs on 12V.
And to complicate things a bit more, 12V doesn’t actually mean 12V. For reasons I won’t get into here (you do have that google thing, right?) most 12V devices actually want around 14V, and if you try to feed them less than that some very strange things can happen.
Now if you do have 12V equipment you want to run, what do you do? Go out and get

yourself a car battery or something? Well, you could if you really wanted to. It would work. For a while. But you’re going to need a 12V power supply similar to this one over on the left. This particular one has a handy Amp meter that tells you how many amps the device(s) connected to it are drawing, and a meter showing the actual voltage the power supply is producing. This particular power supply allows you to adjust the voltage up to about 16V if you need it for some reason.
You can get power supplies with all kinds of bells and whistles on them, but you don’t really need most of them. You can get switching power supplies, transformer power supplies… Generally the switching power supplies are a lot lighter, but they have more electronics in them that can screw up. Transformer based power supplies generally work well, but can use significantly more electricity than switching supplies. Which one you choose depends on what your preferences are, budget, etc. Before you buy one go check out the reviews on eham.net or other sources first.
Once you do get a power supply, the question of how to get that power to the equipment that needs it comes up. Most 12V power supplies only have one or two supply points on them, and generally they aren’t the most convenient things in the world to use. You basically shove a couple of wires into holes and have to tighten down screws to make the actual connection. It’s awkward, and if you have more than one piece of equipment and only one power supply, you’re going to wear those screws out pretty fast switching things around. So I use one of these for 12V power.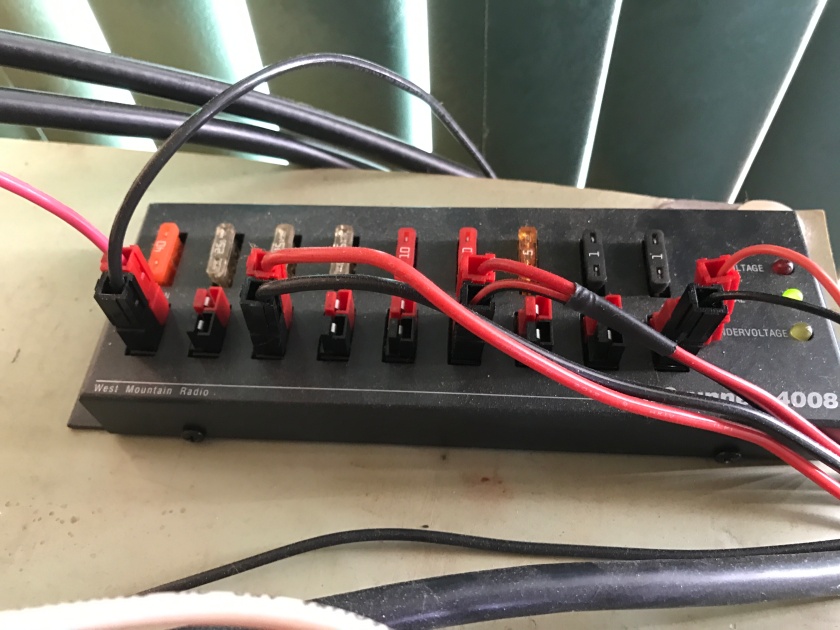
This particular unit is a Rig Runner from West Mountain Radio. It’s basically just a power strip, but for 12V rather than 120V. The main line from the 12V power supply is plugged into the outlets on the far left, and the other connectors then distribute that power. Each of the outlets is fused for various amperage requirements. If you’ve never seen that kind of connector before, don’t worry, I’ll come to them in a minute.
Now power strips like this are available from a variety of companies. MFJ makes them, as does West Mountain. Or you can make your own easily enough.
Now let’s talk about those connectors. If you haven’t seen those before, they’re called  Anderson Power Pole connectors, and they’ve become something of a standard method of connecting power to devices in the amateur radio community. ARES has declare them to be the universal power connector out in the EmCom world, and I have to admit they make life a hell of a lot easier. No more stripping wires, fiddling with electrical tape and all that nonsense. Just install them on the ends of your power leads and you’re good to go.
The drawback is that while they’re simple to use, they do require a special crimping tool to install them on the ends of your wires. A good one like the one in the photo there can set you back a hefty chunk of money.
But if you’ve ever had to fiddle around in the cold under the dash of a car trying to strip insulation off wires, wrap wires with electrical tape, well, that kind of thing gets old fast.
Let’s talk about 240 volt for a moment. The only reason you might need 240V in your shack is if you’re going to be running a 1,500 watt output amplifier. If you want to fire up a big old tube amp and pump enough energy into your antenna to melt the vinyl siding on the neighbor’s house, hey, who am I to tell you not to? But do you really need it? No.
If you really need to put out more power, a 500 – 600 watt amplifier will generally run pretty well on 120V. A lot of the high output amps can be rewired to run on 120v, although at reduced output. So no, you don’t really need 240 volt in your shack.
- I am not going to get involved in the heated argument of lead versus lead-free solder. While many claim that lead-free solder works just as well, is just as reliable, and is just as easy to use as the lead type, there are probably an equal number of people who will claim the lead-free solders are utter garbage. I switched to using lead-free solder for plumbing something like thirty years ago and I’ve never had any problems with it. While I still use lead based solder for electronics, that is due to the fact I have about fifty spools of the stuff laying around the house.

Wow, GREAT overview and quickie introduction to soldering. I do agree that the cheap solder pencils (some of which are less than $10) are not worth having. I have a Weller station similar to yours, and it is a must for any serious hobbyist who is going to be doing a lot of their own fixes and repairs, or experiments/kits, etc. For the inbetweeners who may not have a need for a $160+ soldering station, but don’t want to settle for a $7 junker, there are good mid level soldering irons in the $25-$50 range. As you mentioned, a soldering gun has limited applications, but when you need it, you need it bad. I also sometimes use a propane or butane torch. When you have a large, heavy chunk of metal to heat up, or you’re in a situation where it would be awkward to run an extension cord (such as attaching an antenna connector while up on a roof), a torch is awesome. Also, I suggest keeping some solder flux in the toolbox. It makes the job way easier and faster, especially for thick wires that are hard to heat up or when you want to minimize heat exposure to insulation or other components.
LikeLike
I should have mentioned flux, really. It’s darn near essential. And heat sinks. And, well, a lot of things but I wanted to keep it as brief as I could.
There are some really good mid-range units on the market. CQ magazine just had a brief review of a variable temperature one selling for around $80 that looks quite good indeed. If it’s as durable as the Weller it will sure help a lot of people’s budgets at that price.
LikeLiked by 1 person