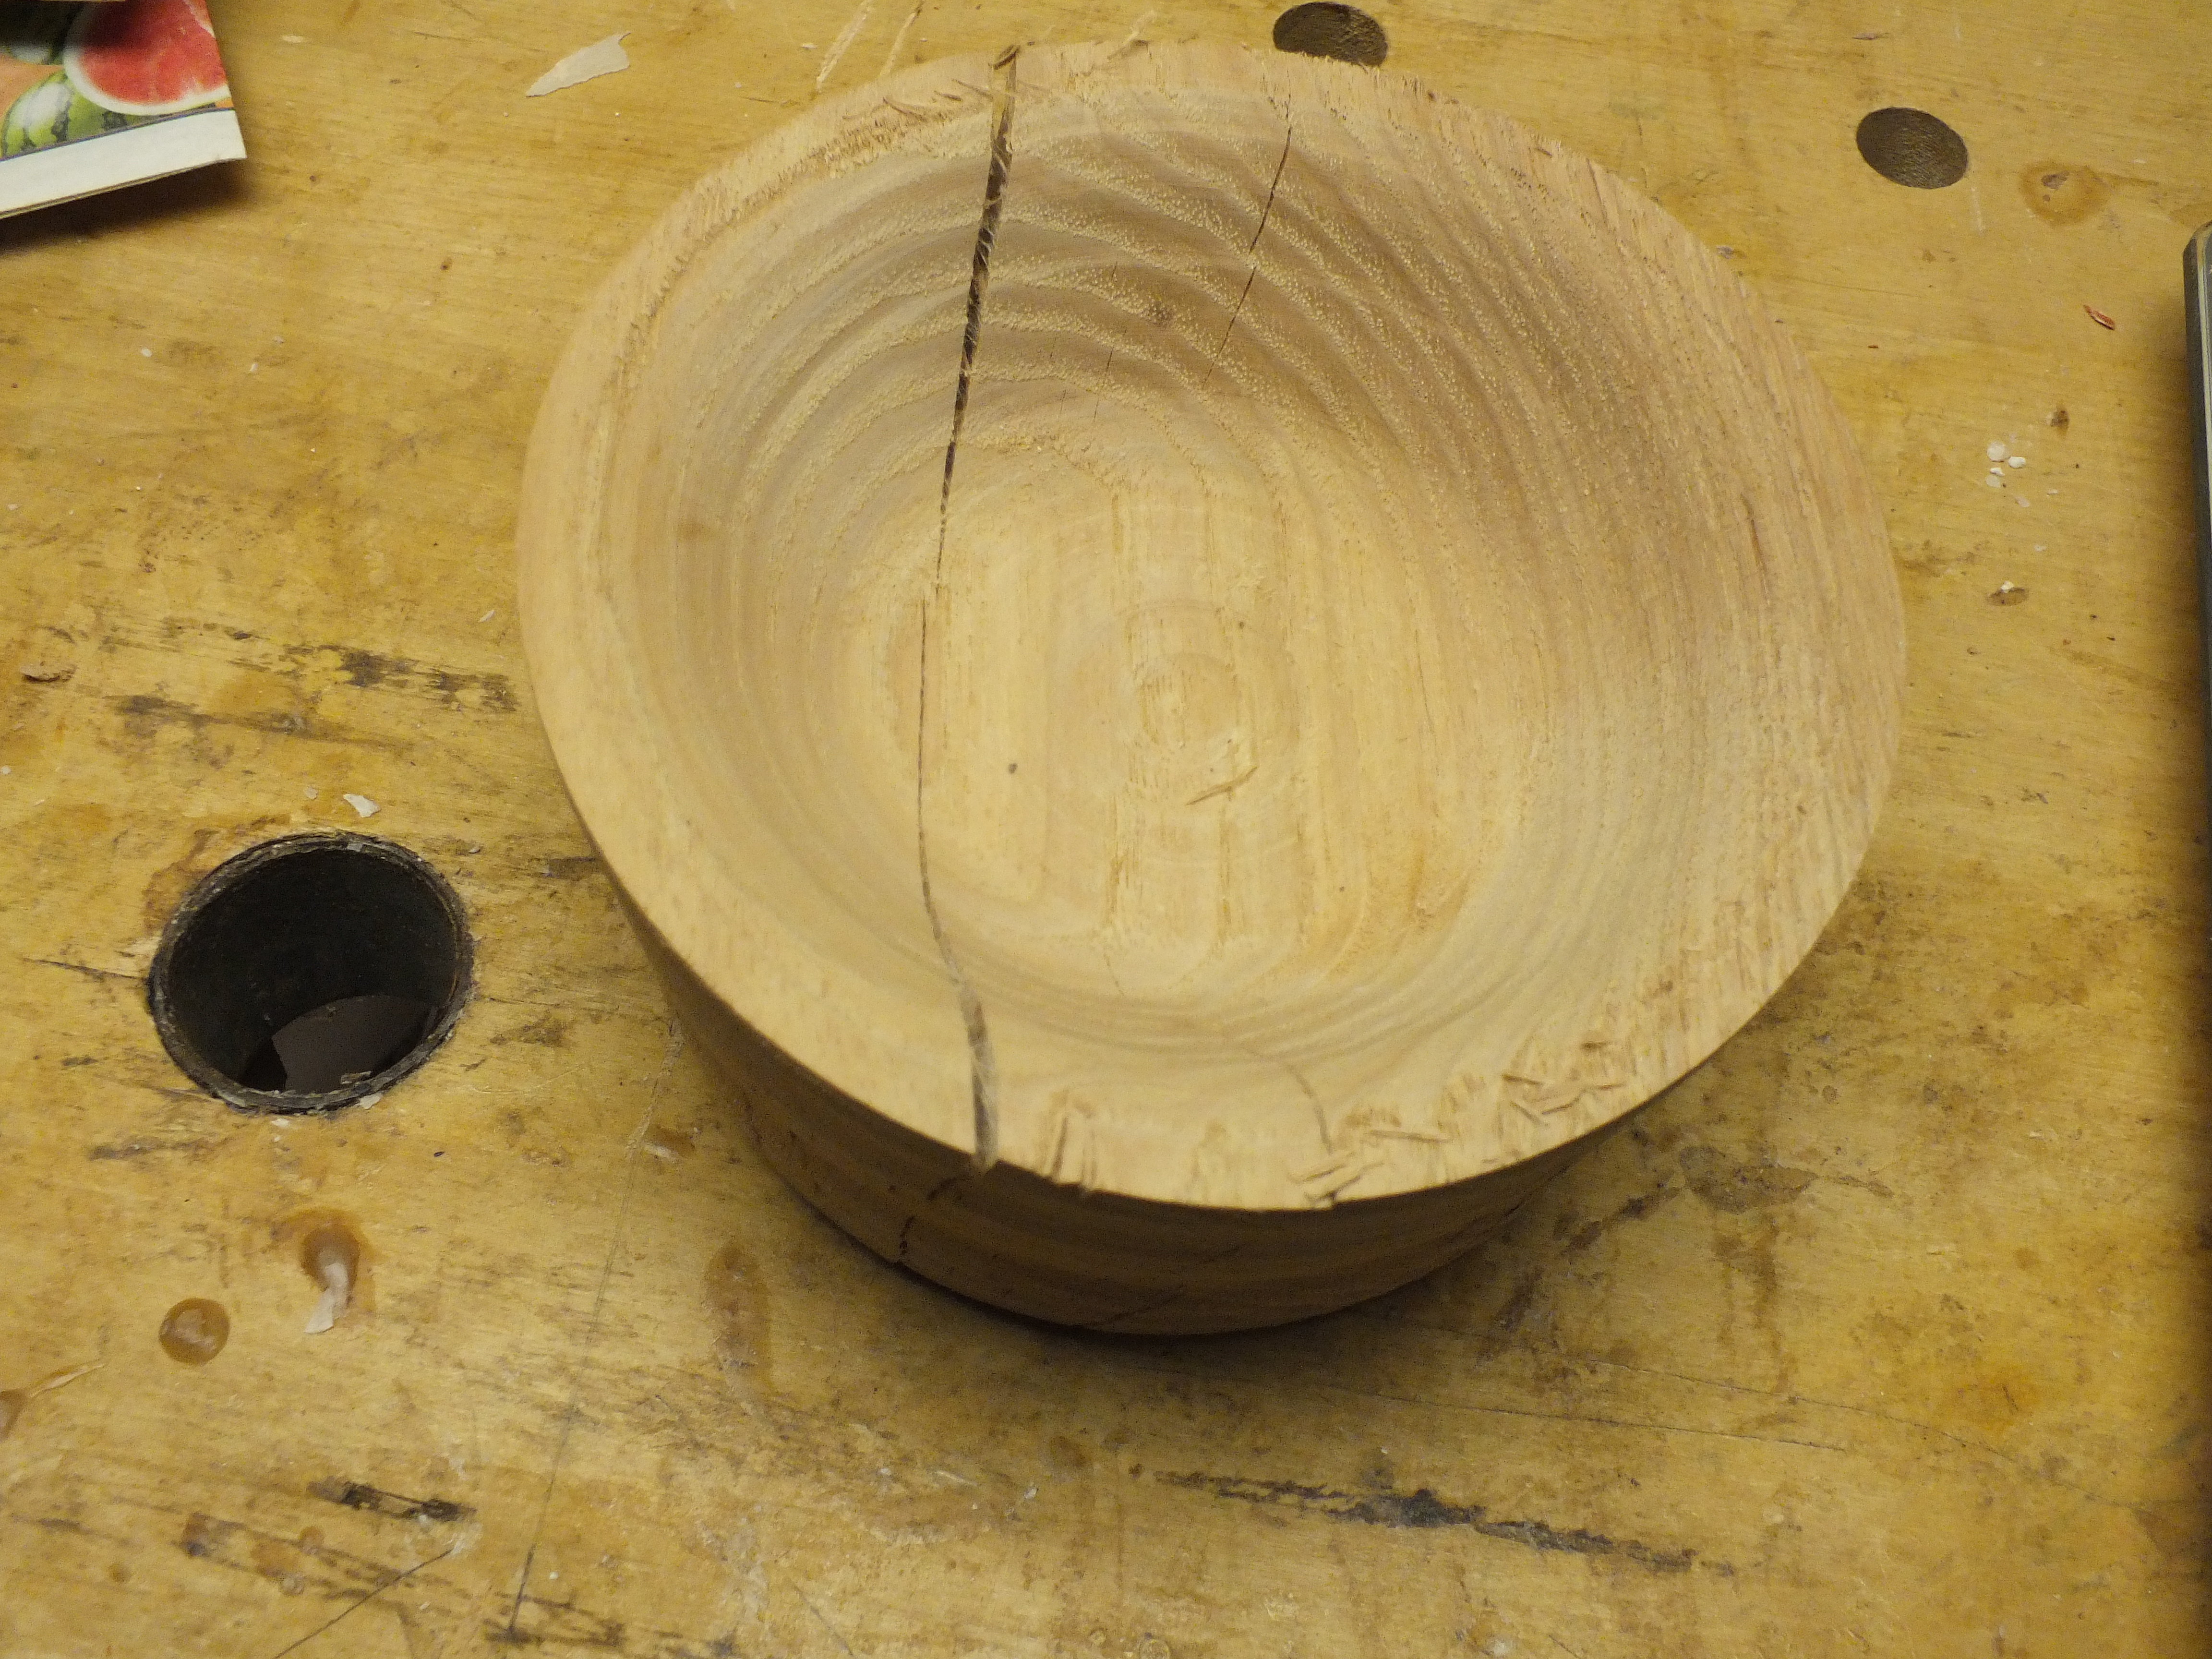
I’ve made a lot of mistakes learning how to do this, but sometimes the wood itself is just – just weird and things go wrong no matter what I do, and that’s what happened here. There was no sign of cracking or anything at all odd about this block of wood when I started turning it, but for some reason it ended up with cracks all over. It was reasonably dry, well under 15% moisture. The wood itself seemed reasonably stable, with nice grain. But by the time I got it turned into a rough shape it started cracking. I took it off the lathe and let it sit for a few days and this is what it looks like now.
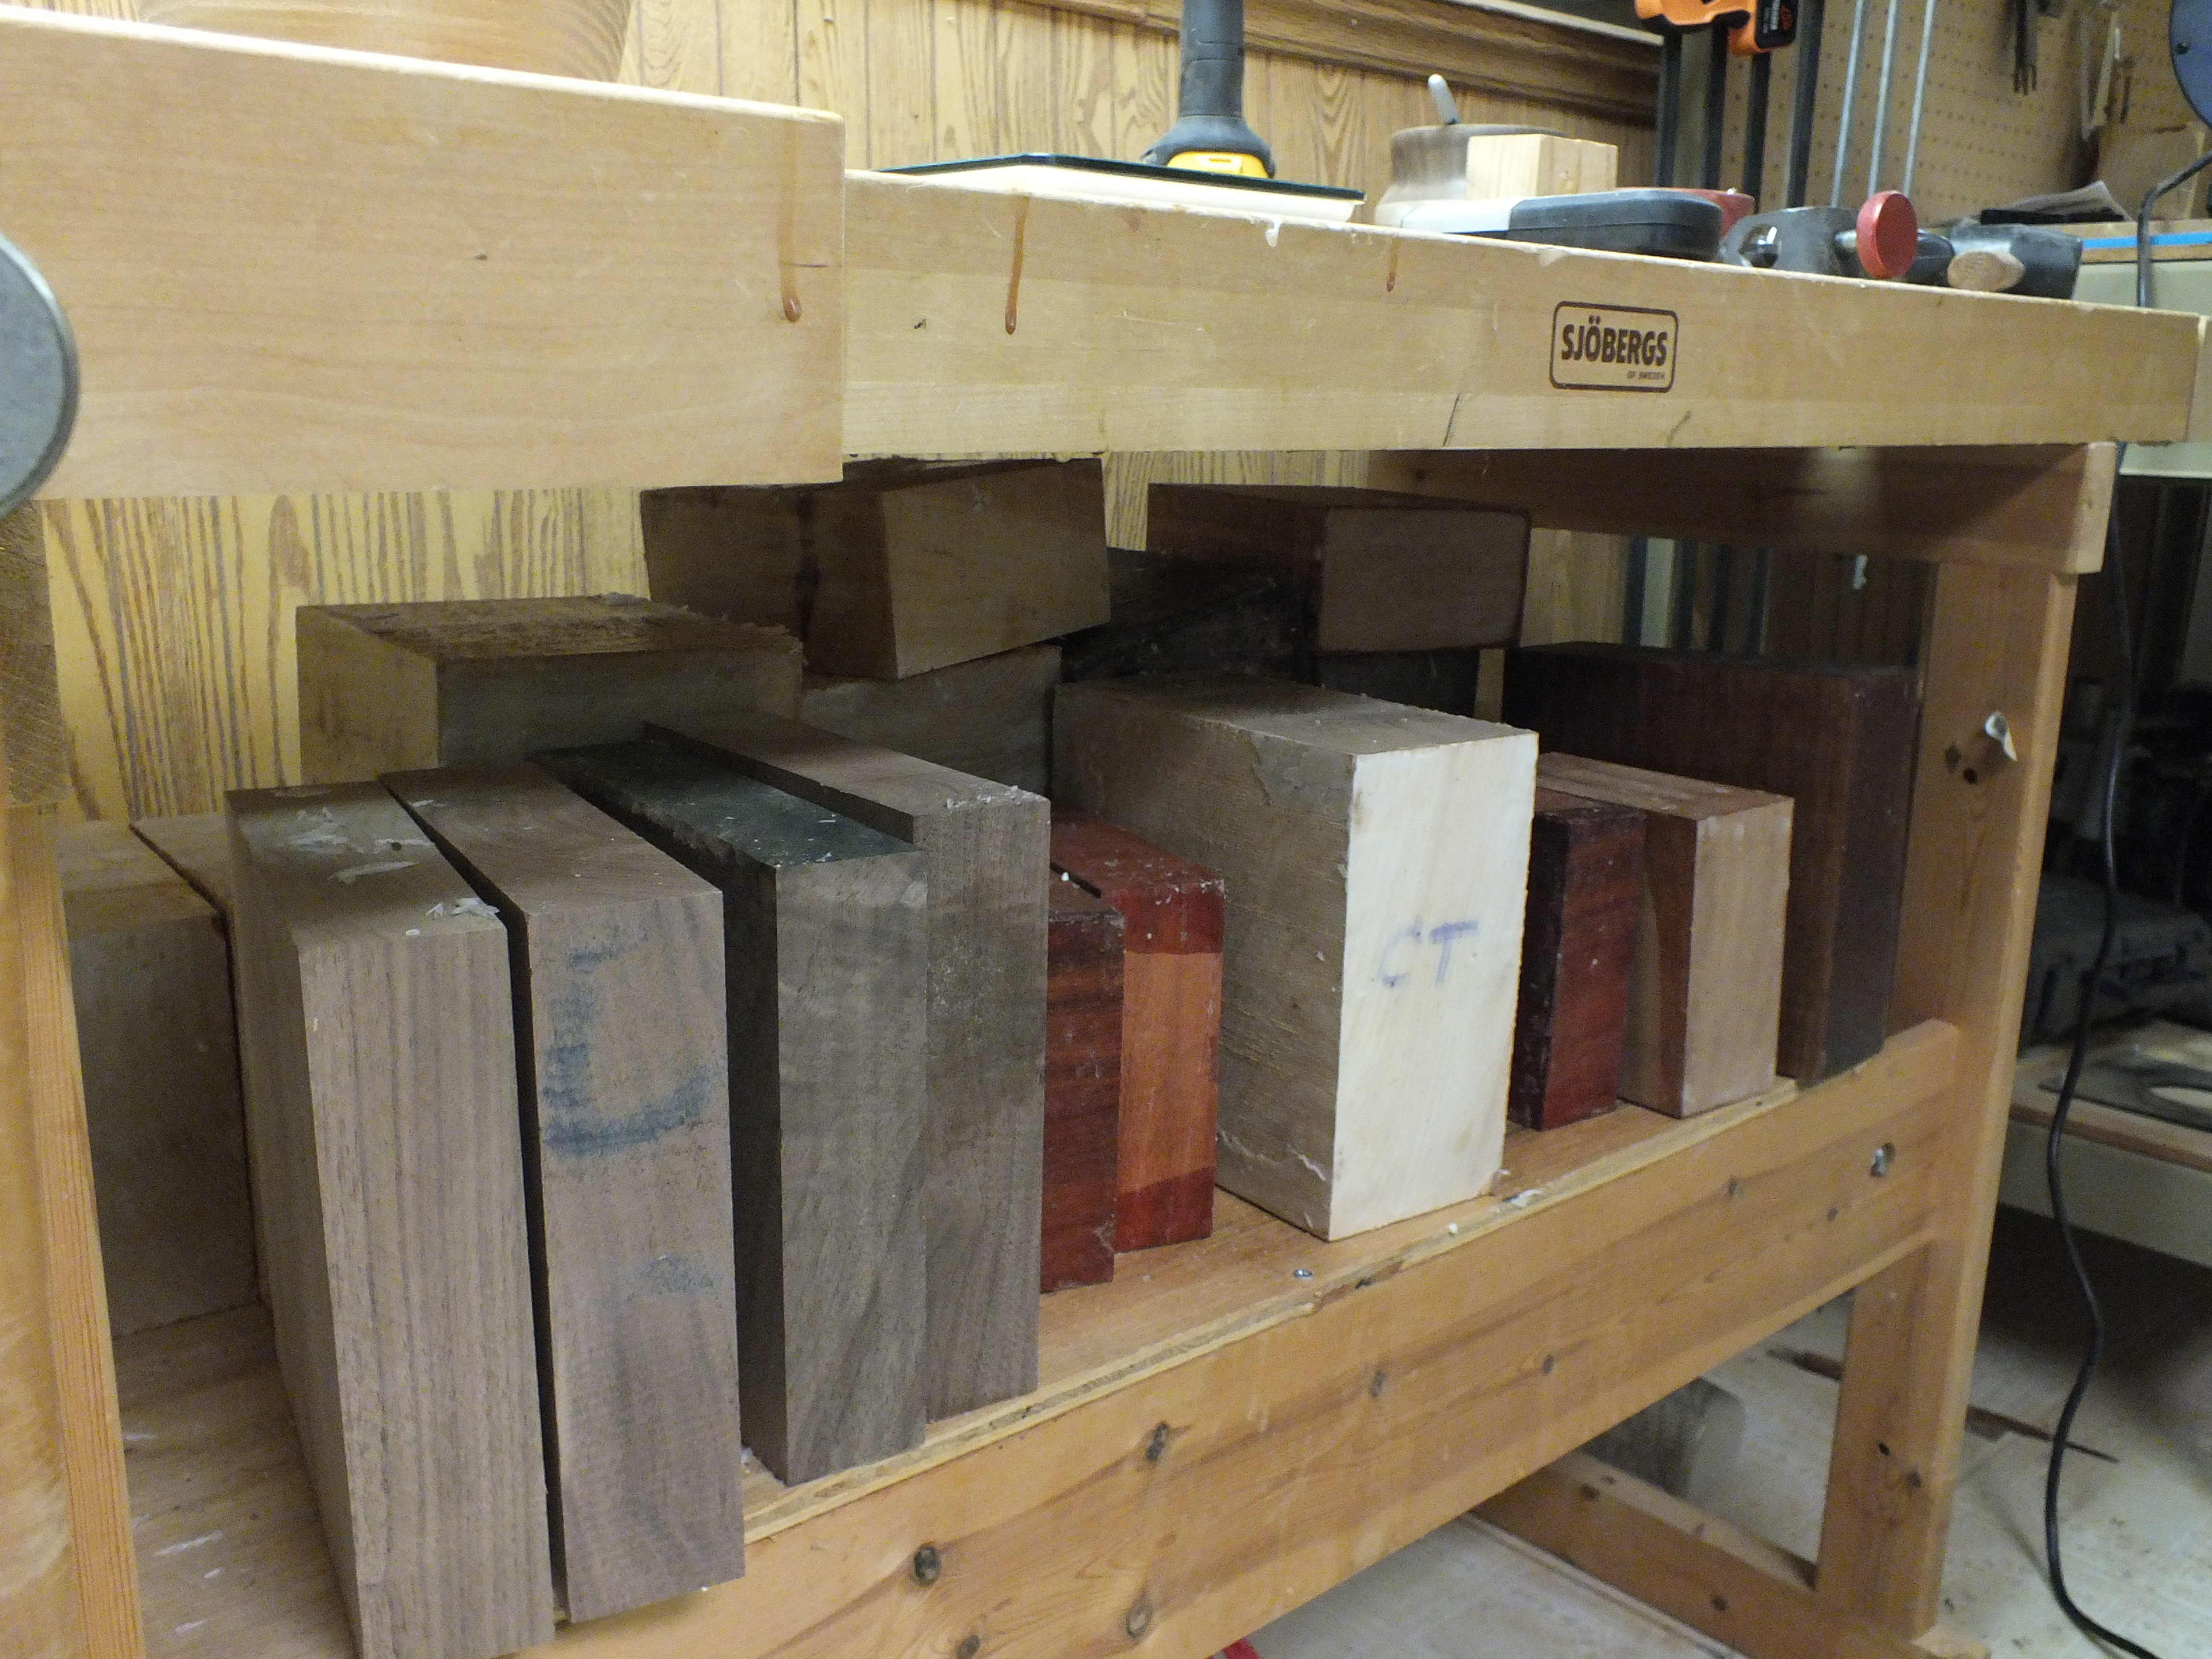
I seem to collect wood like some people collect baseball cards.
I suppose I could try to salvage something from this piece. I could seal up the cracks with CA or cast it in resin but, well, why? It would still look like a badly cracked bit of wood. This one will get chucked into the burn pile, I think. Won’t be the first time I’ve had to do that. And it isn’t like I have a wood shortage around here. I have dozens of blanks of various sizes and species sitting on the shelf in varying stages of drying, quite a few probably ready to turn.
I don’t just do wood turning, of course. I do everything from rough framing to furniture.
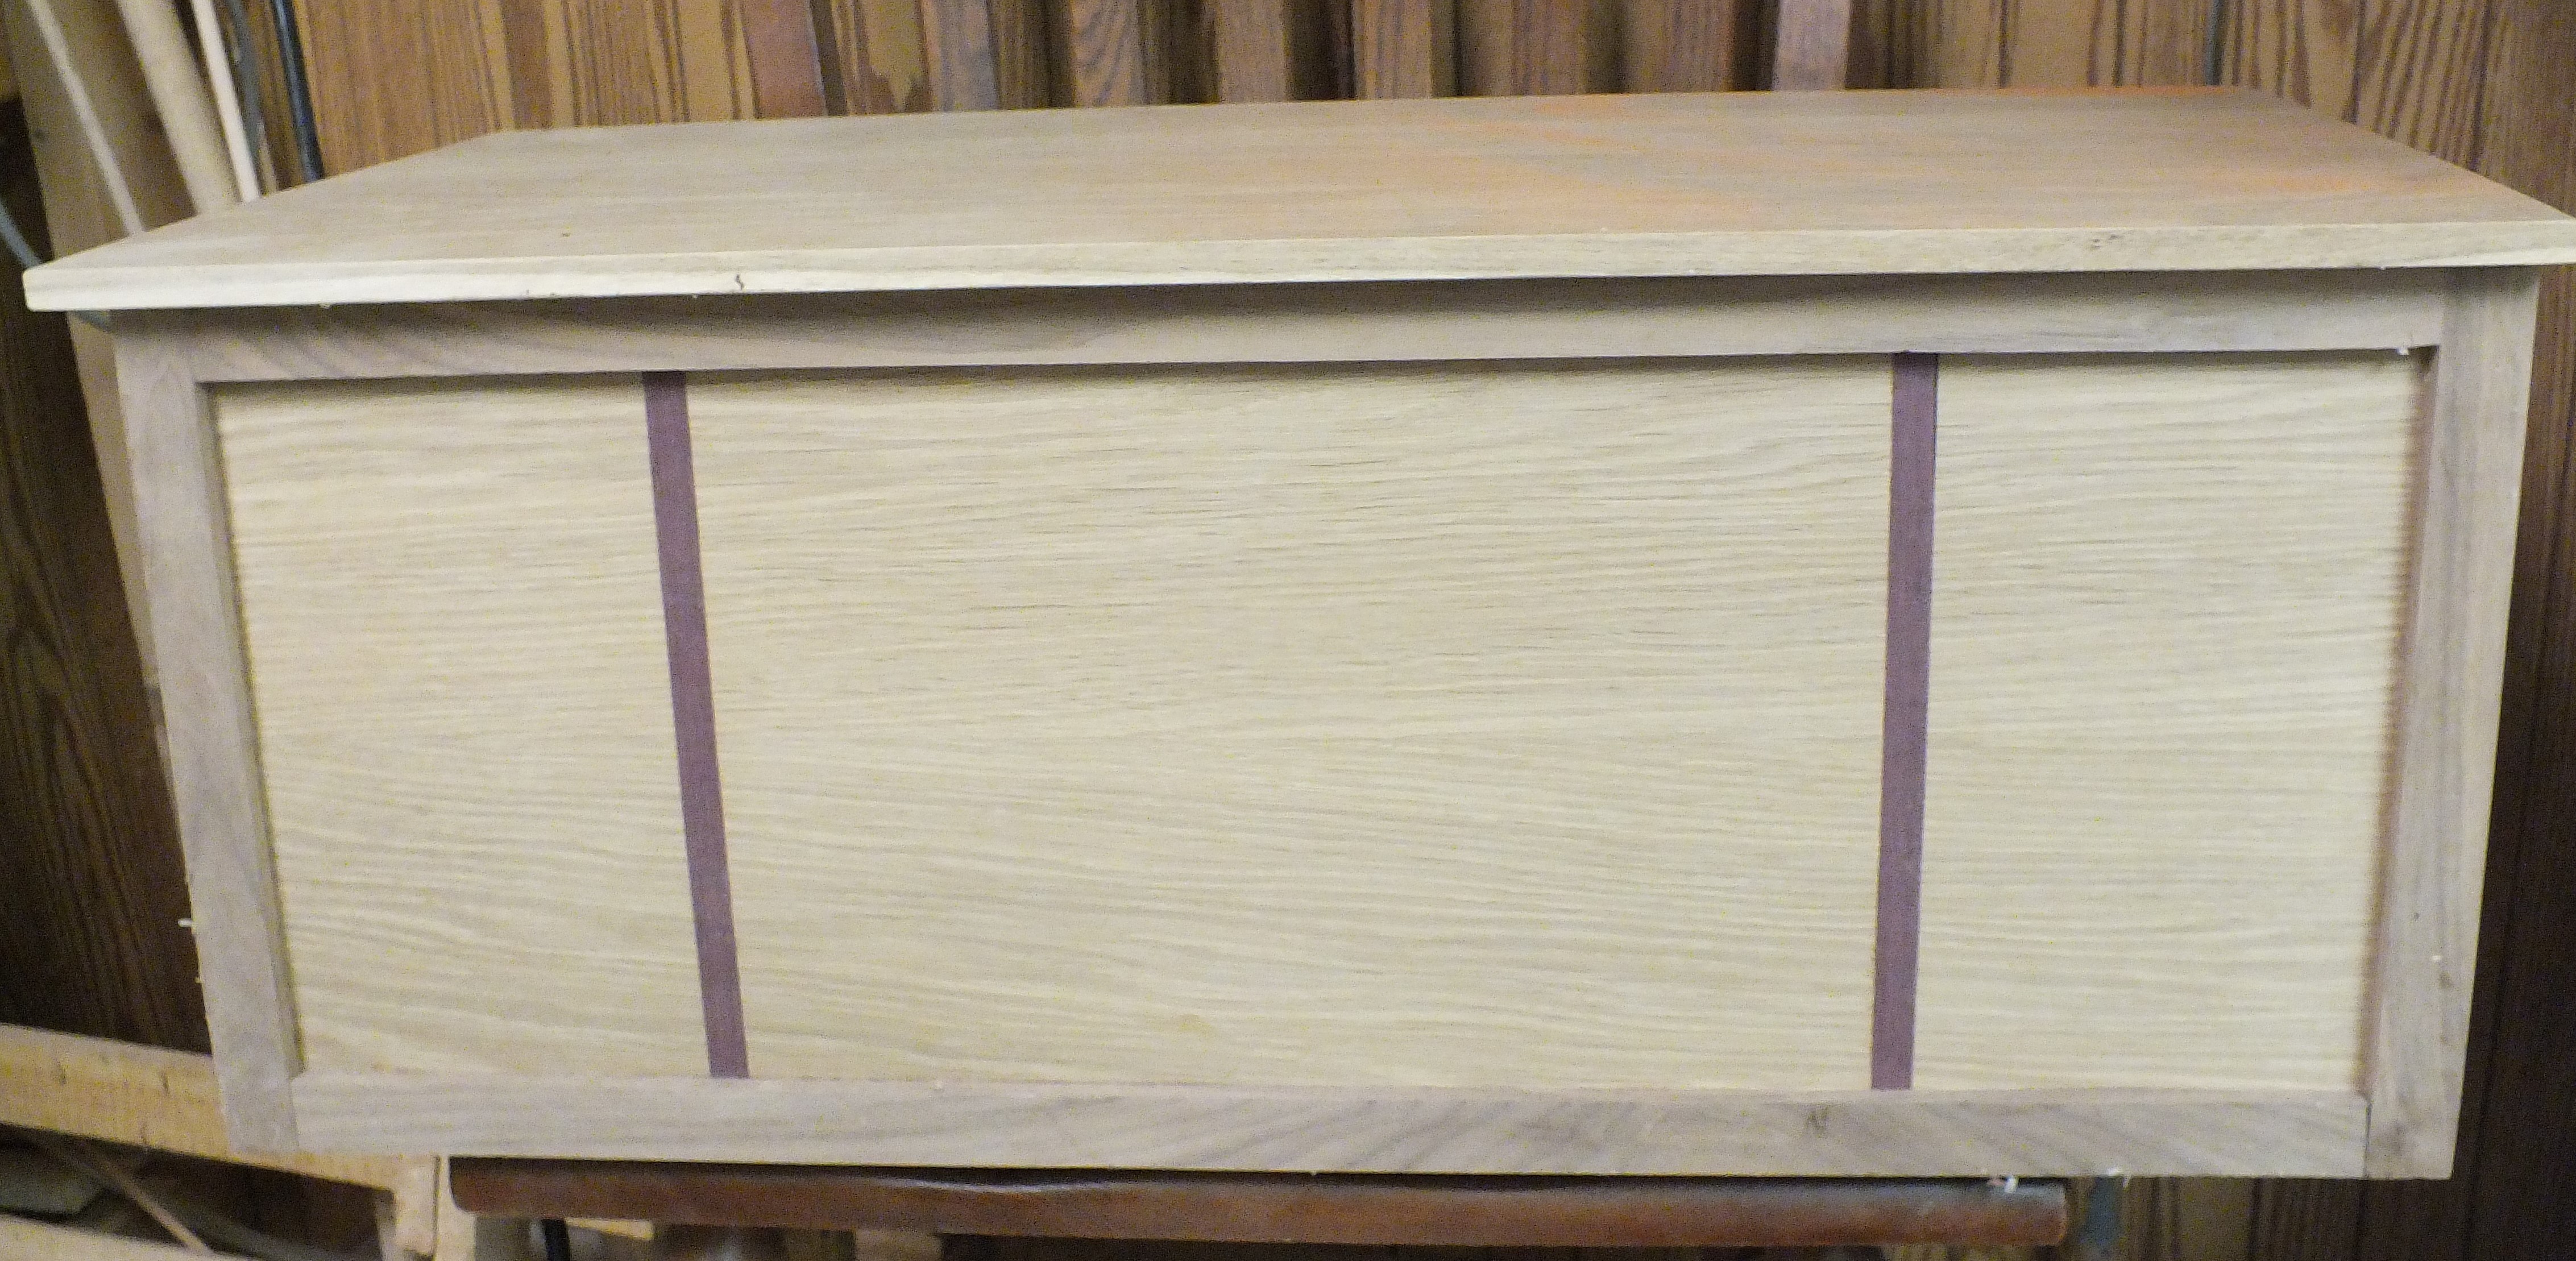
This a blanket chest and it is on the agenda for tomorrow. It was kicking around the shop for ages and finally MrsGF put her foot down and told me to just finish the dopy thing, so I got the lid done and a few other things finished up and now it needs finish sanding and some of the glue joints to be cleaned up and I need to get some handles for it and this will be ready to go out the door. It looks rather pale now but once the finish is on the inlay will really pop and the black walnut edges will really show.
Every once in a while something irritates me so badly I have to vent. So here goes. A week or so ago VP Pence and NASA announced the names of astronauts who will be part of the team which will land on the moon in 2024.
Oh, dear…
NASA and the White House are still claiming they’re going to return people to the moon in 2024, even though everyone, including most of the people at NASA, know that the chances of that actually happening in 2024 are pretty close to zero.
The breathtakingly, mind numbingly expensive SLS launch system (the last cost estimate I heard was that an SLS launch will cost $2 billion. Billion. Per launch.)that’s supposed to be used for this hasn’t even been fully tested yet. They might, might have a test launch of the SLS “sometime” in 2021, perhaps November. I should point out that it is already more than 3 years behind schedule. It was supposed to fly in 2017. And now it looks like it quite possibly won’t fly until well into 2022. And perhaps not even then.
The Orion space craft that’s supposed to carry people… It’s been under development for 15 years now. Fifteen years. And it has flown into space once and preliminary testing is still turning up significant problems, especially with the software and electronic systems. The latest on that is that an electronic component failed in the PDU, and it could take up to a full year just to replace that single component.
And then there is Gateway. This is a bare bones orbital platform in orbit around the Moon. Eventually astronauts will not go directly to the moon, but instead dock at Gateway, which is going to be a sort of mini space station. From Gateway they will use a lunar lander to make the actual descent to the surface of the moon. The first flight to the moon apparently won’t require Gateway, which is good because Gateway, like large parts of this entire system, doesn’t actually exist.
The first flight or two will be stand alone missions, not requiring Gateway. They’ll descend in a lunar lander they’ll bring with them…
Oh, wait a minute, and they don’t actually have a lunar lander, either, do they?. Three different companies are working to develop three entirely different landers. And none of them actually have built an actual lander. Well, okay, they have a mock up of one, which is something. I guess.
So here we are just a few days away from 2021. NASA and the White House claim that we’re going to land people on the Moon before the end of 2024. Using a launch system that is already years behind schedule, 60% over budget, and hasn’t even test flown yet, with human beings in a spacecraft that hasn’t been successfully tested yet, using a lunar lander that doesn’t exist yet. And the first test flight isn’t scheduled until late 2021 and, more probably mid 2022. And which will cost $2 billion per launch.
And they’re going to do all of this before the end of 2024.
Now if they pull this off, I will be thrilled. I skipped school several times to watch the original moon landings. I’m a SF fan. I’m an amateur astronomer. I love anything to do with space exploration. But please excuse me for being just a wee bit skeptical here.
The christmas cactus is now in full bloom and looking spectacular! I don’t know how MrsGF does it, but this cactus of hers puts on these amazing shows of color at least twice a year. But she also brings in an outdoor rose bush and somehow keeps it blossoming most of the winter as well, and I don’t know how she does that, either.
I haven’t had to get up early in the morning for a long time but I still have this silly habit of waking up ridiculously early in the morning, usually just before sunrise. It’s worth it, though. The sunrise this morning was absolutely beautiful. Seeing the silhouette of the trees against those pinks and oranges and reds was a gentle reminder of just how beautiful this world can be if you take the time to just sit back and see what’s around you.
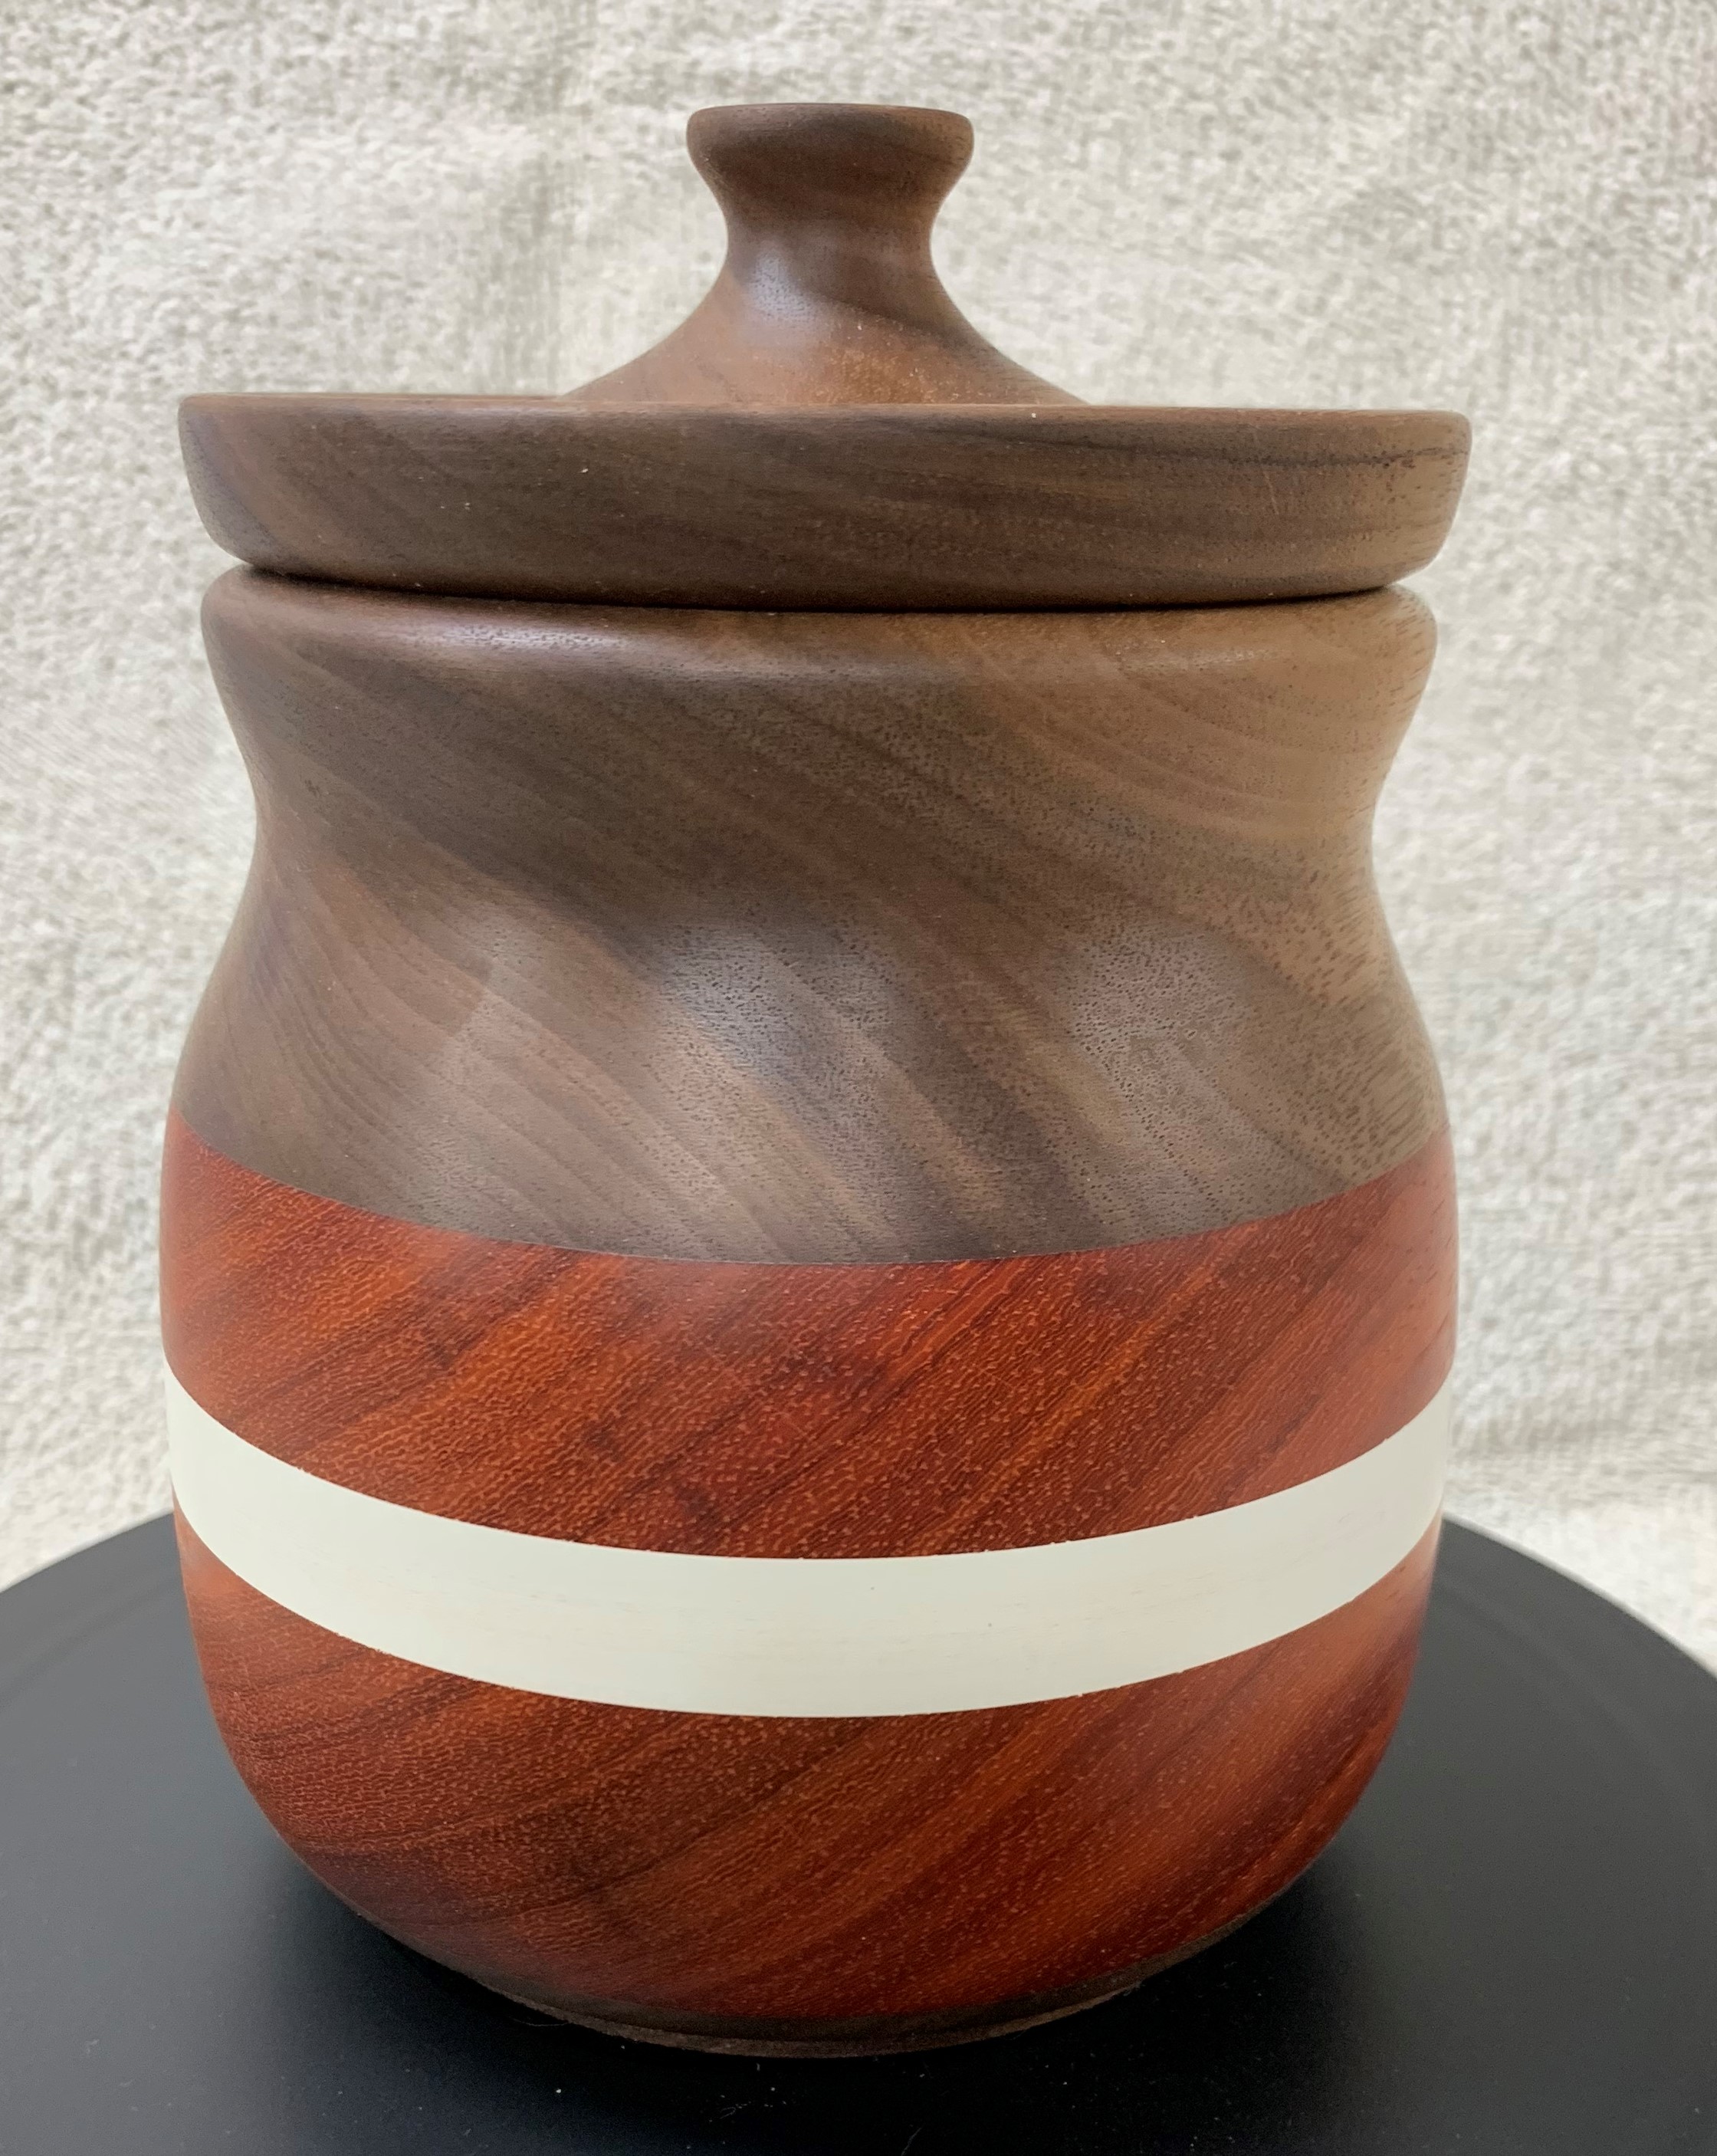
I’ve been puttering along with the cake plate project and I finally finished the top platter the other day. The final shaping is done and I spent way, way too long sanding and smoothing it down, then sealing it and putting several coats of wax on it. Even the bottom of it looks pretty good.
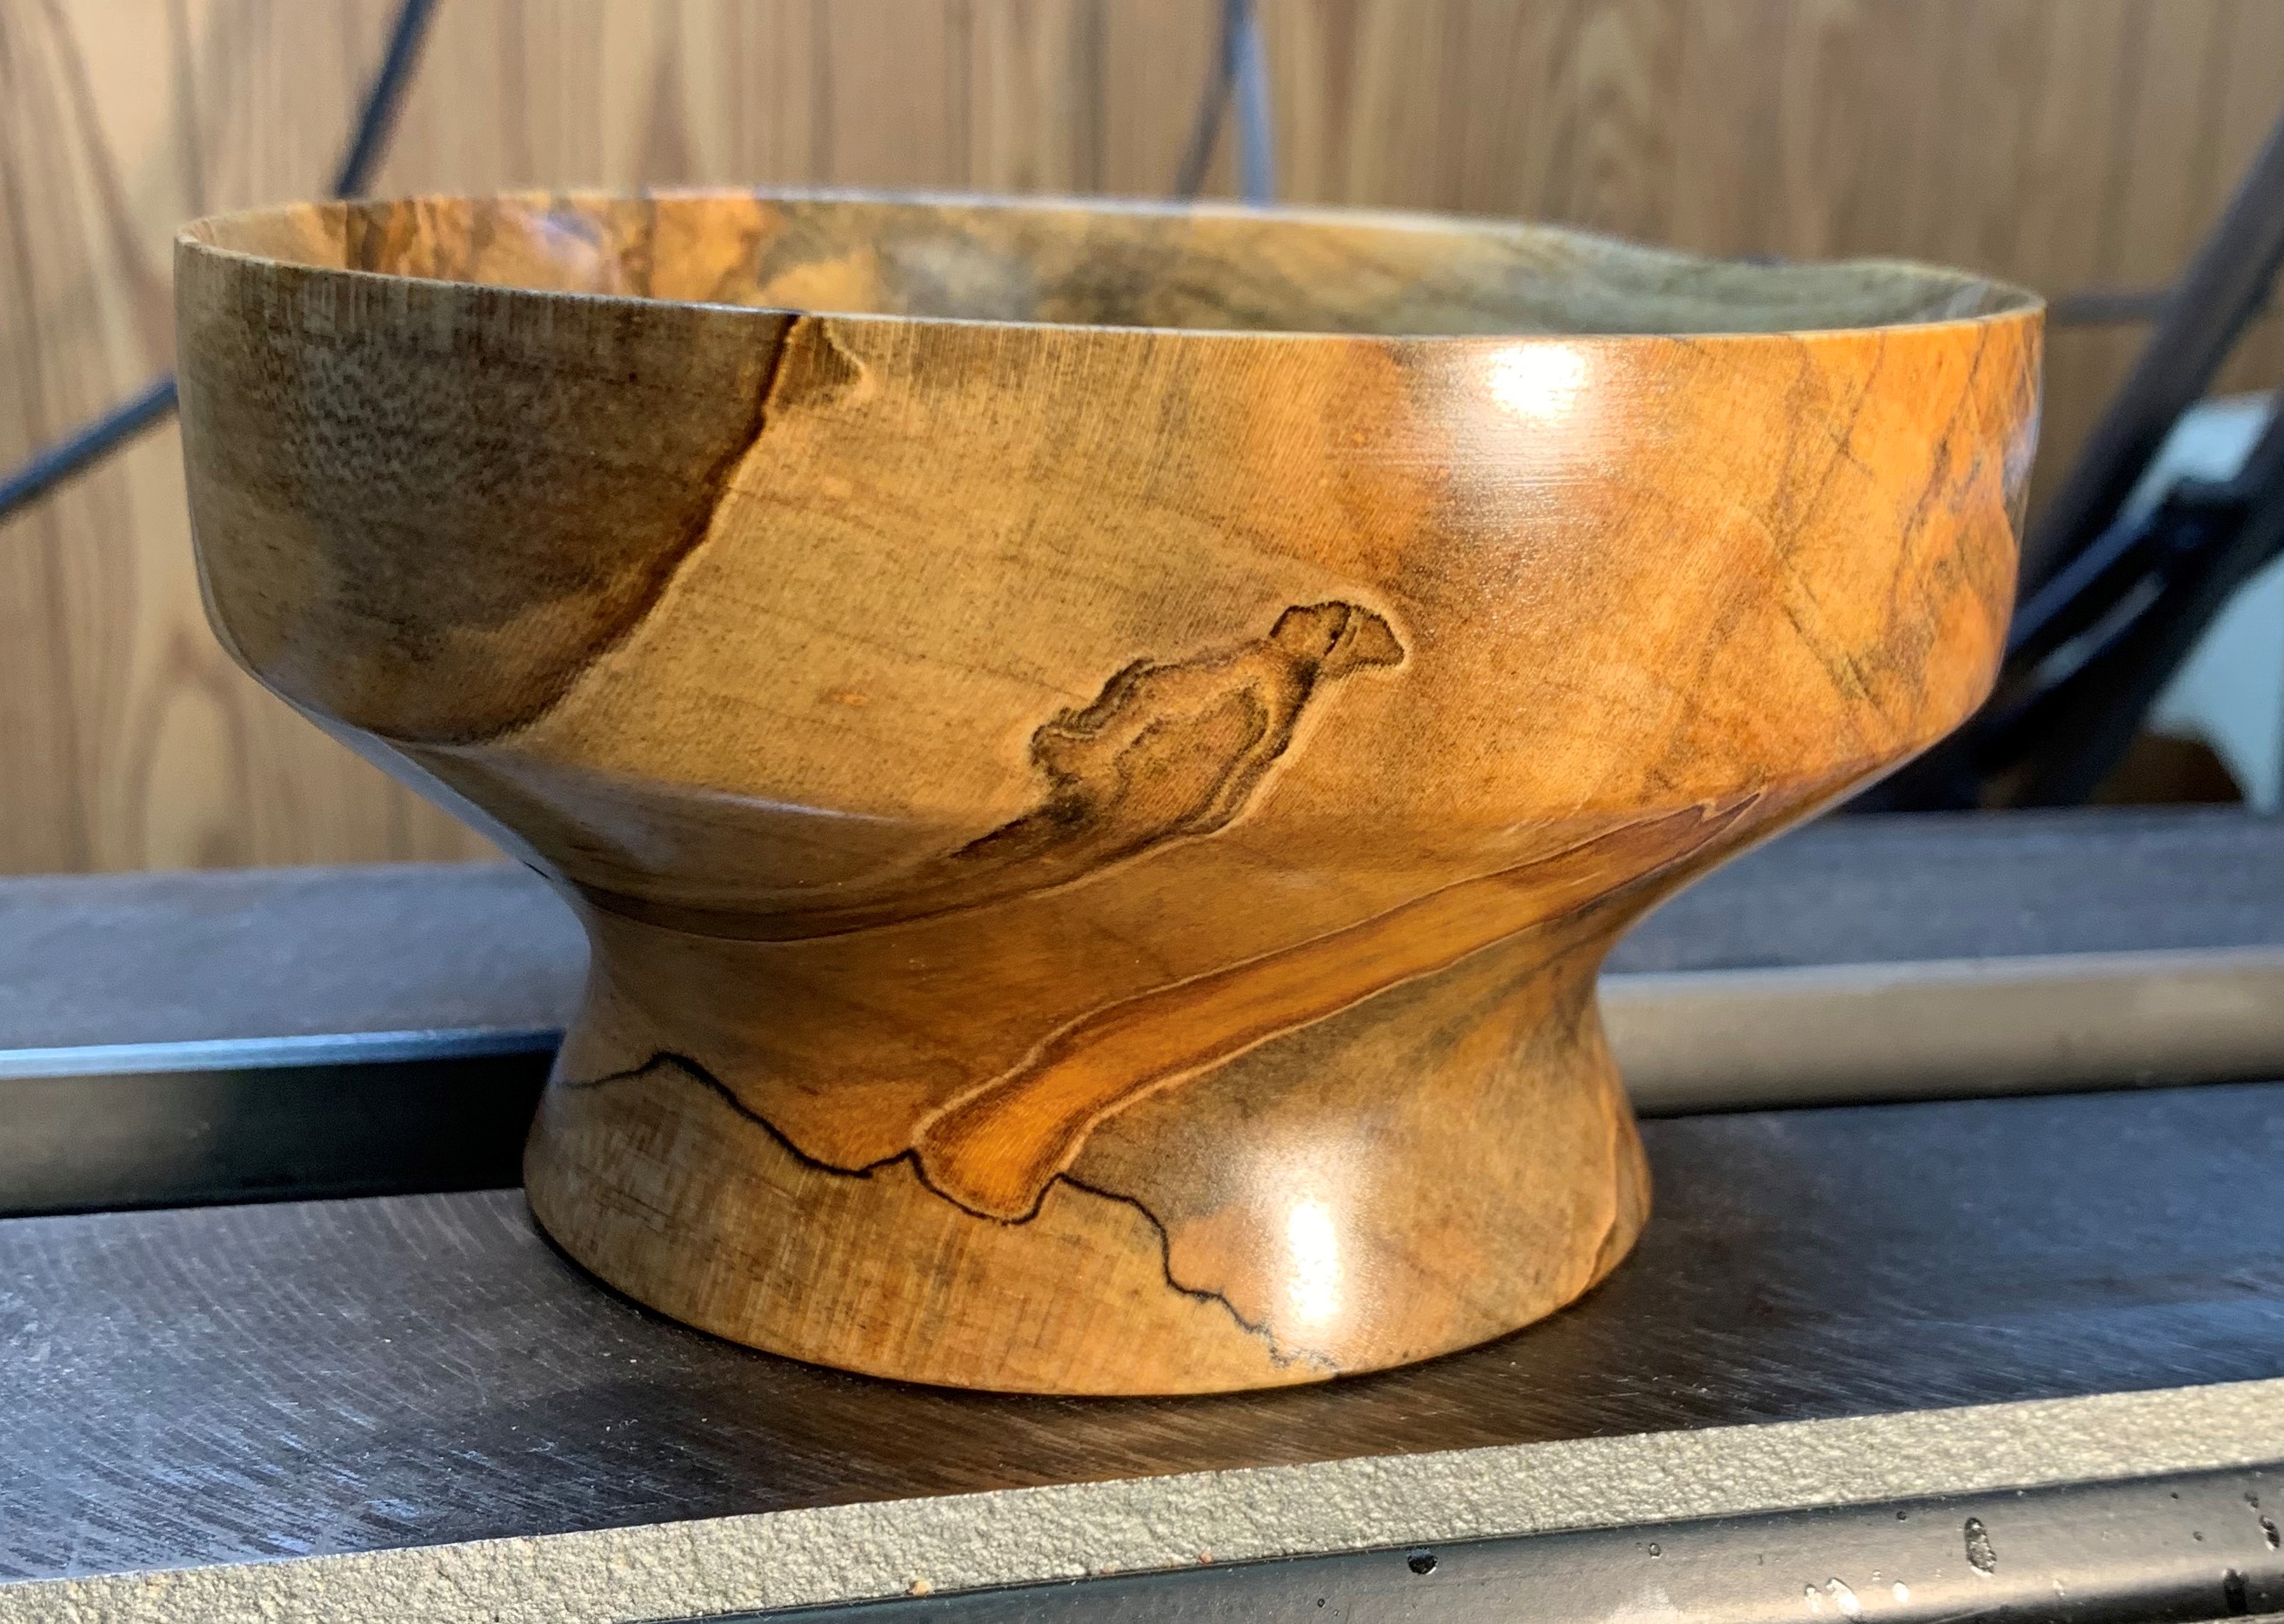
Yes, your eyes are not deceiving you, there are holes in that wood, worm/insect holes. This is “ambrosia” maple. These striking colors and patterns are caused by a fungus carried by the ambrosia beetle. It’s beautiful stuff but you have to deal with the holes left in the wood as well sometimes. I’ll be sealing those up with epoxy. It will eventually be perched on a short pedestal made of the same wood.
Even I question my mental stability sometimes.
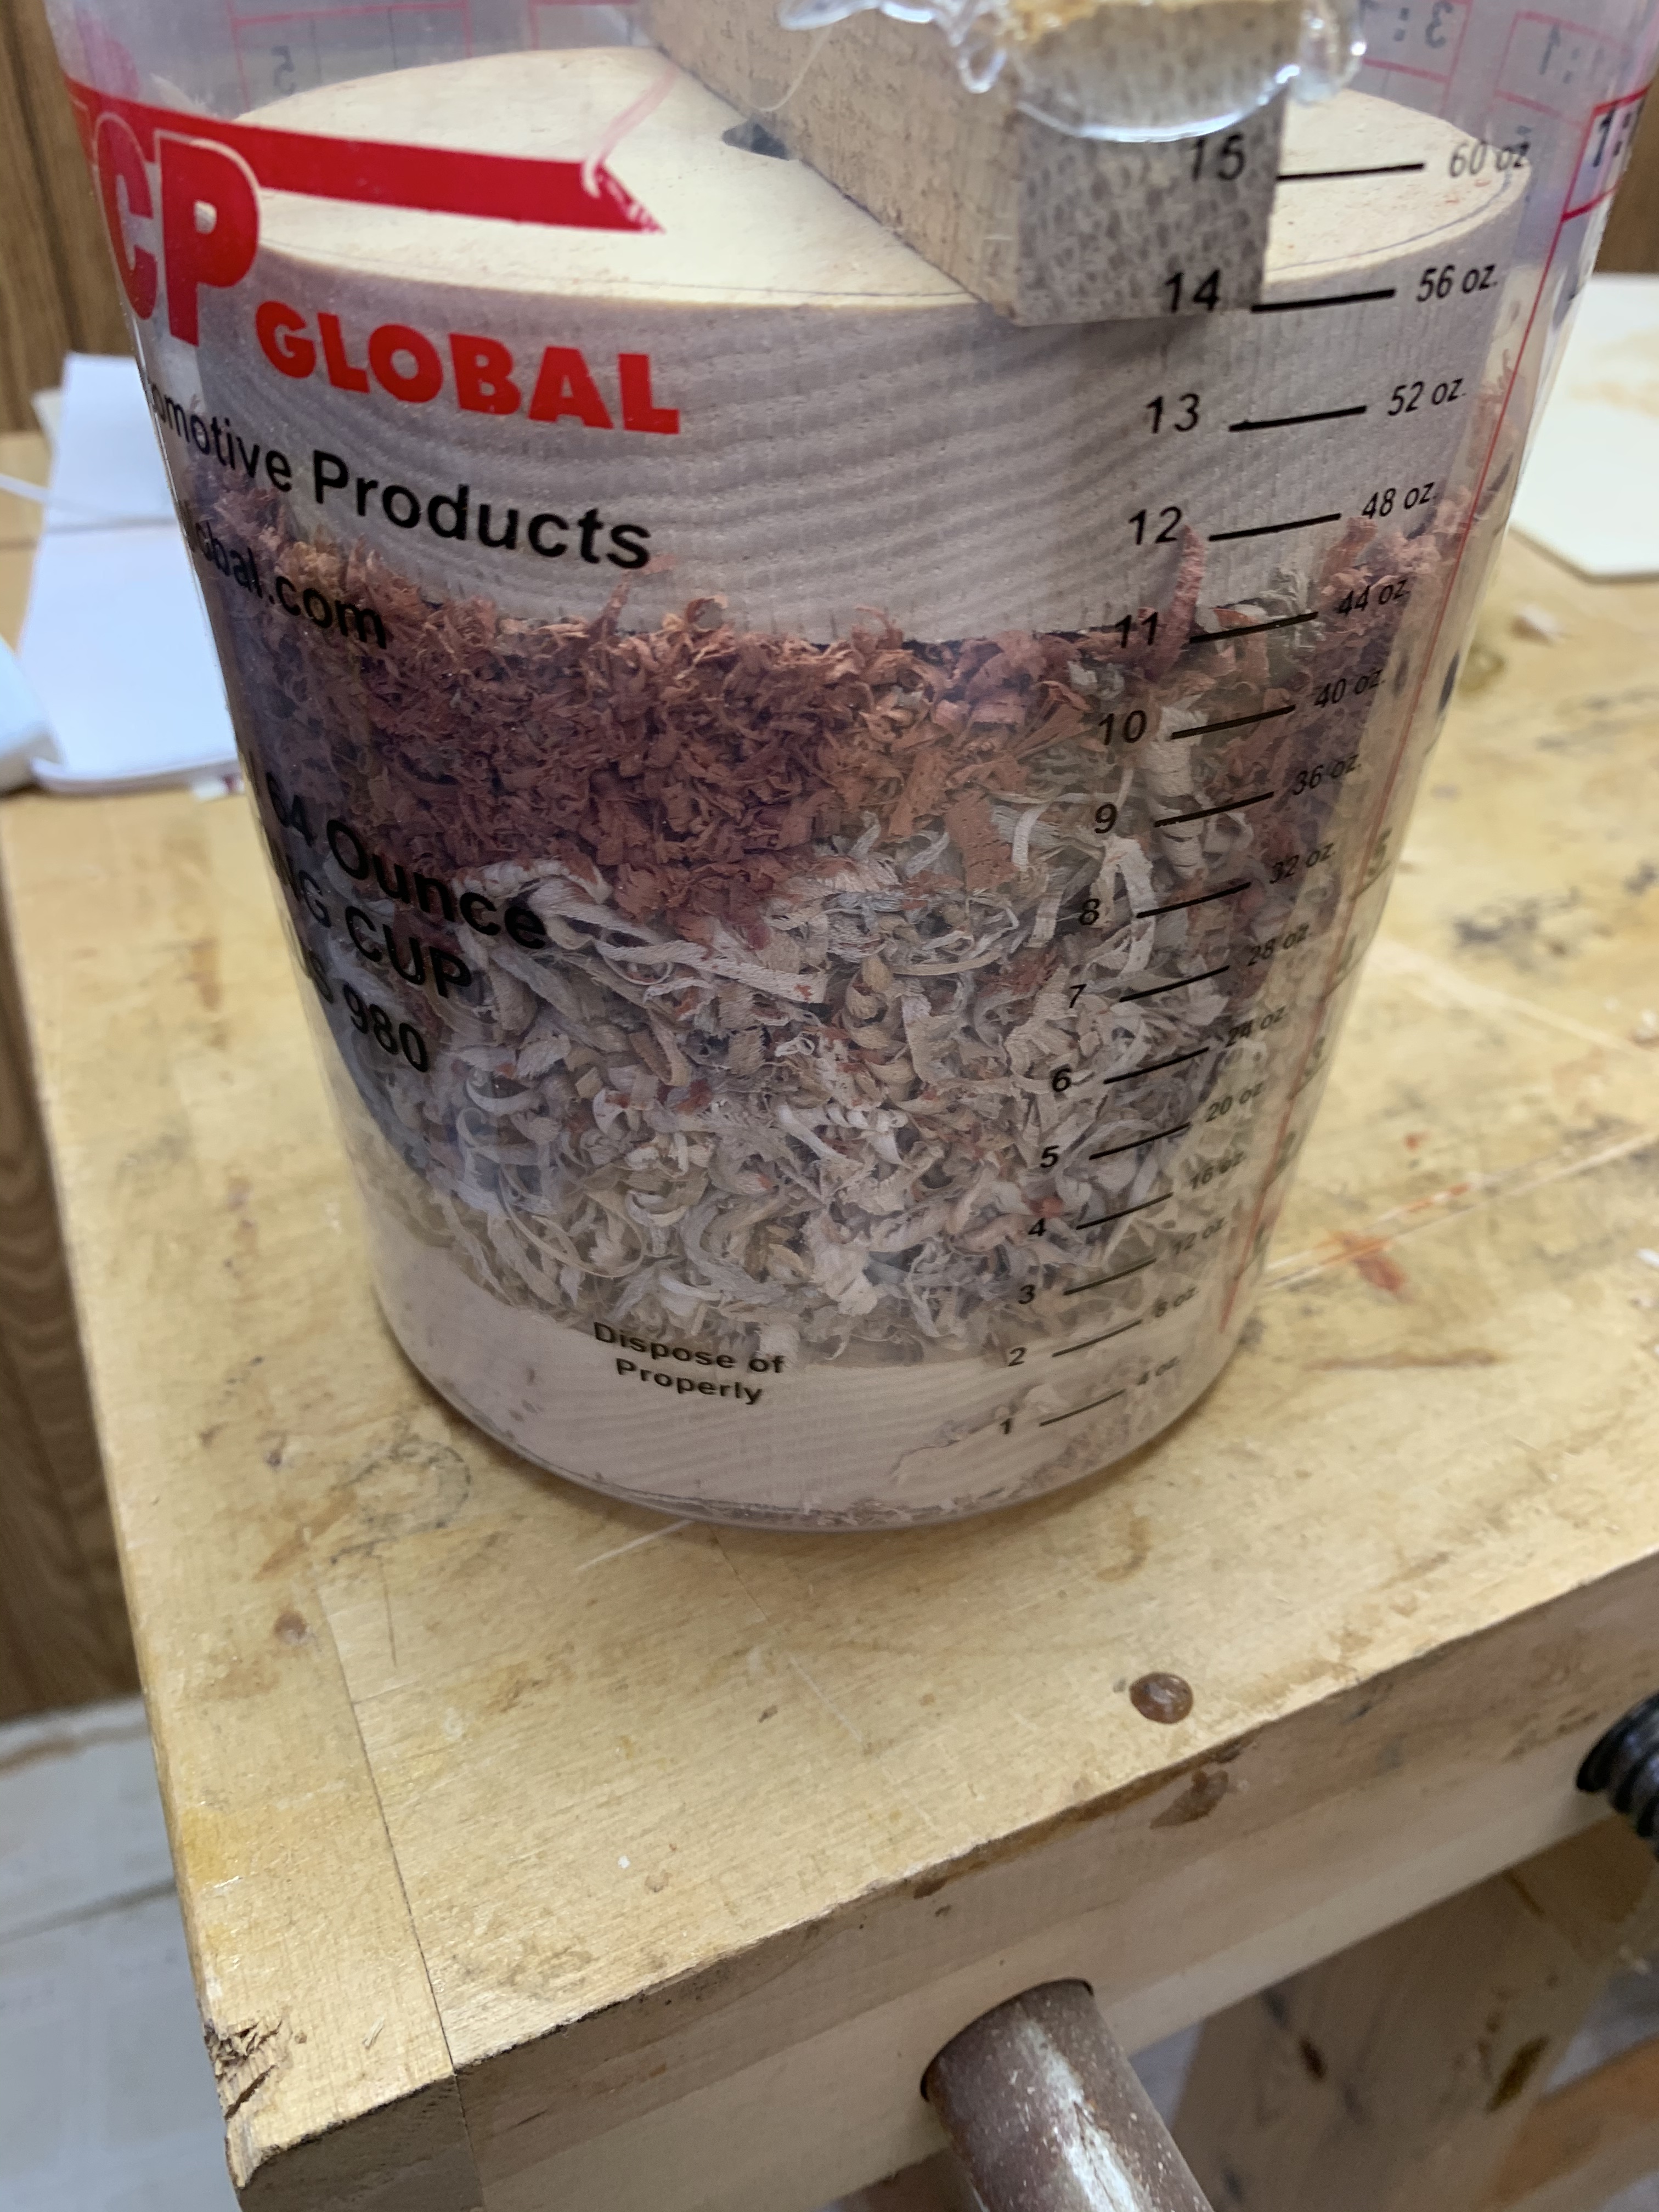
So, I have lots and lots of wood shavings. I have a bunch of ‘free’ resin left. So, I thought, what happens if you shove a whole bunch of random wood shavings into a plastic tub and fill it with violet resin? That’s the question that absolutely, well, that absolutely no one has been asking. So, of course, I decided to try it because hey, why not?
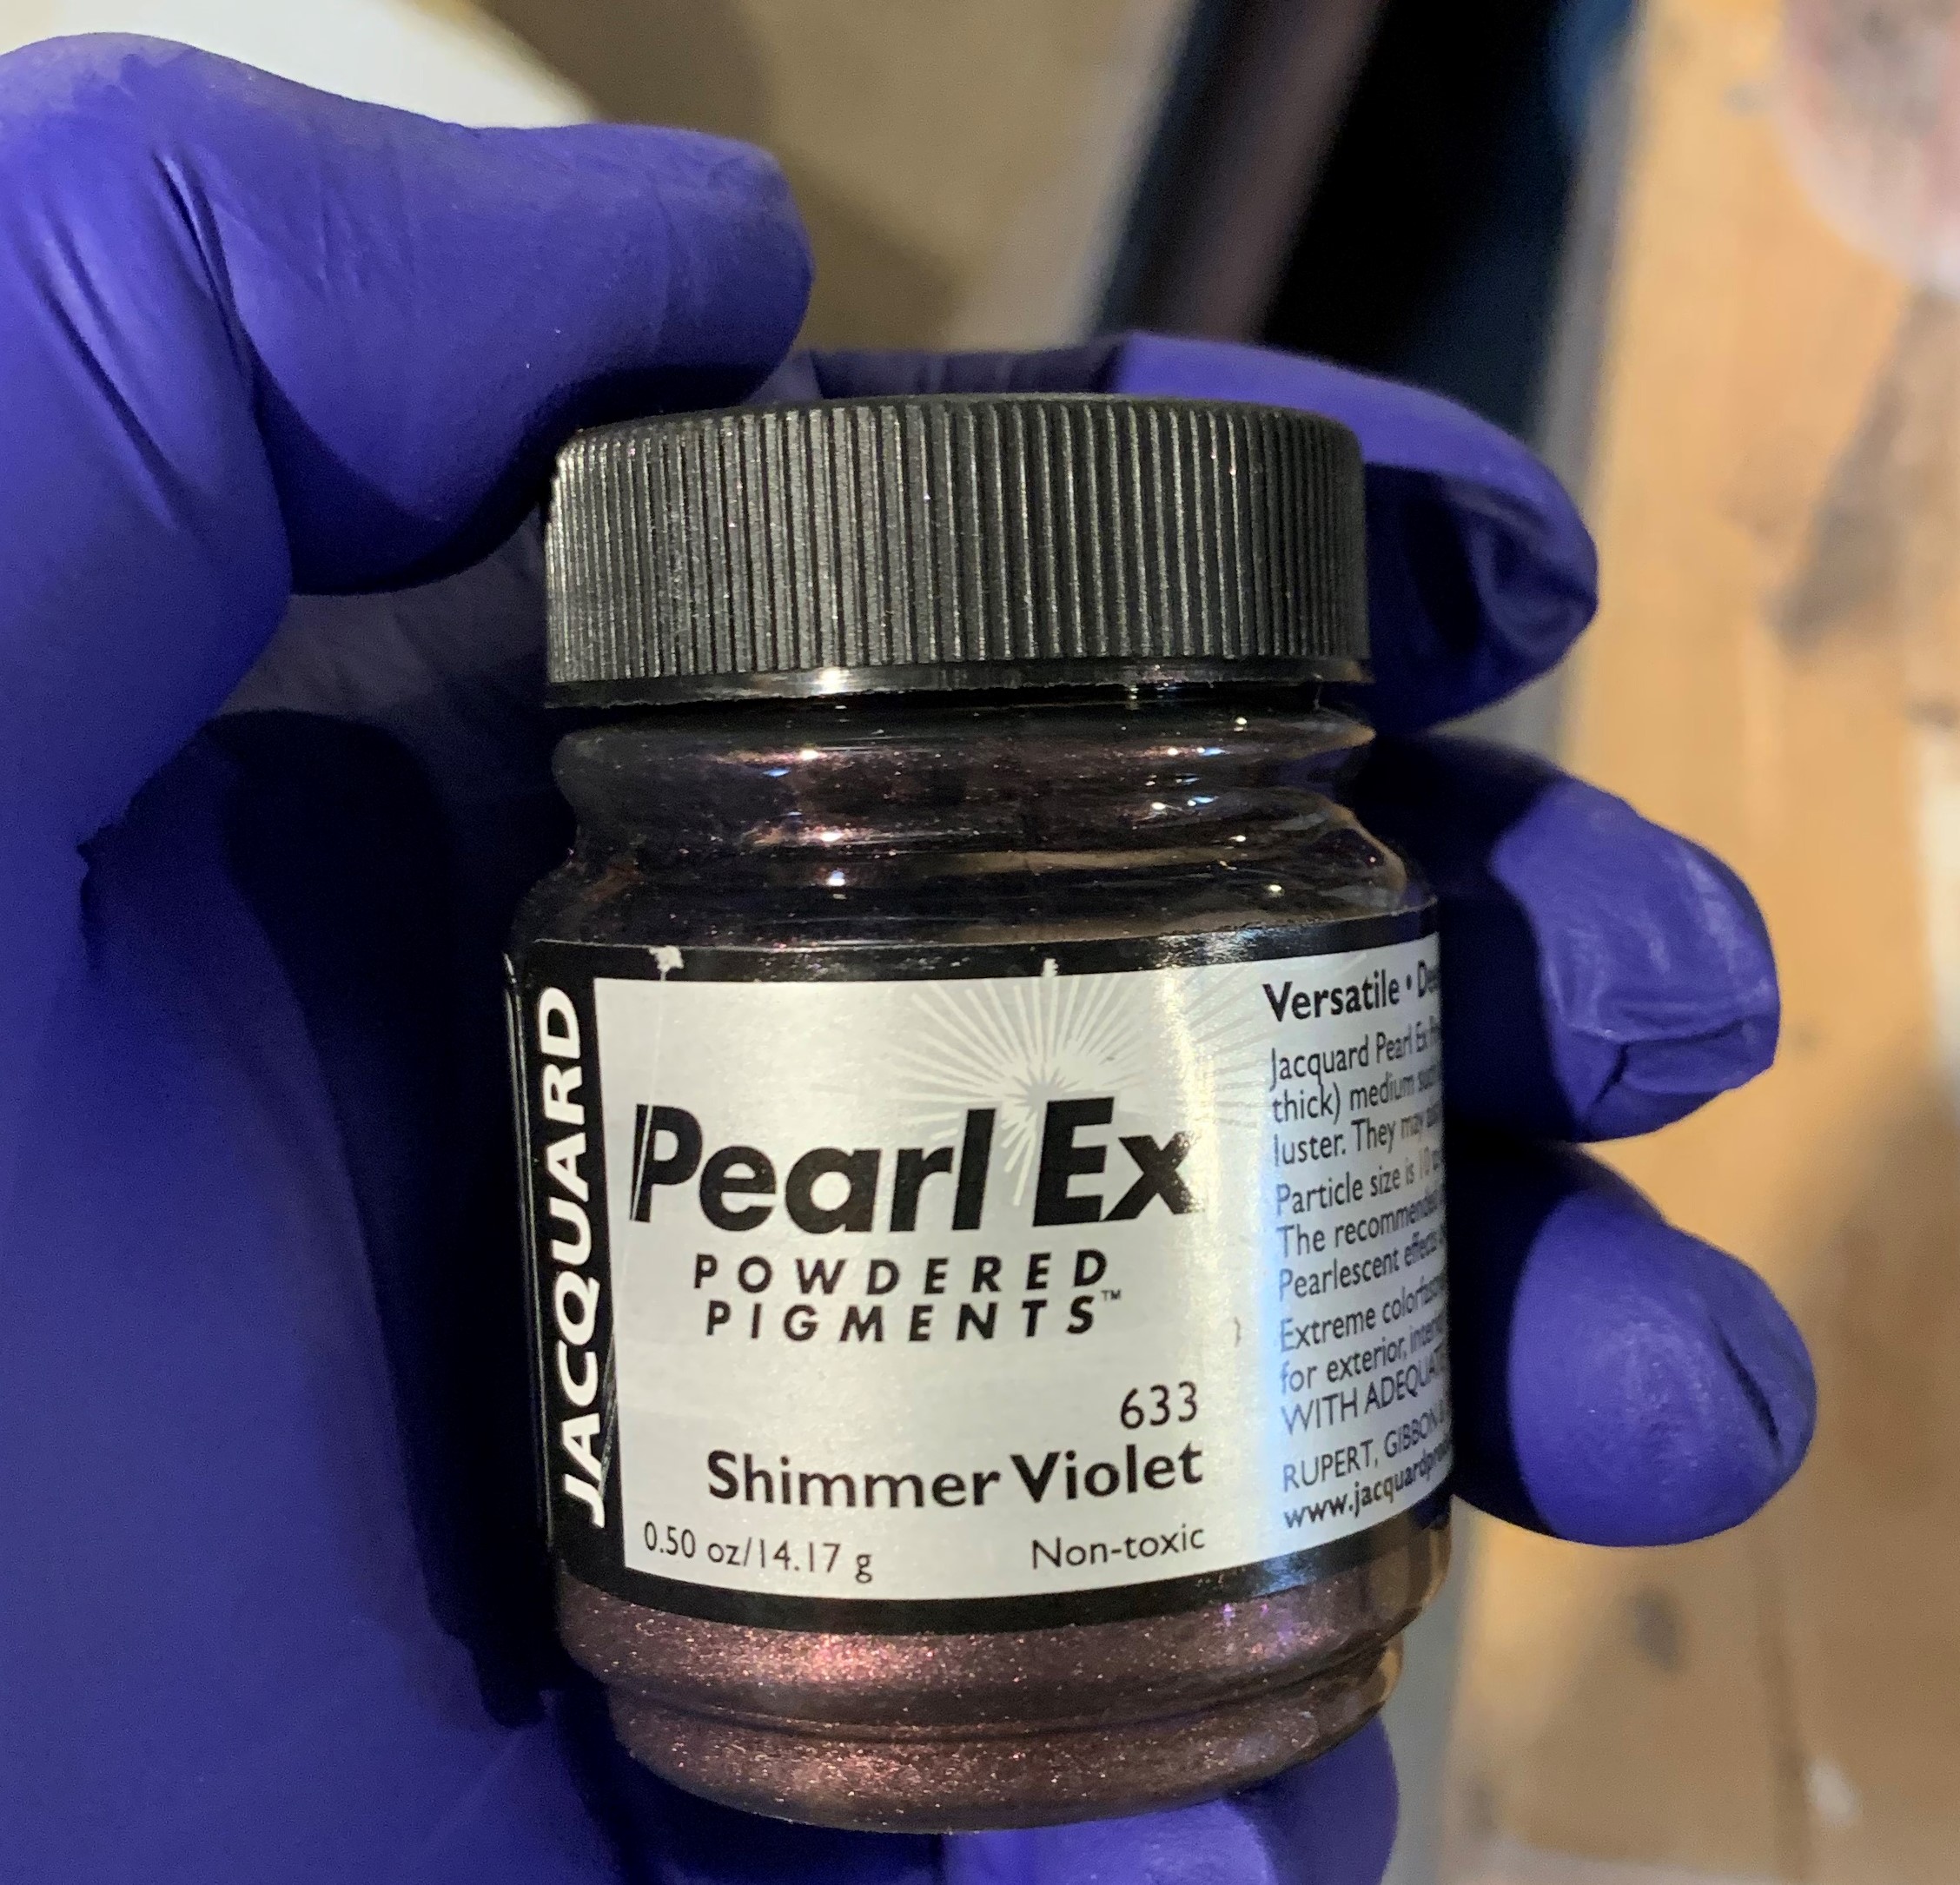
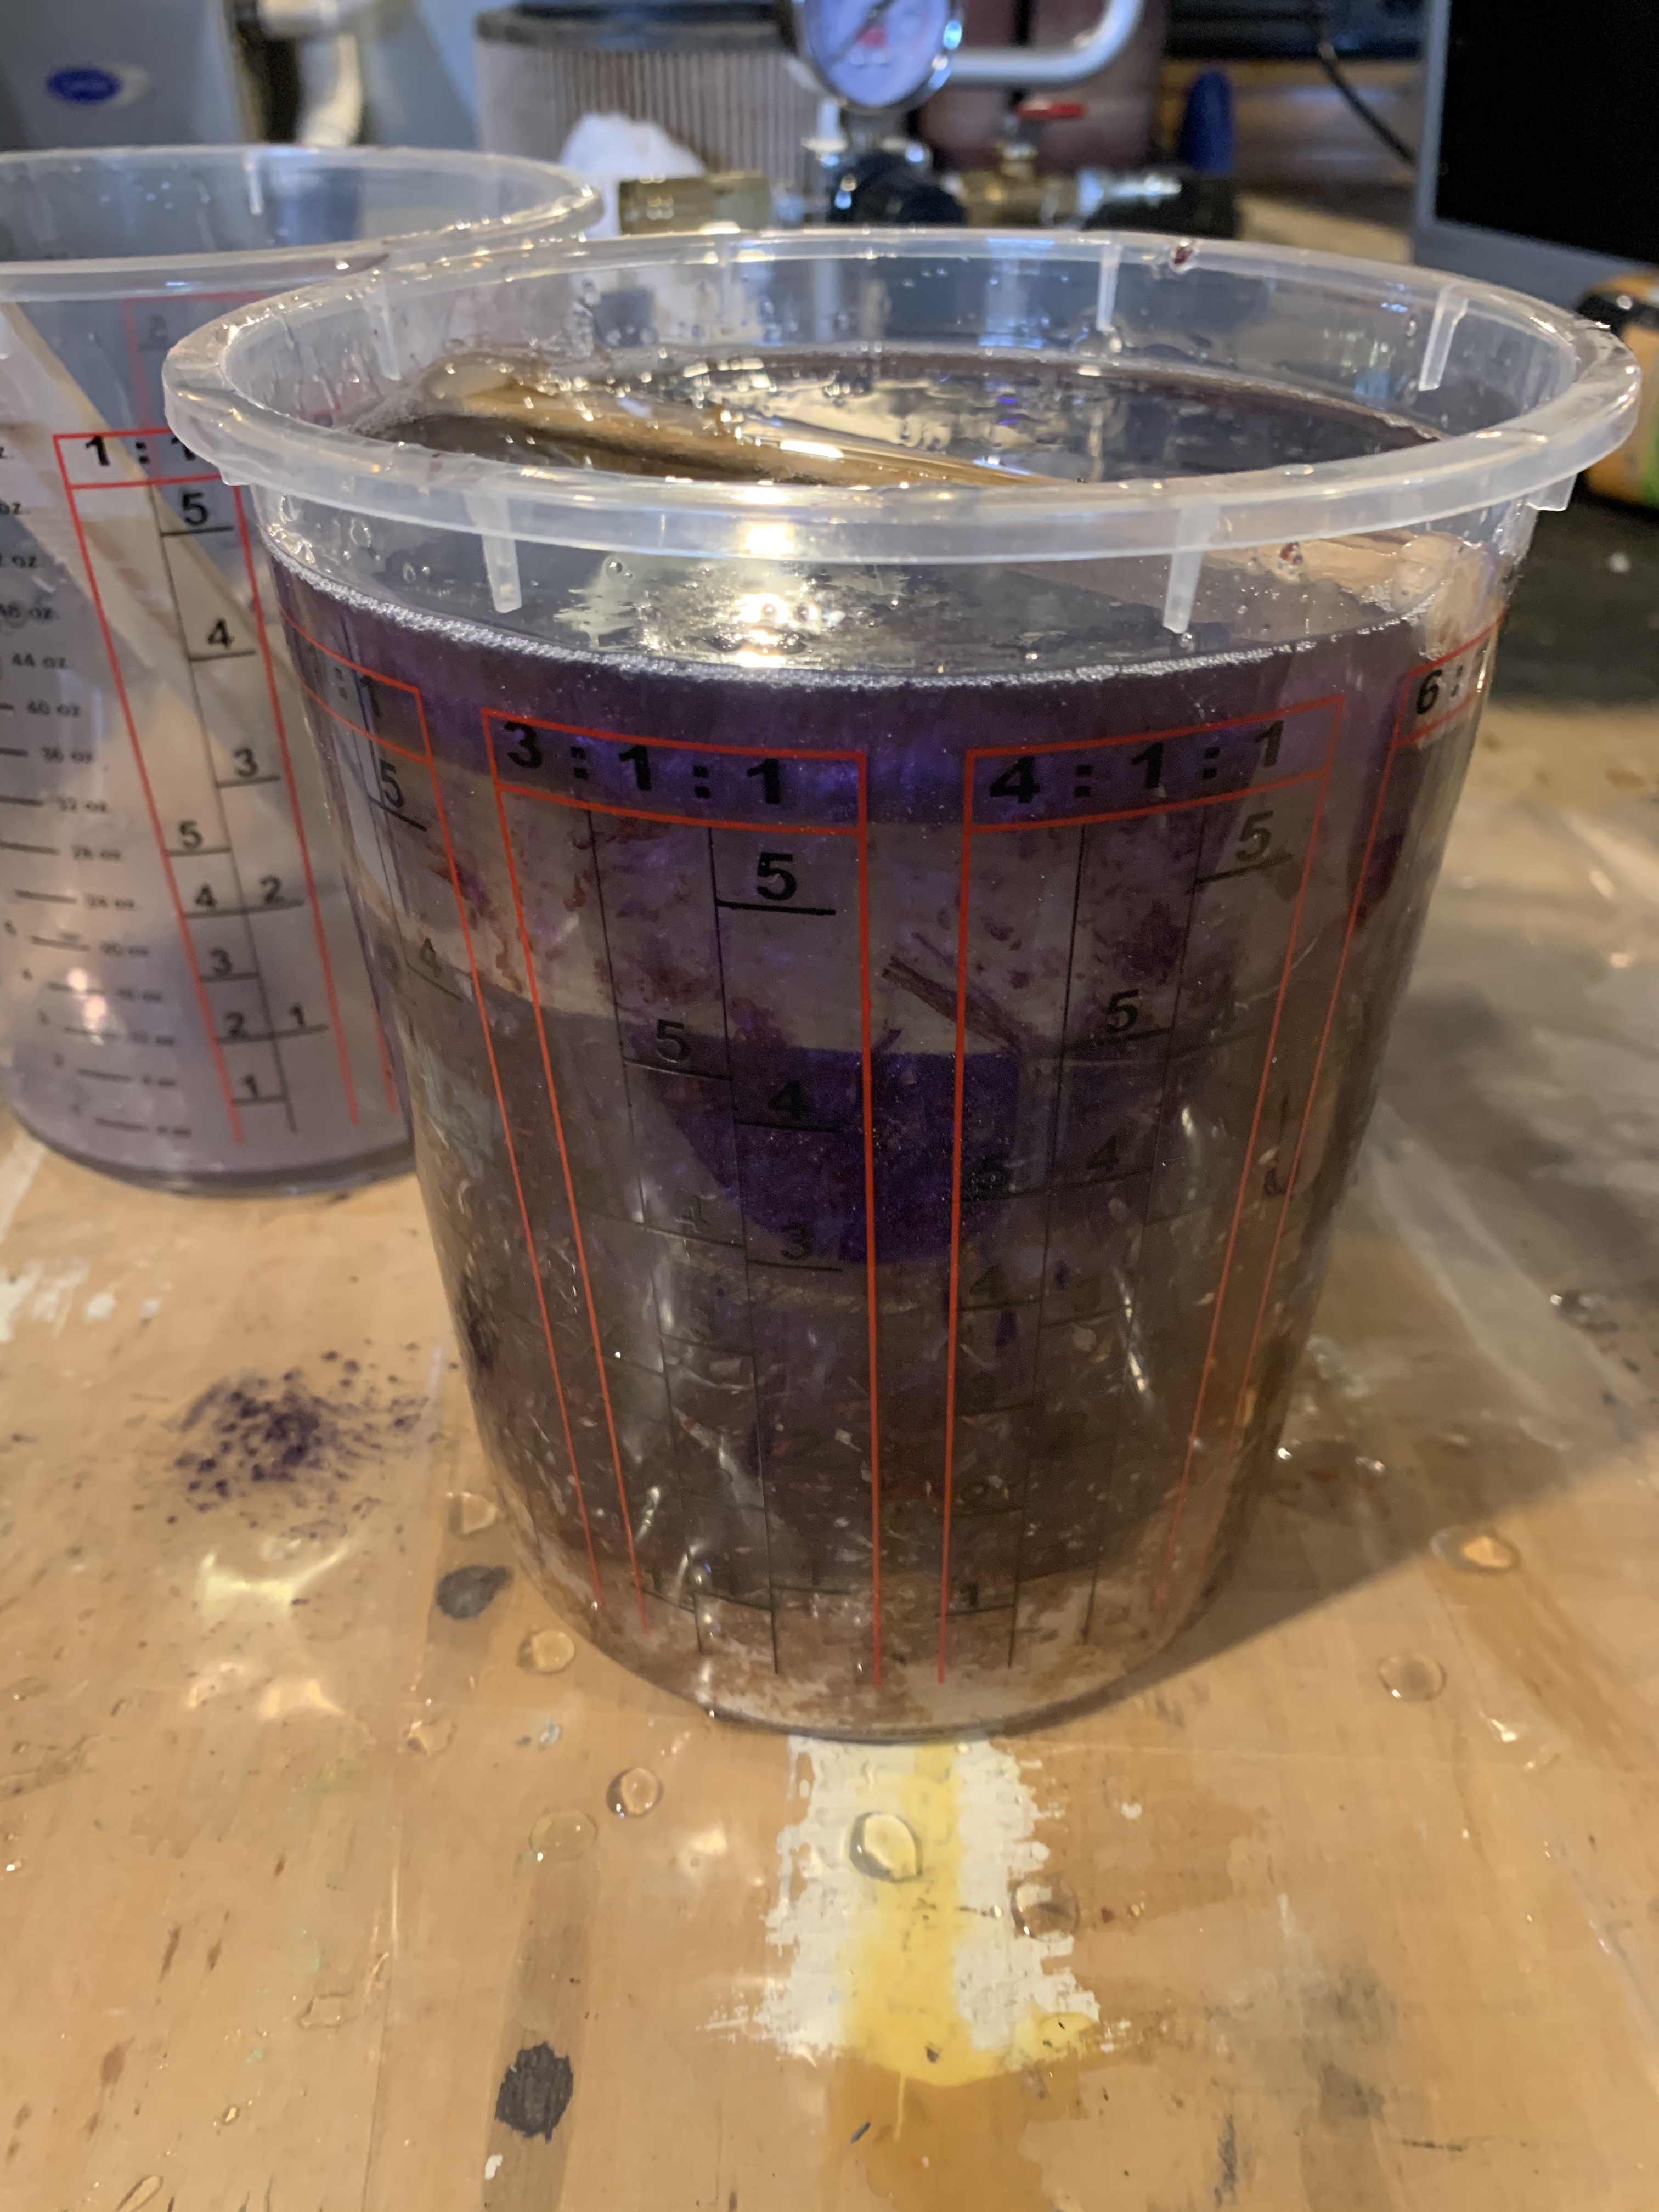
So I stuffed a plastic tub full of random wood shavings from various turning projects, glued some wood discs on the top and bottom to hold everything in place, then got out the last of my ‘free’ resin and mixed it up, dumped in a bunch of “Shimmer Violet” iridescent coloring, and almost immediately regretted it because holy cow it’s weird looking.
It’s a good thing this Naked Fusion “Deep Pour” has a long pot life because took a long time to pour this, with lots of banging, tamping and poking around with sticks to try to get all the air out of that mess.
I suspect this is going to be a complete failure, but, what the heck. I don’t think I’ve ever written about the projects I’ve tried that have been utter failures. Fortunately I’ve had very few complete failures over the years. But this one looks like it’s going to be one where I’ll look back on it and say “what the hell was I even thinking?” Well, it’s in the pressure tank right now so I’ll see in about two days. If you don’t see anything here about it in the near future it’s because it was so ugly I couldn’t figure out what the heck to do with it.
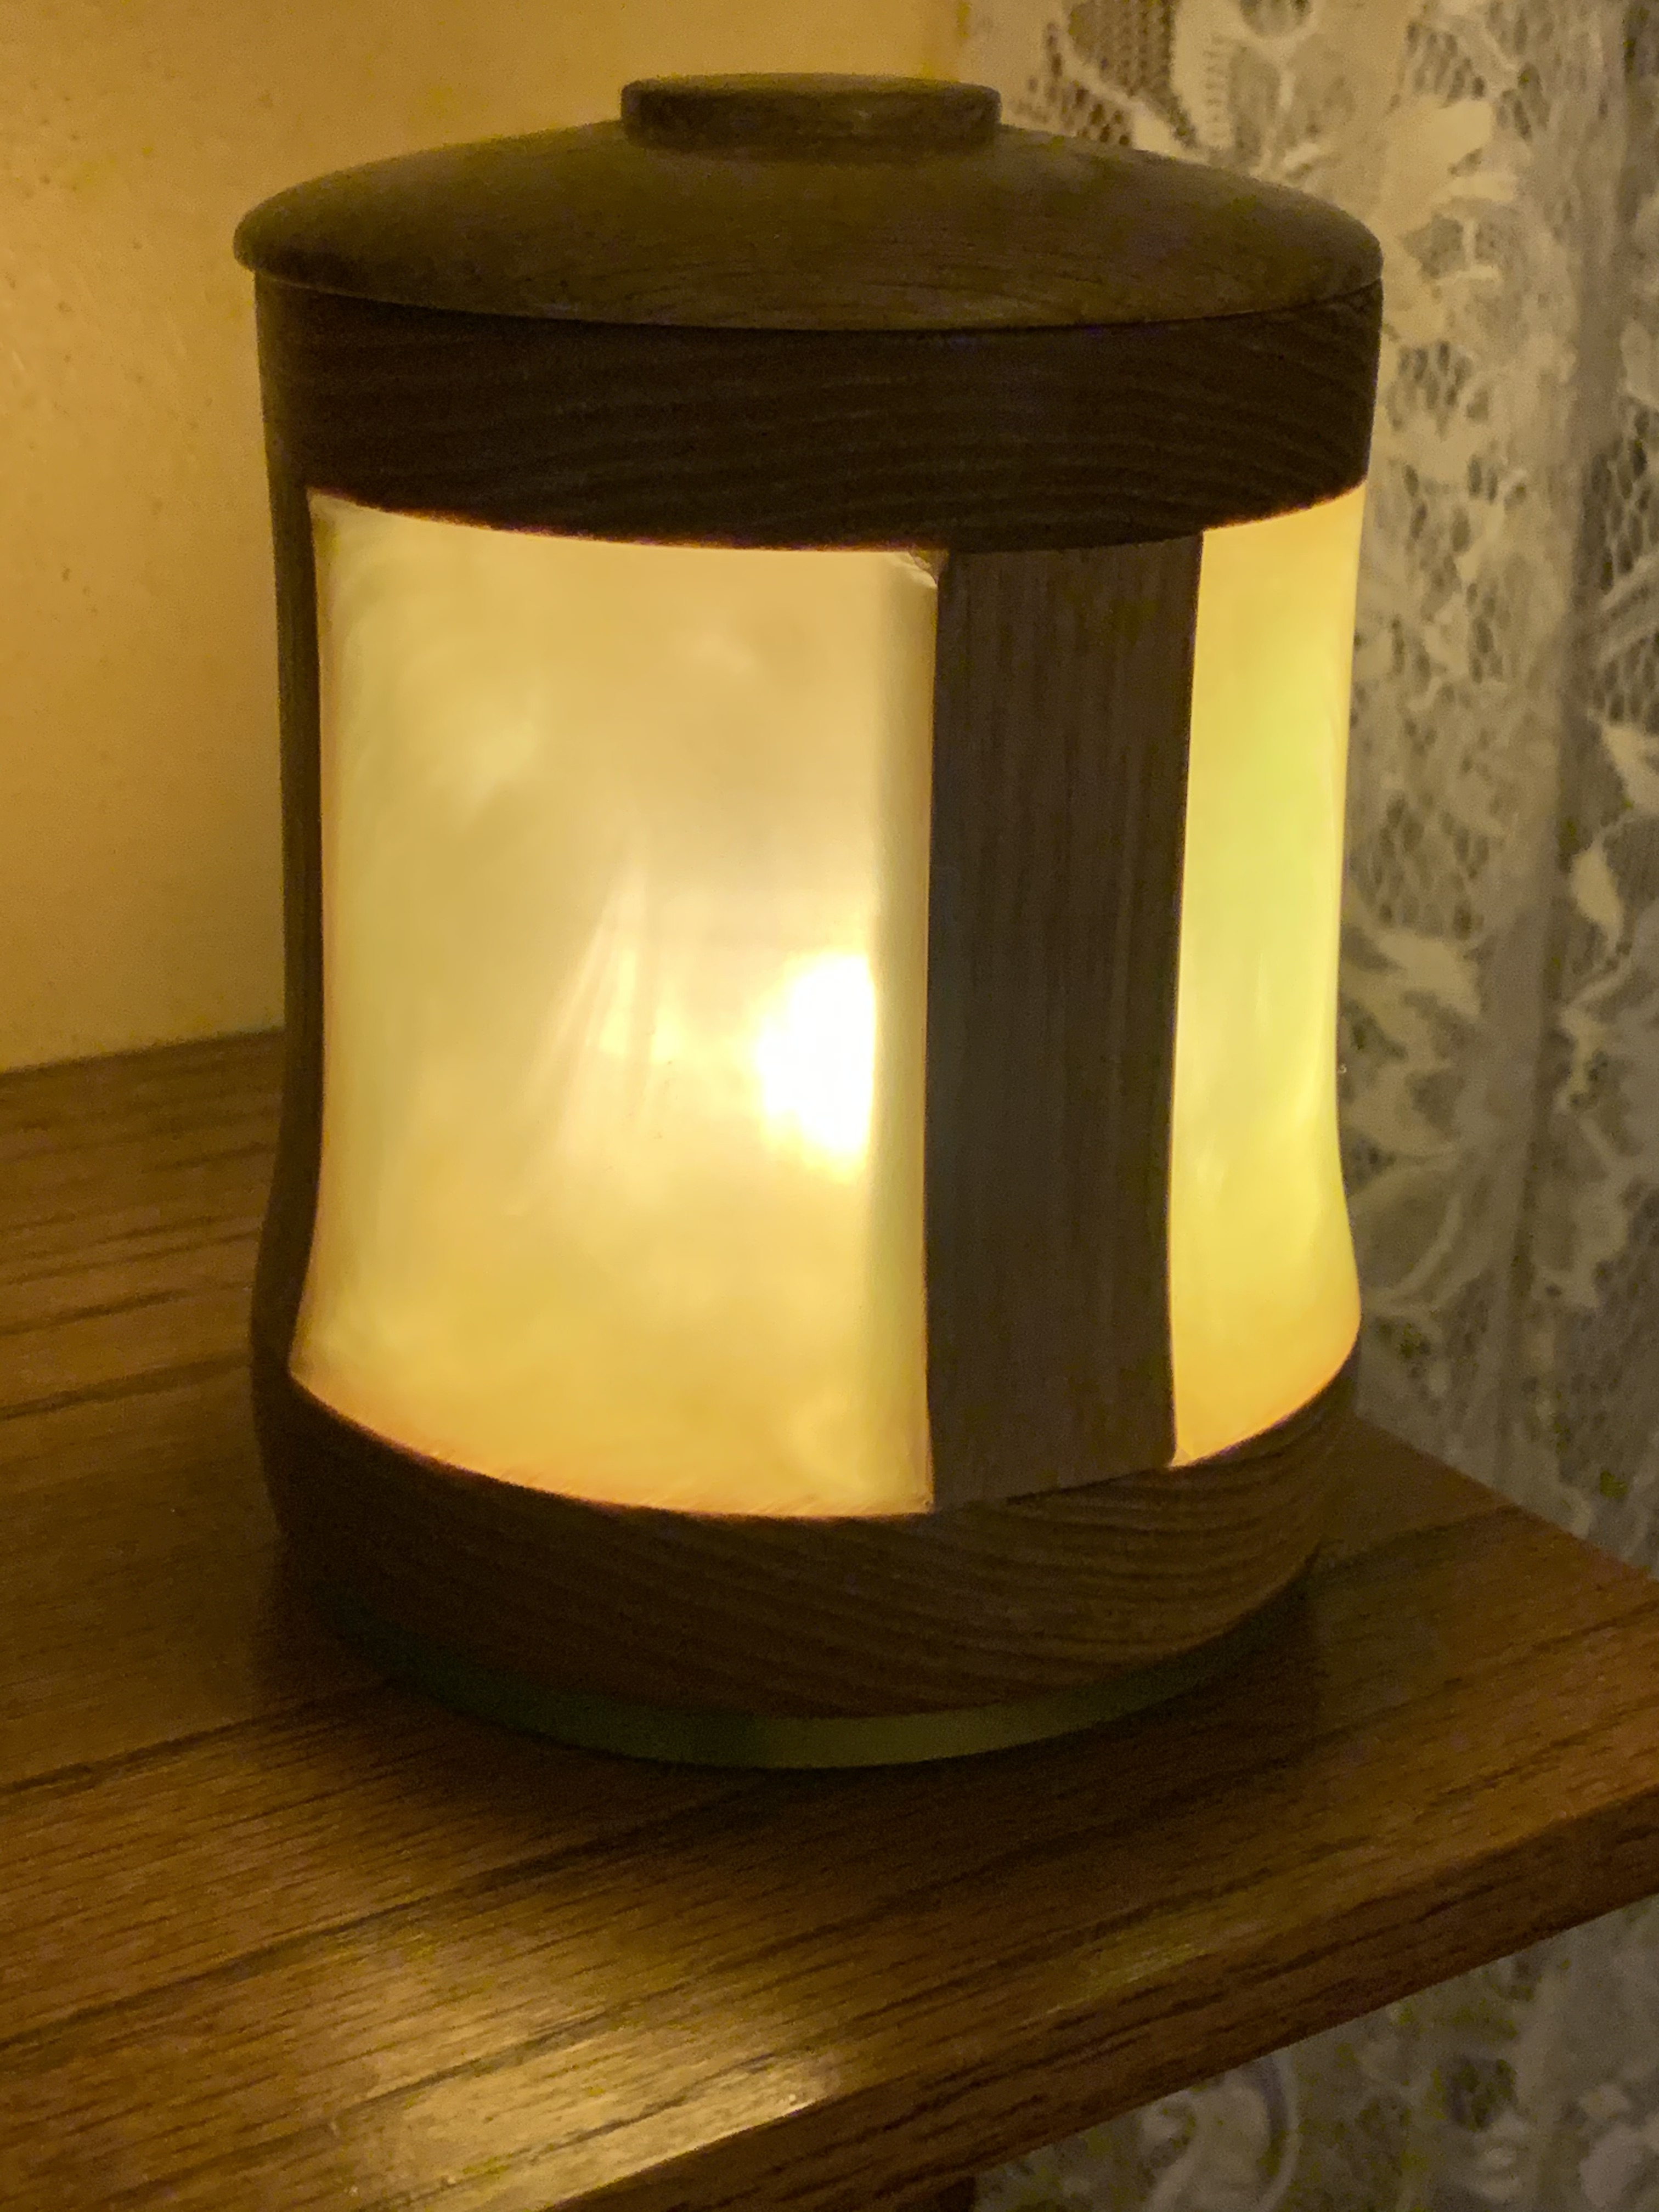
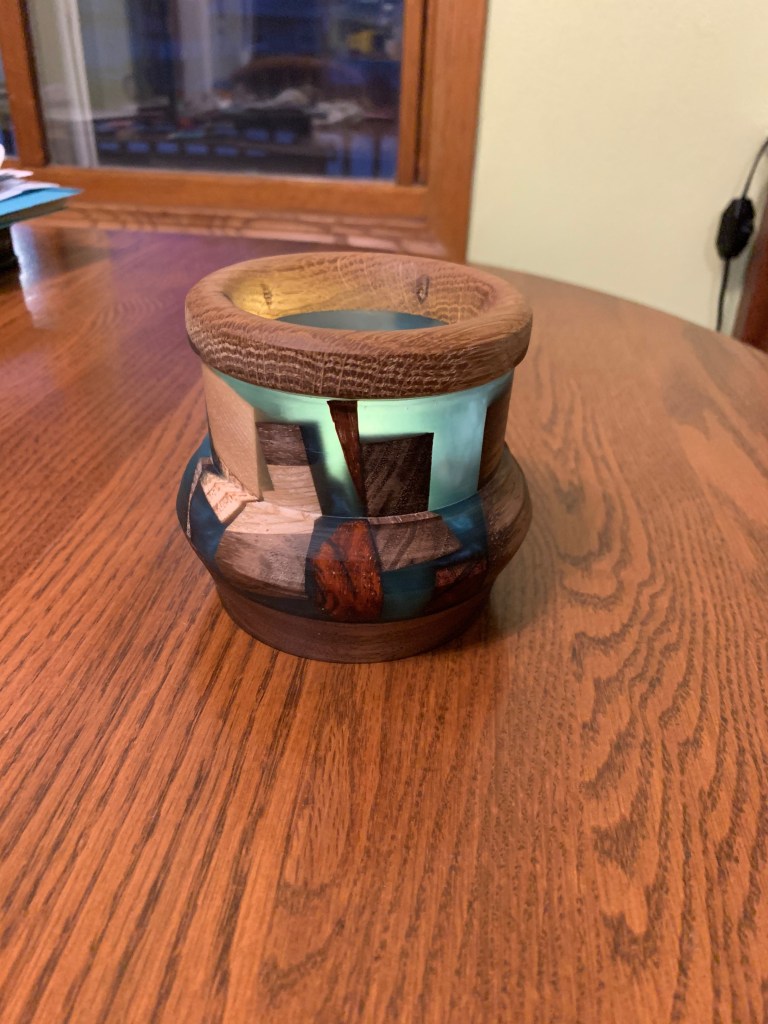
I got very impatient to see how the green blob over there on the left would turn out so I set aside the cake plate project for the time being to work on this new one. It didn’t look all that promising when I started out, and I had some issues with the thing as I started to work with it. But finally I ended up with something with a relatively pleasing shape and look to it, fitted the lamp into the thing, and the end result is below.
I still need to make a top for it. Rather than go for a high polish I left the translucent parts a mat finish. I think it looks better that way.
And it has some problems. If you look at the middle photo you’ll see some cracks in the top wooden ring. I don’t know if those were in the wood to begin with and I didn’t notice them, or if they developed as I worked on the piece.
All things considered, it’s not too bad for my third attempt at this. I’ve made quite a few mistakes but at least I’ve ended up with three projects that weren’t too bad for a beginning. And I’ve learned a lot.
I really need to do more experimenting with color mixing. I’m not at all satisfied with how some of the colors turn out.
It’s been sitting in the pressure tank for about 48 hours now, so let’s open that sucker up and see what we got…
Eeewww… Well, that’s not too encouraging looking
Yeah, not sure about that color. Not at all
He’s going to make this into a lamp? Seriously? He must be nuts.
Demolding requires large rubber hammers. Did you know that? Well, I require them. Great fun beating on large hunks of plastic with hammers. And now that I got it in decent light, that color doesn’t look too bad. Let’s get it out of the mold
Ooo, I kinda like that. All shimmery and stuff. It still needs to sit another 24 hours before it can go on the lathe. It’s still tacky to the touch.
Meanwhile I got this going…
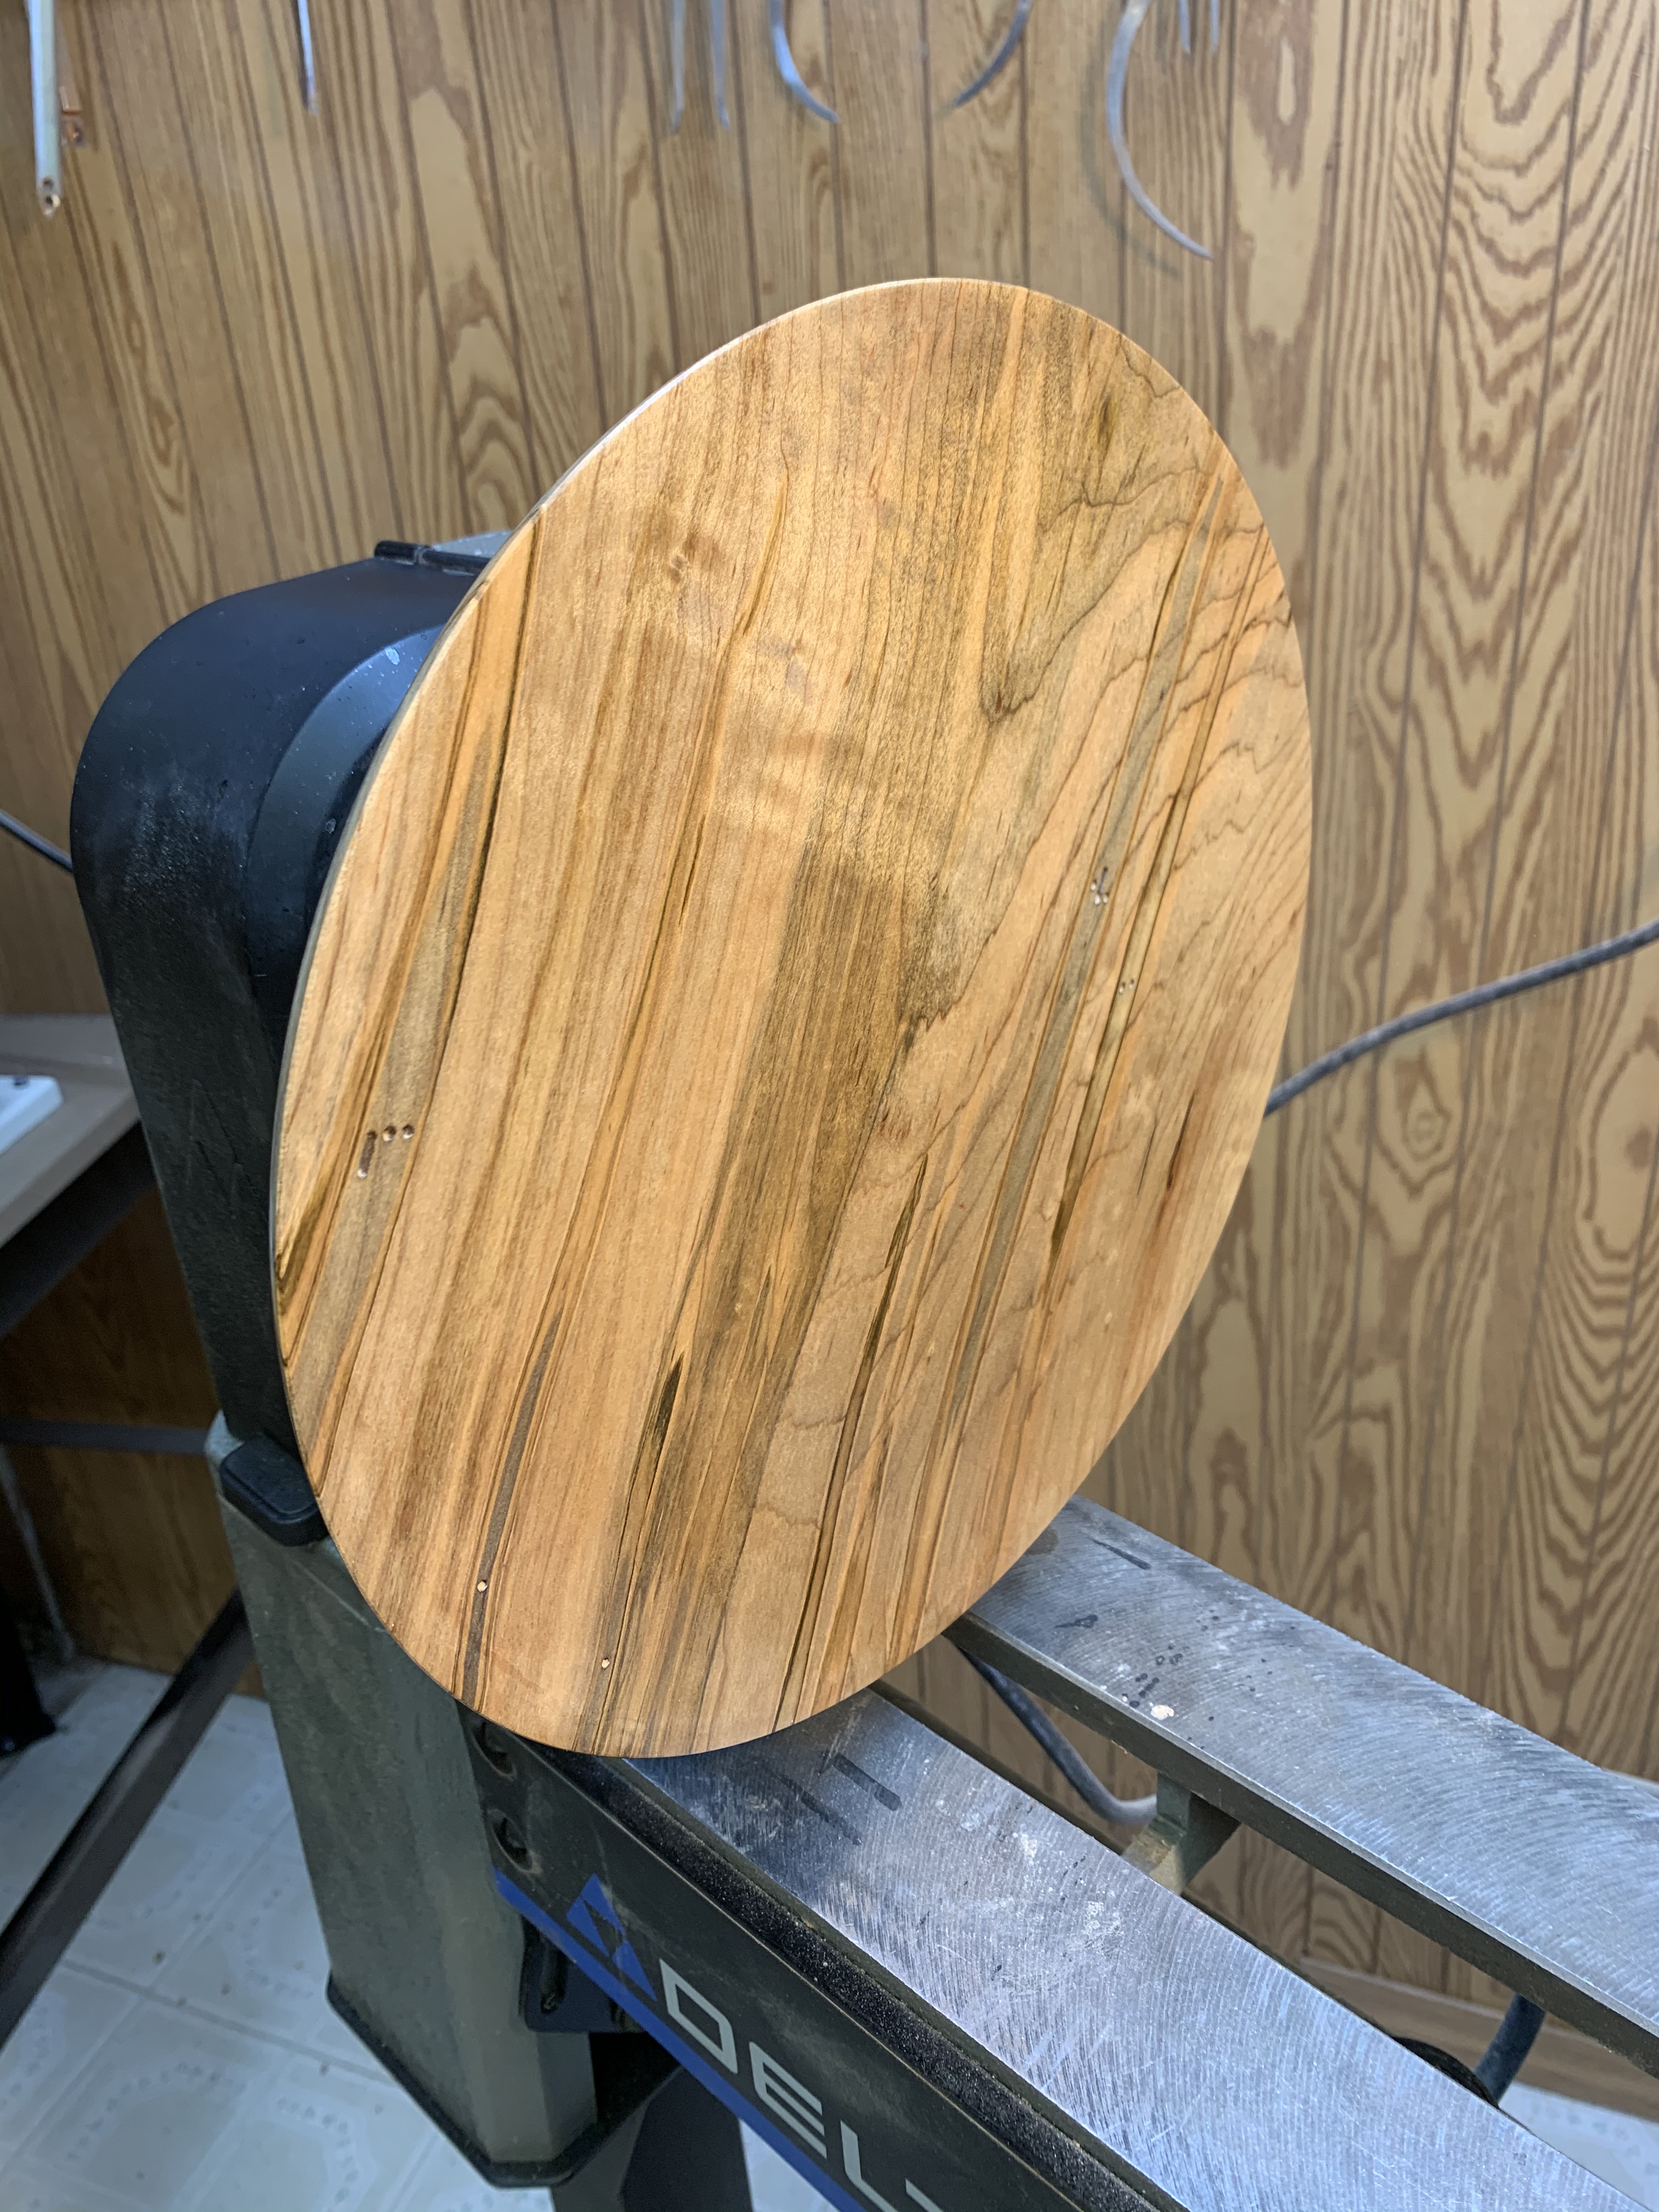
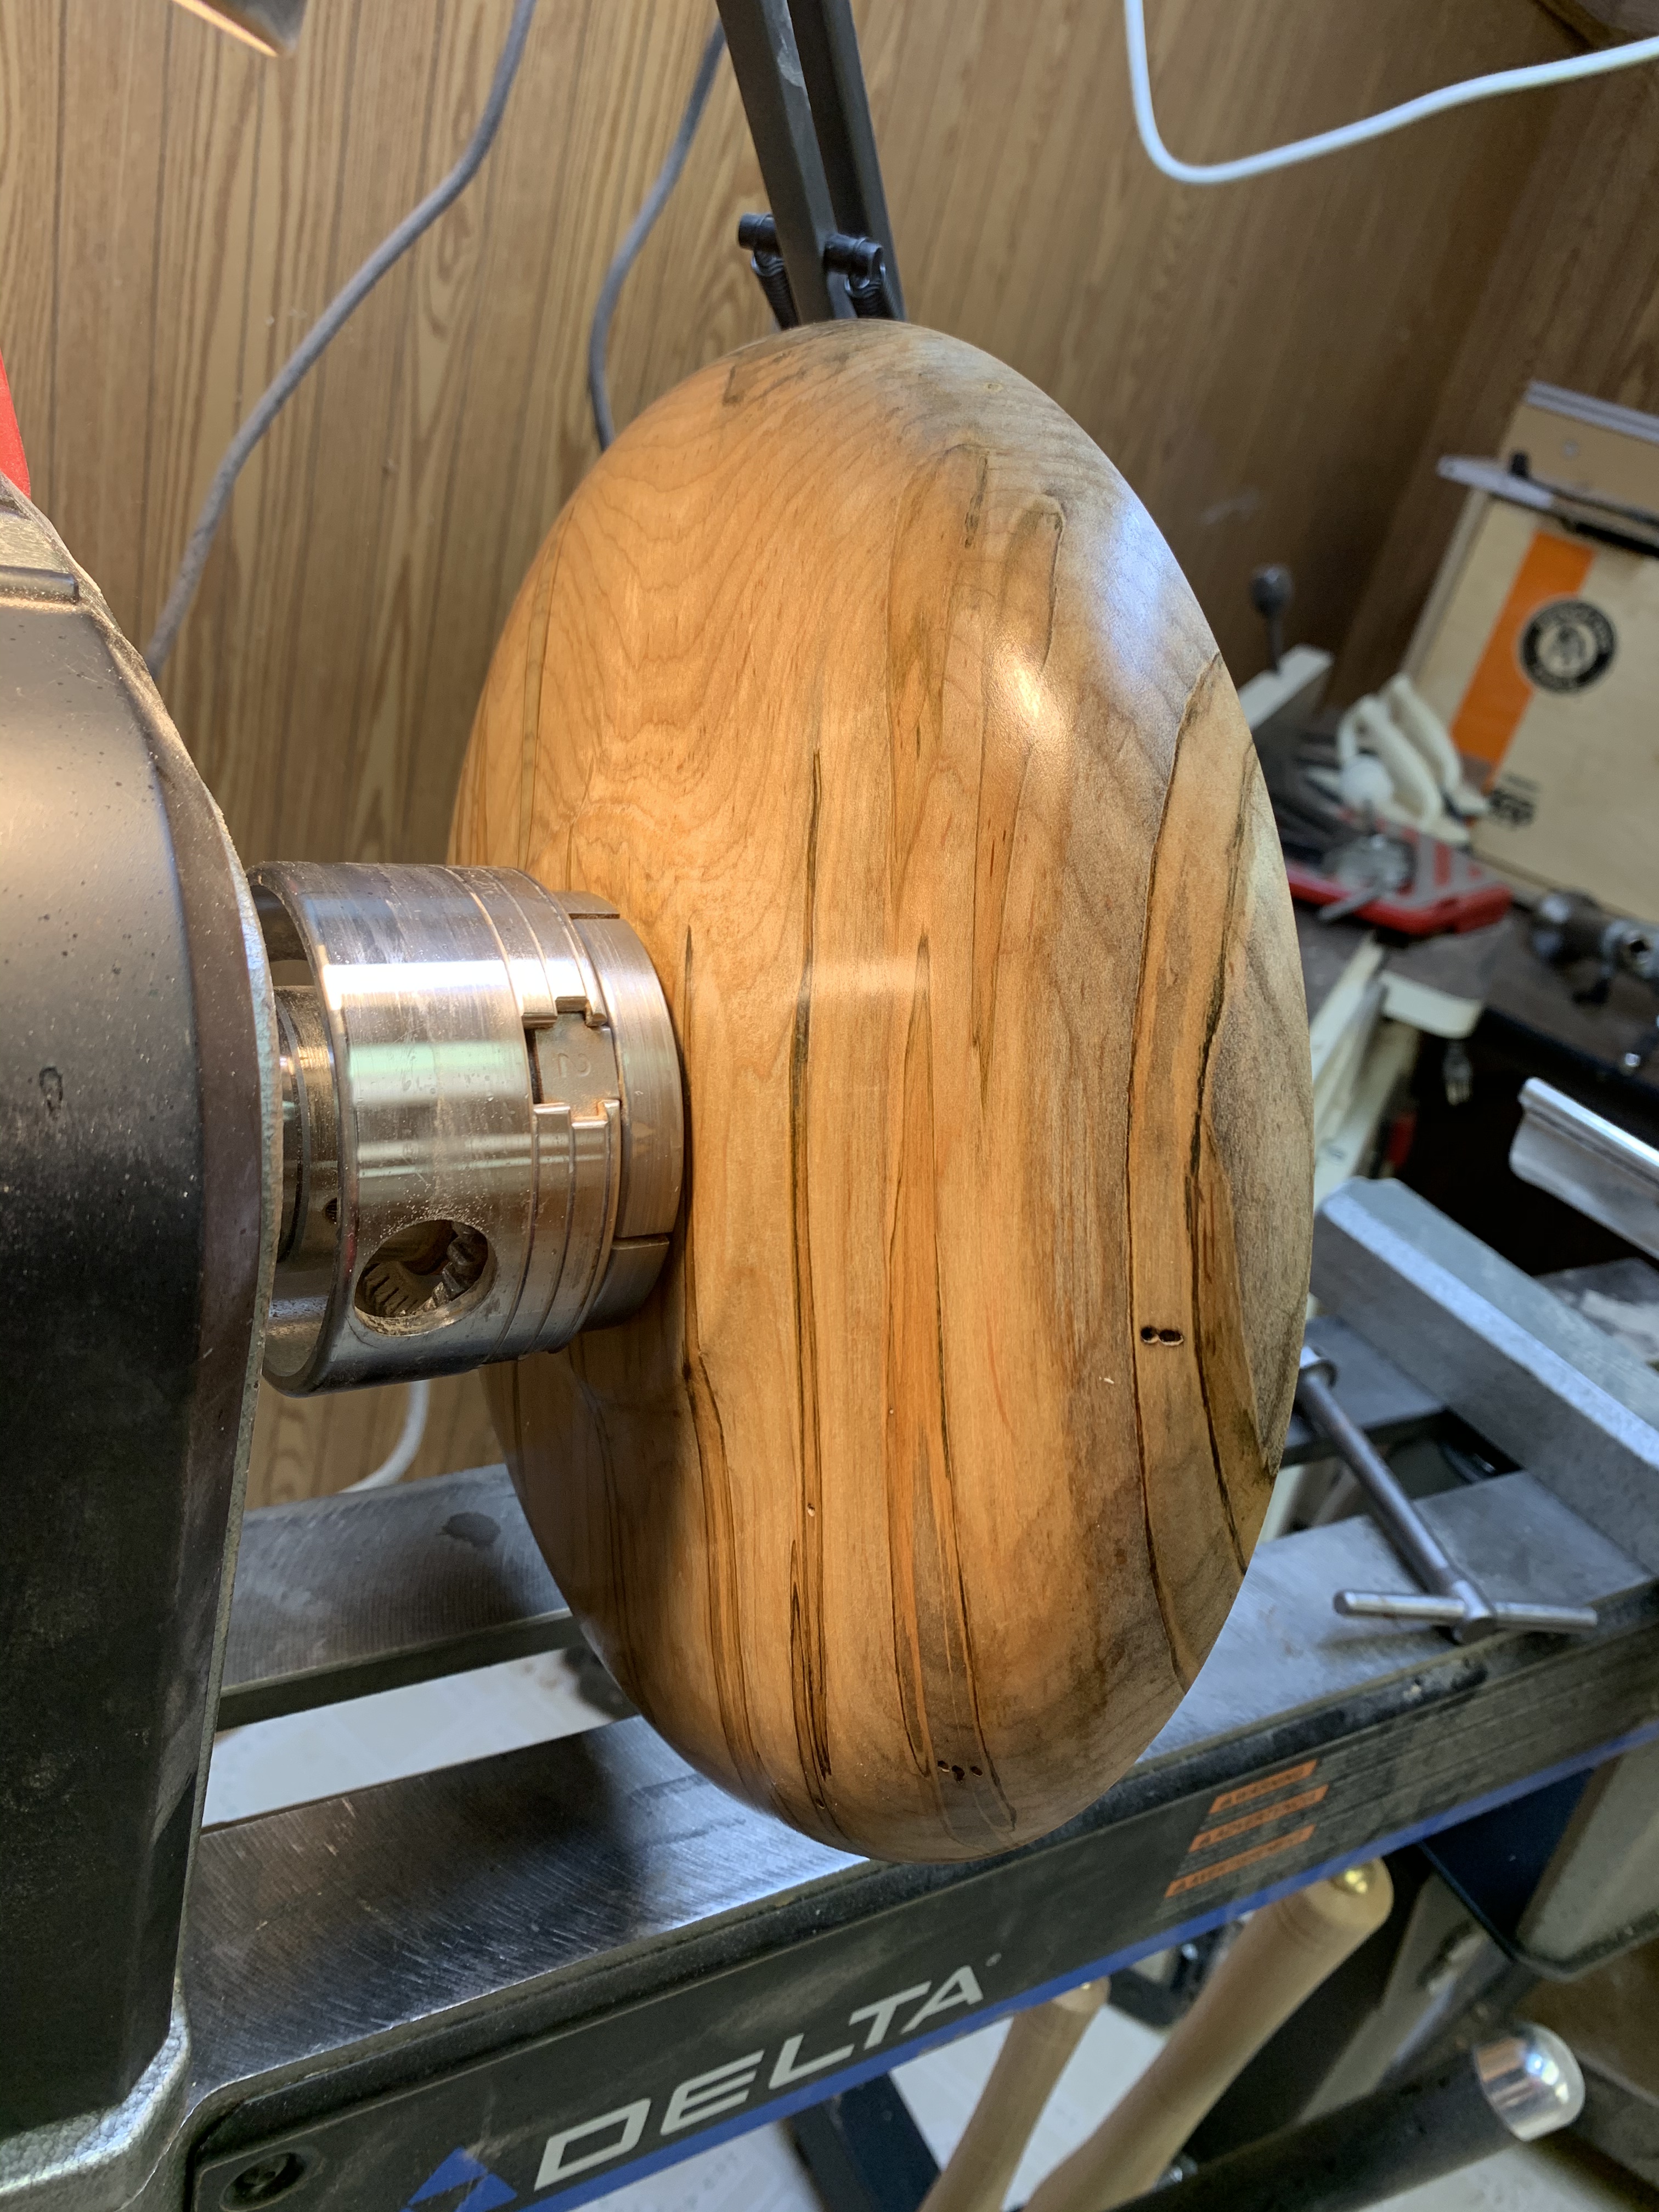
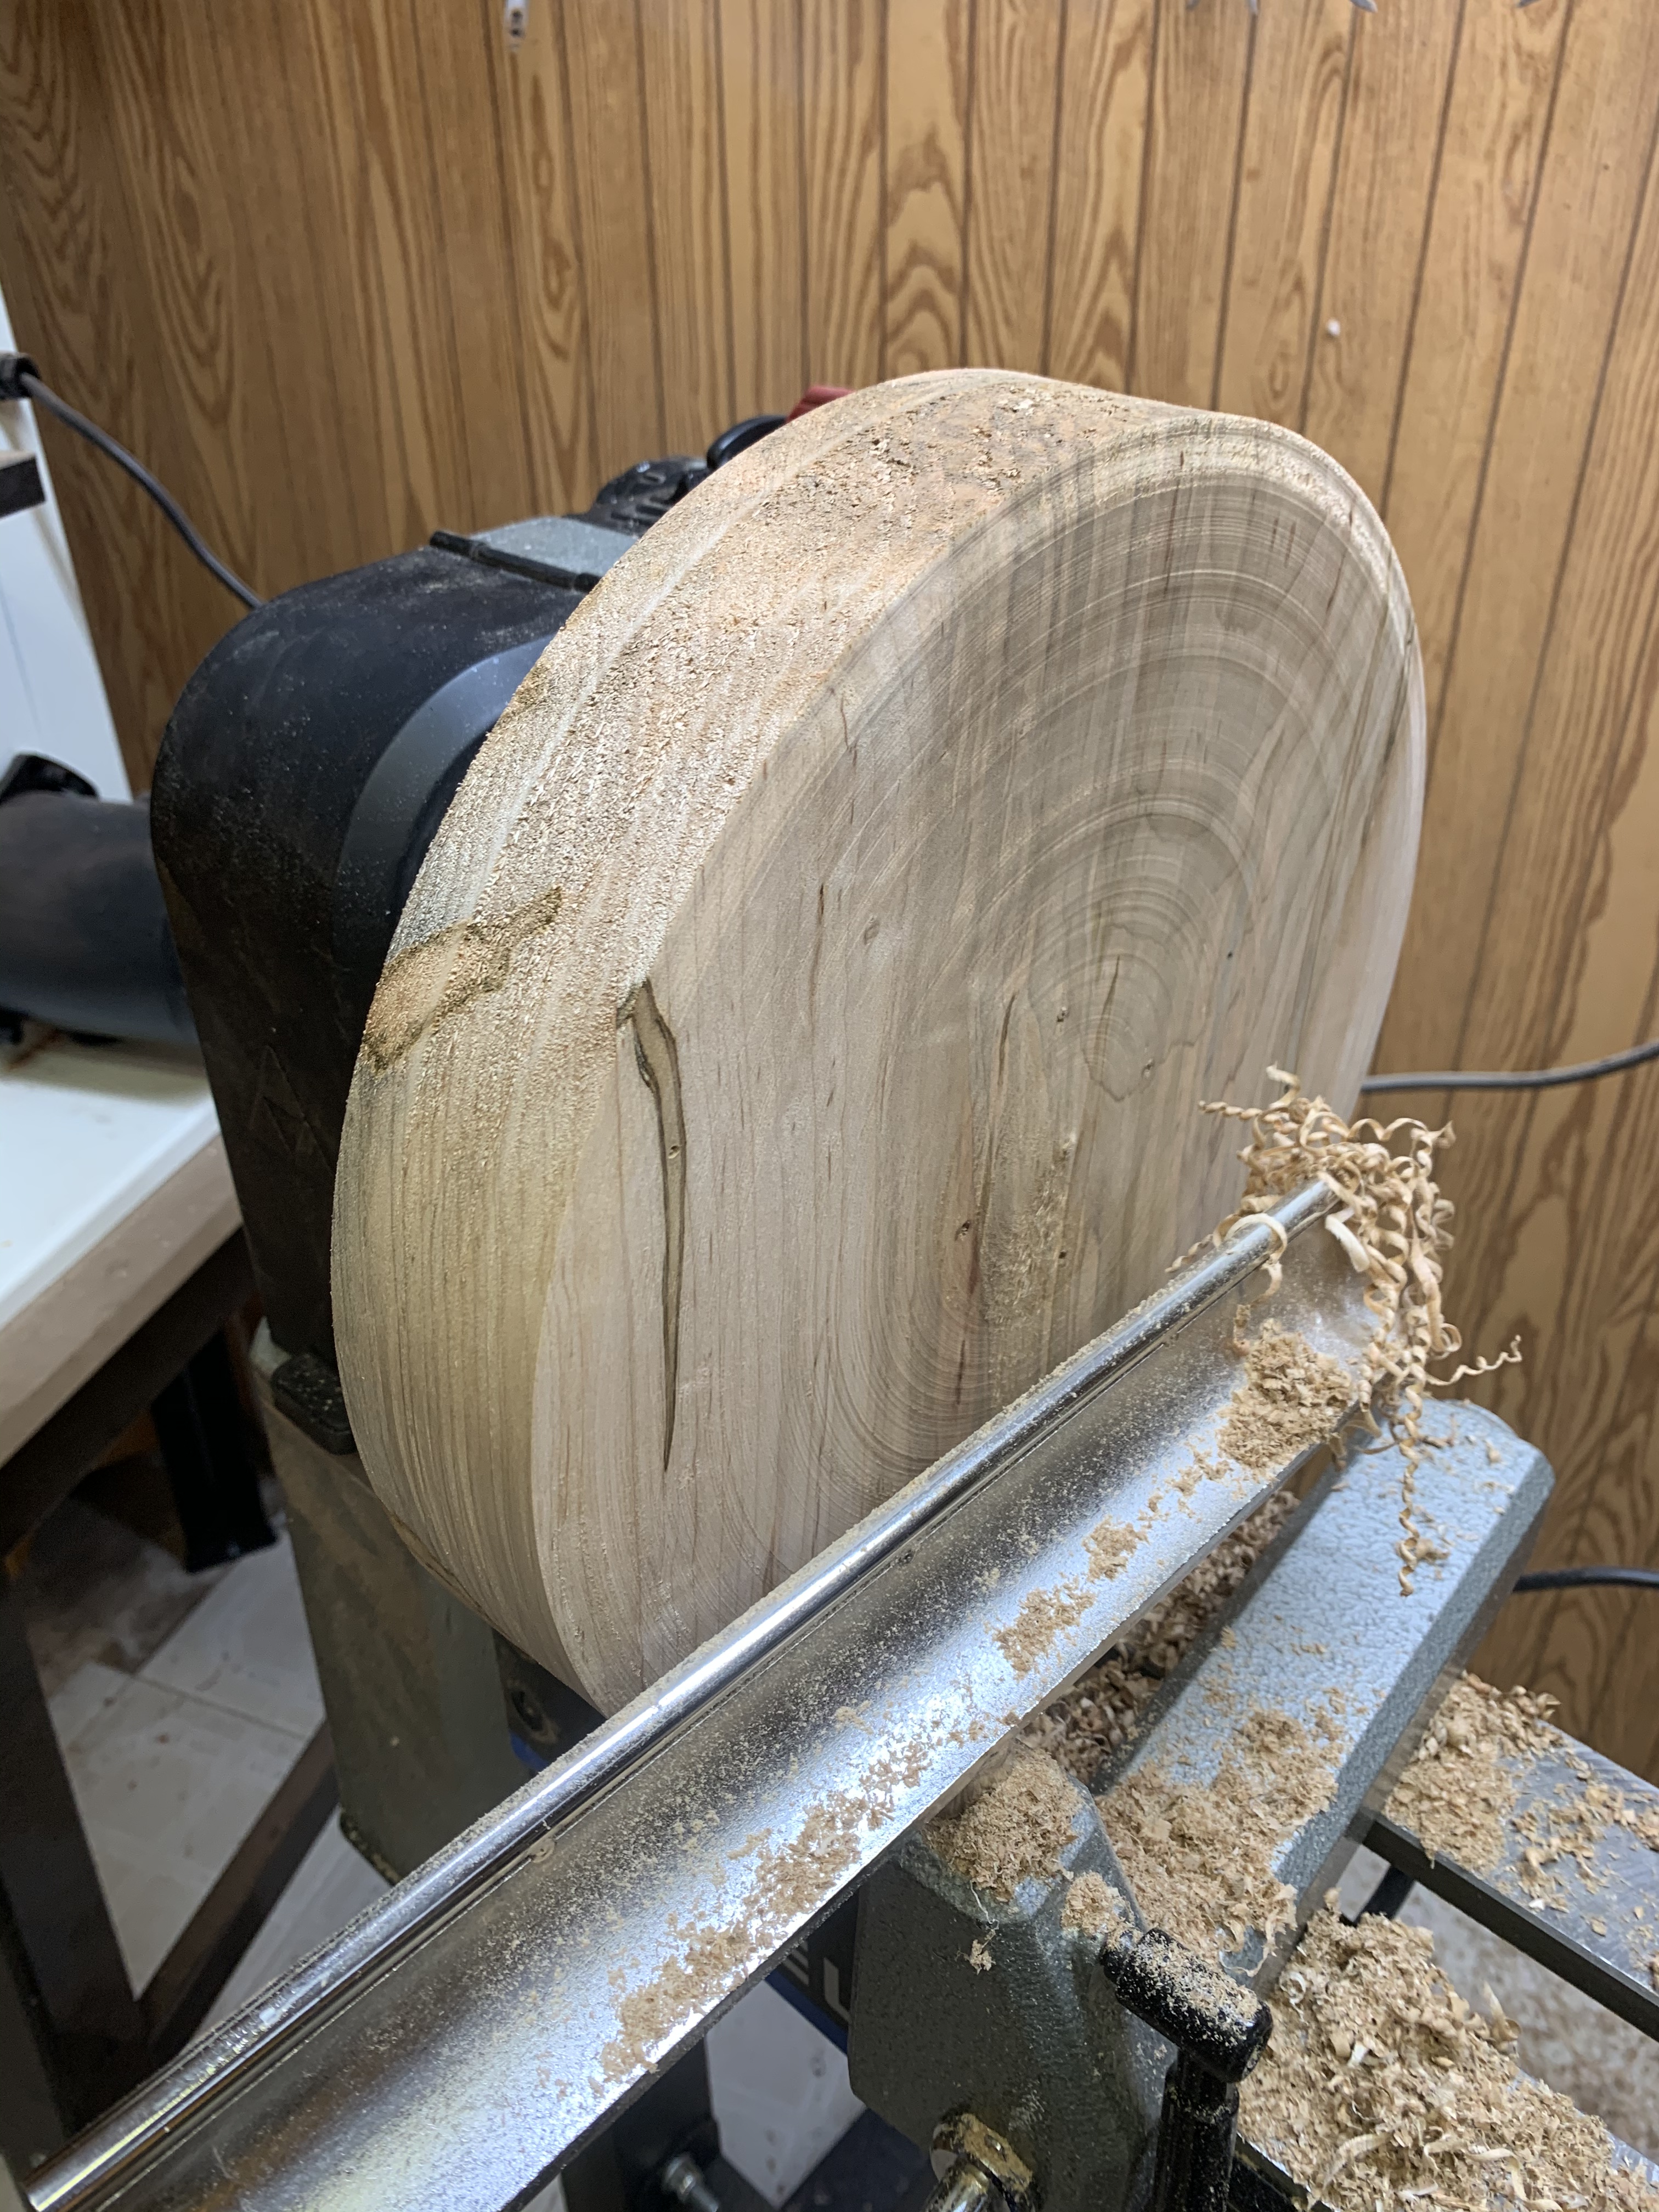
This is going to be the top plate for a pedestal cake stand. I hope. Maybe. This puppy is literally nearly touching the bed of the lathe. About 12″ across. Damn, this better work. I’m not even going to tell you how much that hunk of wood cost me. If all goes well, this is going to be a Christmas gift for MrsGF. Or it will fit nicely into the neighbor’s firepit if it goes bad.
So we got winter now? So it seems. This is what it looks like outside this morning. Sheesh – it’s way too early for this, but, well, this is Wisconsin so we never know what we’re going to see out there when we get up in the morning.
Wood Finishes – I’ve become disillusioned with the finish I used to like, which was a mixture of beeswax, tung and cedar oil. It put a beautiful finish on the pieces, but unfortunately it didn’t stay nice. After several weeks the finish started to get dull looking, even rather nasty. I was really disappointed with that because I liked the satin finish it left.
So I’ve been using a different technique. I make my own shellac and I use that as a base coat on the wood, scuff it with 0000 steel wool to smooth things down, then put down a coat of hard carnauba wax and buff it out at high speed. It’s a bit more work because I have to sand down the wood to a higher grit than I normally would. I used to sand up to a 340 grit, but for this to work I have to go up to 600 grit because the high polish will show even tiny defects. But so far the results have been pretty nice.
This one was originally done with the beeswax blend. I had to sand it back to bare wood and refinish it because it was looking so bad.
Early results are encouraging. And there are no nasty chemicals in any of this. The shellac is just shellac flakes dissolved in alcohol, and the wax is pure carnauba. So far it seems to be working pretty well. But time will tell. The beeswax finish I used looked good at first too.
I finally broke down and bought a band saw. I’ve wanted one for a long time but always talked myself out of it, claiming I could get along with a table saw and miter saw. But I’m working with a lot of 3-4 inch thick wood now and I just can’t cut that stuff without one. The one I really wanted cost over $2,000 and wouldn’t fit into my workshop. And I’m sure MrsGF would give me that look if I showed up with a $2K bandsaw some afternoon. (You really don’t want her to give you that look. Seriously. It’s scary.)
It’s a Rikon and it doesn’t seem bad at all. It was easy to put together and get set up, it runs smooth and seems to be pretty well made and reasonably sturdy. It will cut up to 5″ thick stock. I’d have liked to have a larger capacity than that, but wow, do prices go up fast in the larger size saws. A saw with just one inch greater capacity, 6″ instead of 5″, would be twice or even three times the cost of this one, and I can’t justify that. This one was under $500 and it seems to be pretty good quality for that price. But time will tell.
Rikon has a fairly good reputation, so it will be interesting to see how this saw works out. The only other Rikon tool I have is my low speed grinder that I use for sharpening my lathe tools.
I just read yet another overly hyped article about the miracles of 5G and how it is going to “transform” my life, and well, enough is enough. I just had to throw my two cents in on the whole 5G cell network nonsense because I’ve been hearing so much hype and, frankly, pure B.S. that I can’t stand it any more.
Look, all that stuff about gigabit speeds and a revolution in data communications because of 5G? Don’t believe any of it. Pretty much none of it is true, certainly all the hype you’re hearing from the cell phone companies isn’t.
5G does indeed deliver impressive speed. Theoretically it is faster than the internet connection to your house. (Well, hell, just about anything is faster than the connection I have at my house which often drops to speeds not much faster than what I could get back in the 1990s with a 28K modem. Just one of the “joys” of the government protected internet/cable tv monopolies we have.)
But that’s the key word, isn’t it? Theoretically. In the laboratory. In testing. Out in the real world 5G almost never reaches those speeds. In fact, it doesn’t even get close. Real world testing of newly installed 5G networks is showing that they are operating at speeds that are no better and often worse than the old 4G network. Seriously. Real world test results where the new 5G network is supposedly up and running are showing that in a lot of areas 5G is slower than the existing 4G/LTE network. And that doesn’t surprise me at all
I know a bit about radio, and that is exactly what the cell phone system is, radio. I know how propagation works, how radio waves at specific frequencies behave, how they can (or more importantly can’t) penetrate things like buildings, windows, etc., I know something about transmitters, receivers, antennas and all that guff. I know all that because I play with that stuff almost every day. And system just will not, can not, deliver the bandwidth and speeds these companies are claiming it will except under ideal circumstances which almost never exist out here in the real world.
Some of their transmitters at certain frequencies have a range of a whopping 150 yards. That’s it. Some of the frequencies being used are blocked by, well, everything, even glass. In difficult areas at some frequencies the companies would have to not only install equipment every few hundred feet, they’d have to install repeaters inside of large buildings to get coverage. Trying to fully implement this network to make it capable of what the cell companies claim it will do would cost massive amounts of money, trying to get permits, locate transmitters, etc would be a nightmare. So outside of dense (and high profit) urban areas, it just ain’t gonna happen.
Sure, it has a lot of potential, especially in rural areas. The system that runs down in the 600 mHz band has a lot of potential. It won’t get anywhere near gigabit speeds, but it does promise to deliver speed in the 30 -40 mbs range, which is a hell of a lot better than what most of us out here in rural areas are getting.
But all that other stuff about pushing up to gigabit speeds with ridiculously low latency times? Don’t believe it. The only places where you’ll see those kinds of speeds are in the most densely populated areas where the companies can maximize their profits.
And then there is going to be the cost. That seems to be one thing everyone is forgetting to mention. What is this going to cost us? You can be darn sure that the cell/data monopolies are going to try to suck every penny they can out of you. There are going to be data caps, speed throttling, and eye watering overage charges. They’re going to milk this for every penny they can get. And if you think they won’t, I should remind you that one of the big cell companies drastically throttled back the speeds and capabilities of some of California’s emergency services, including the fire departments a year or so ago. In the middle of a state wide fire emergency while whole towns were burning. Even though they paid extra for “unlimited” service. So yeah, they’re going to charge you through the nose for it.
5G has huge potential. The problem is that for most of us out in the real world we’re never going to see that potential fulfilled because of a lack of infrastructure, poor implementation by the carriers, and sheer greed on the part of the companies.
Just thought I’d keep you up to date about the resin experiments. I started this about a week or so ago and, of course, I entirely forgot to take photos. Sigh… But I can show you the end result and tell you that it worked out reasonably well for something I just threw together.
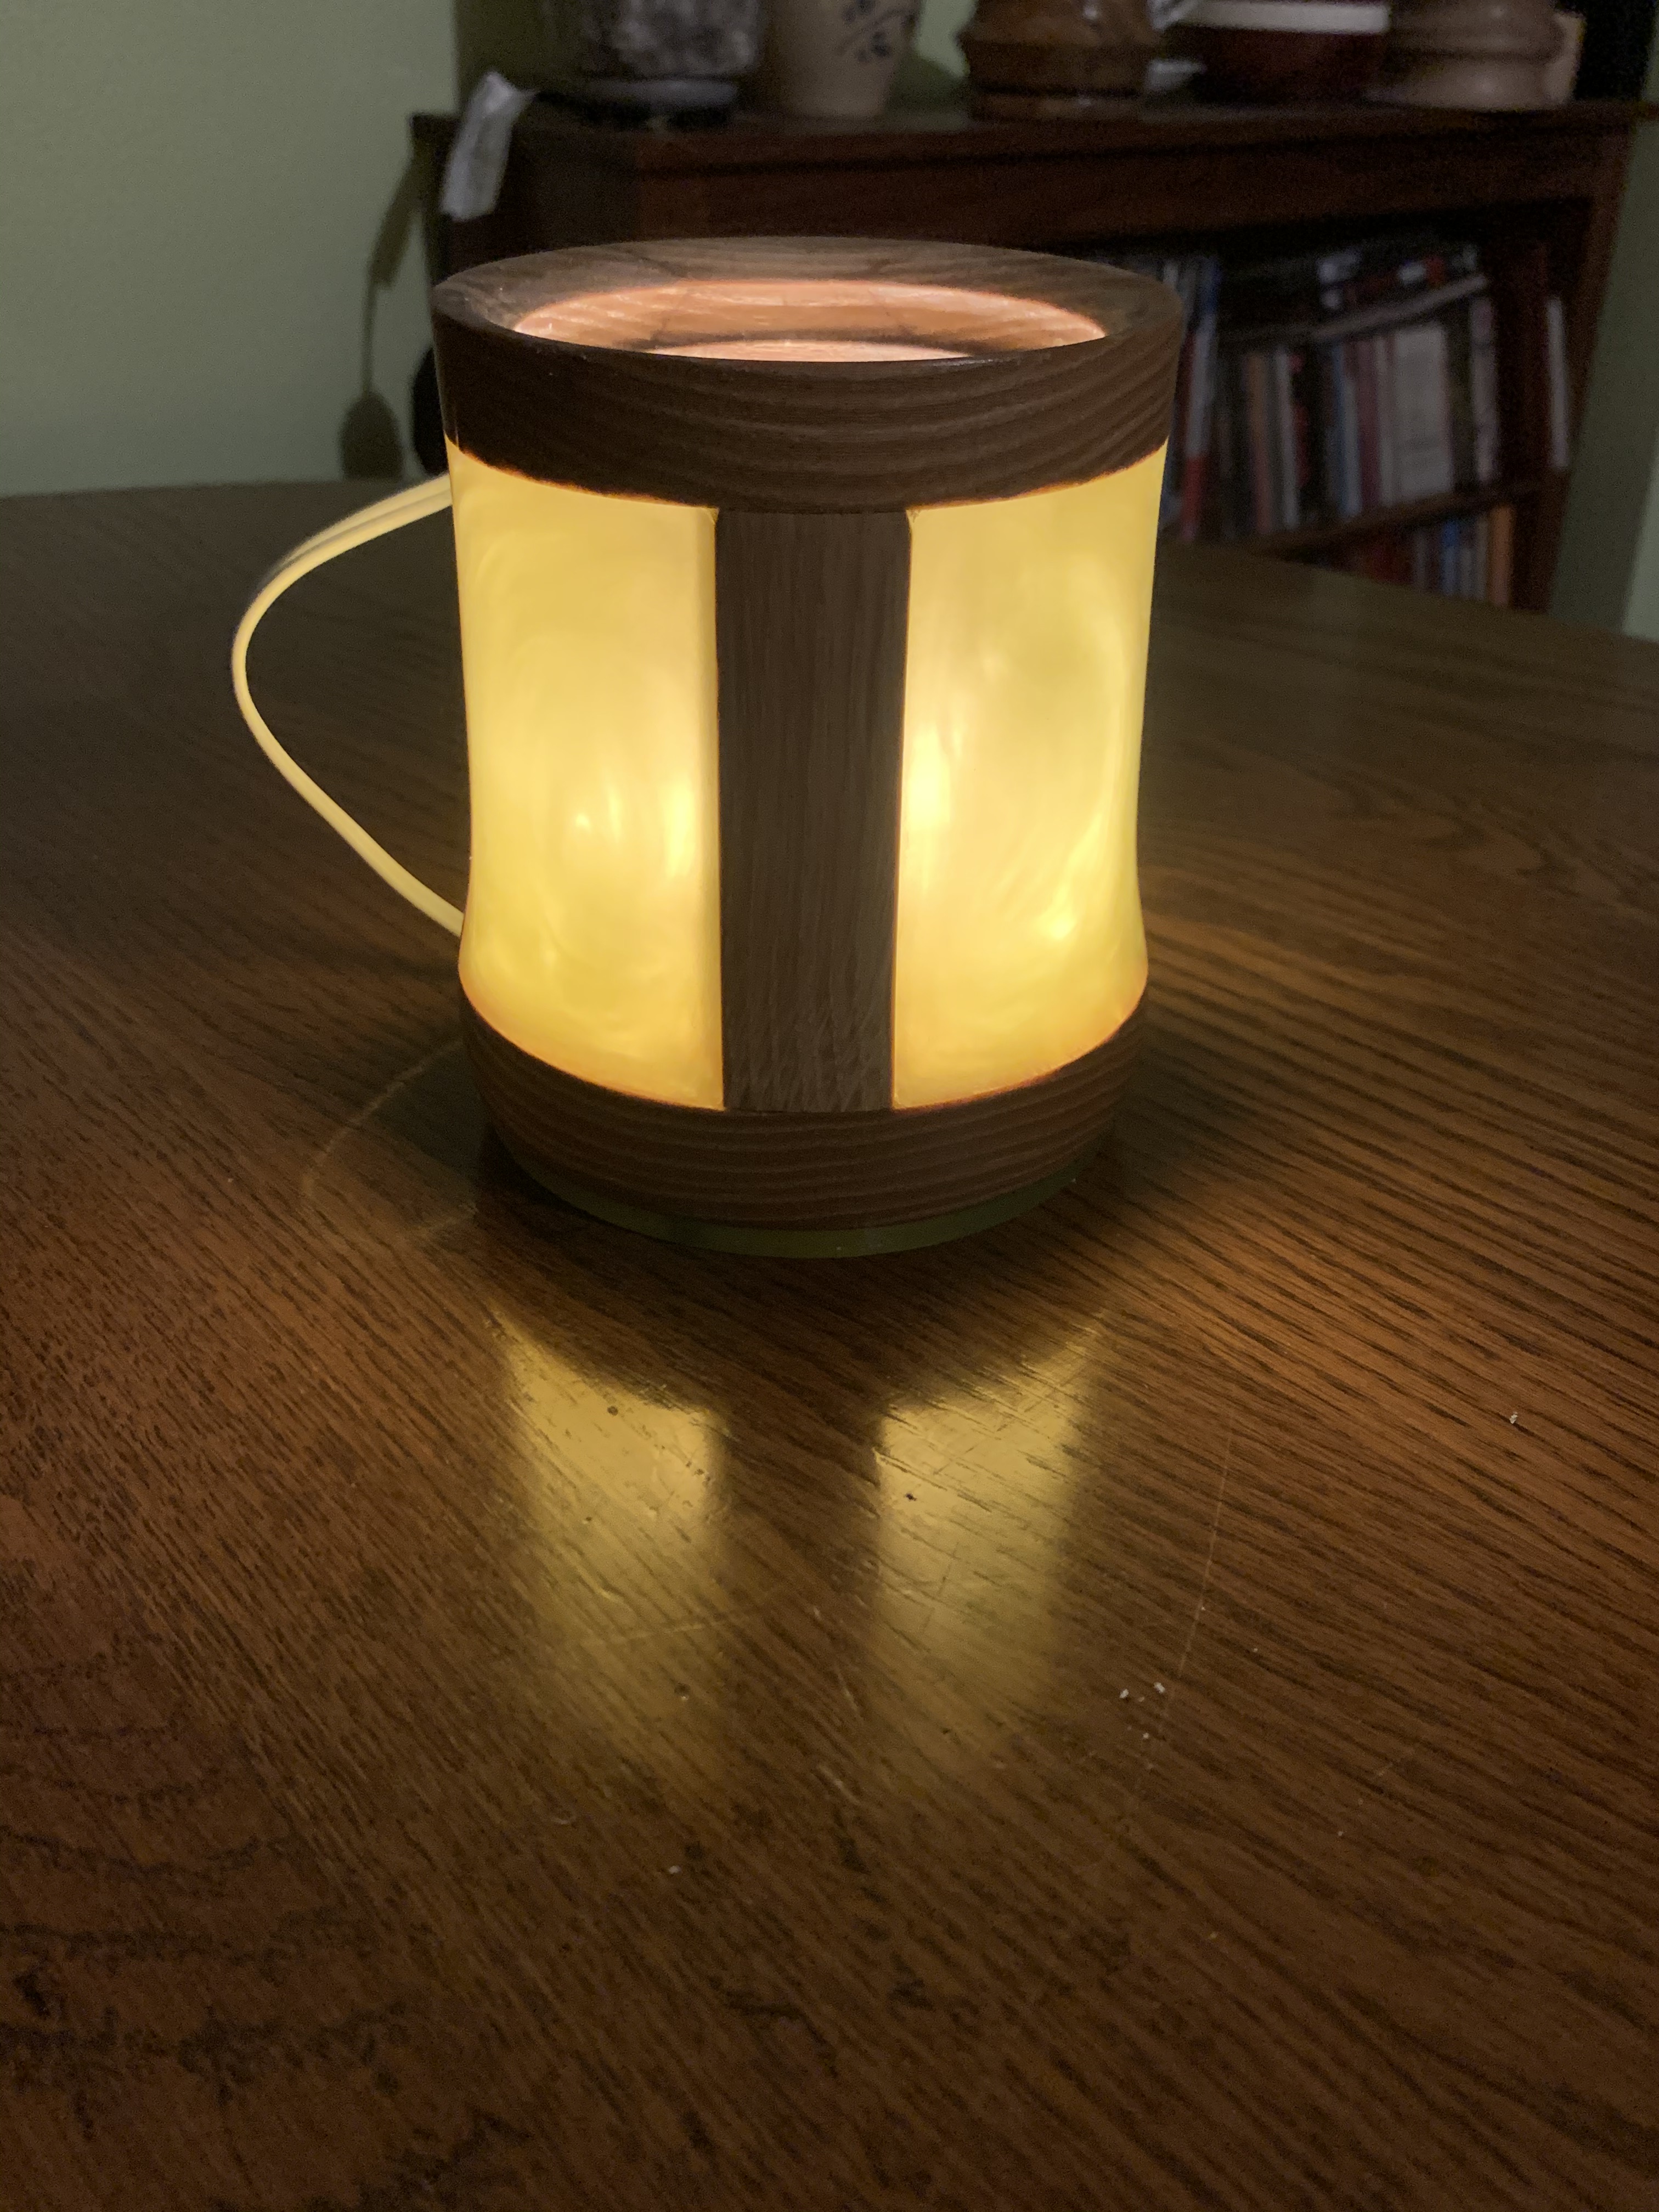
I stuck a battery powered tea light in the thing. Turned out much better than I thought it would.
I did all of this just to see how the whole system worked and to discover any quirks or issues I might not have been aware of. It all worked surprisingly well.
The resin I’m using here is from Naked Fusion, their “Deep Pour” formula, and it was really easy to work with. I had no problems at all with mixing it or coloring it. You might remember this was the stuff that got damaged in shipping and started leaking on my front deck. The hardener bottle got punctured. The resin bottle was fine, and I managed to salvage about two thirds of the hardener, putting it into sealed glass jars. Anyway, I do like this stuff a lot now that I’ve had a chance to try it. It has no VOCs and virtually no odor at all. Some of this stuff is so nasty you have to wear a respirator just to work with it. I had no such problems with this. It mixes easily, was easy to use with coloring agents, and worked just fine.
I took a bunch of small wood scraps and shoved them into a plastic container, mixed up about 30 oz of the resin with some coloring in it, poured it over the top of the wood, then chucked the whole thing into the pressure tank. I pumped it up to 65 PSI and let it sit for 24 hours. After that I released the pressure on the tank and checked, and it was still a bit, well, squishy. But I expected that. Naked Fusion says it can take up to 72 hours or even longer to fully cure, depending on the temperature, quantity of material being used and some other factors.
So I put it back in the tank and pulled it out after another 24 hours hours and was able to peel the mold off it. The epoxy still felt tacky to the touch so I waited another 12 hours, by which time it seemed fully cured. That’s pretty much spot on according to the instructions.
The tank seemed to do its job of eliminating bubbles. I didn’t see any noticeable bubbles in the epoxy when I looked at it under a strong light.
I stuck it in the lathe and flattened one end, used a 2″ Forstner bit chucked into the lathe to drill a mortise into one end to fit my 4 jaw chuck, and got to work because I what I really wanted to see was how well this stuff could be shaped with my equipment and tools.
Wear a respirator if you work with this stuff. Seriously. Do I really need to tell you that you do not want to be breathing epoxy dust? Or wood dust, for that matter.
It machines pretty darn well, but dear lord it’s messy! I should have taken some photos or a video of it because holy cow it was a mess! I had long, thin strings of epoxy flying off everywhere and getting into everything. I looked like I was covered in tinsel after a few minutes, and so did everything else within three feet of the lathe. I had to vacuum my hair afterwards, for heaven’s sake. And change all my clothes, including my socks. I can see I’m going to need to rig up some kind of frame to hold the nozzle from the shopvac close to lathe to try to suck this stuff up before it gets all over everything the next time I do this.
I’ve heard people claim you can only work this stuff with carbide tools. I’ve heard other people claim you can’t use carbide tools and have to use HSS tools. So I tried both and it doesn’t matter. My traditional steel roughing gouge and bowl gouges worked just as well with this stuff as my carbide tipped tools. The only issue I noticed is that the epoxy can chip if I started to try to make too deep of a cut. Using a traditional bowl gouge works a wee bit better, but only because the “U” shape of the tool guides the material away from work. With the carbide tools waste material tended to build up right at the cutter head and I’d have to stop more often to clean things off so I could see what I was doing
Sanding this stuff is a major hassle. Sanding worked ok up to about 120 grit, but finer grit sandpaper clogs up almost immediately. I can see that if I want to get a good, glass smooth finish on this stuff I’m going to have to resort to wet sanding. I didn’t want to go through all the the mess involved with that for this experiment so I only sanded up to 120 grit and then quit.
Normally I use a beeswax/tung oil blend to finish off my wood pieces because I like it. I personally don’t like wood with mirror like finishes on it because I think it looks ridiculously artificial. I like wood to look like wood, and the beeswax gives it a nice finish without ending up with something that looks like it was dipped in plastic. The finish on this is also an experiment, using a carnauba wax product. That worked out pretty well too. I don’t think it’s any better than the beeswax/tung oil finish I’ve used before, but it isn’t bad at all. And for some reason it smells like blueberries? Seriously?
All things considered I think this experiment was pretty successful and I’m confident enough now to want to try more serious things with this system.
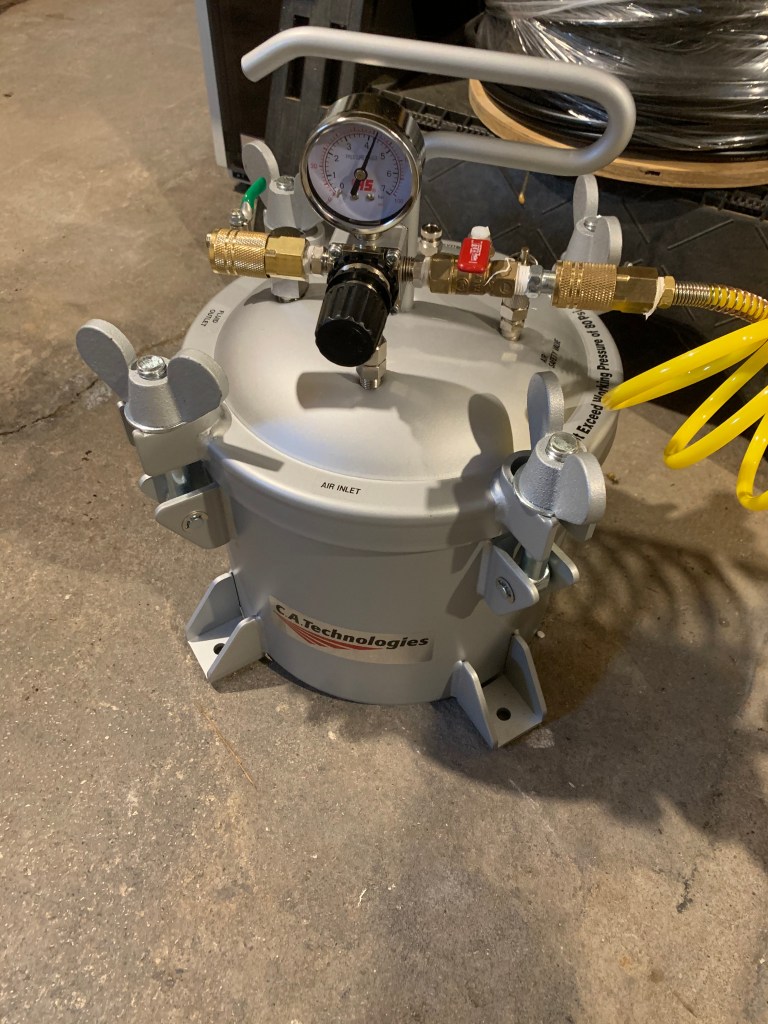
Are there drawbacks? You bet. Some serious, like the cost. If this looks like something you want to try yourself, I’ll warn you right now it ain’t cheap. That one and a half gallon resin kit up there will set you back about $170. If you want to color the resin you need to buy dyes, powders, etc. and that’s more money. That pressure tank used to reduce bubbles in the resin will set you back about $400. There are cheaper tanks on the market but I wouldn’t trust them. You can get a pressure pot from a certain well known ultra-cheap tool vendor that I won’t name that costs less than half what my CA Technologies tank cost and, well, I personally don’t know anyone who has had a cheap pressure tank explode on them, but stories about these things failing and actual photos of failed tanks pop up all the time. Plug the phrase “resin casting pressure pot failure” into Google search and you’ll quickly find out which brand I’m talking about. If you need a pressure tank for resin casting you very, very much want to avoid the cheap brands and the home made ones you see out there.
Then you need molds, of course. You can try to make your own. There are silicon molds in various shapes and sizes that you can buy. Since I was going to be machining this stuff anyway I wasn’t worried about the mold shape. I just ordered a bunch of cheap, disposable plastic mixing cups off Amazon in various sizes and those work quite well.
Let’s talk about the resin for a minute. There are a bewildering variety of brands and types out there. Every different type has its advantages and disadvantages. If you want to do stuff like this, do your research before you start buying anything. I can’t emphasize that enough. Most of the “art” rosins are only good for very thin pours, 1/2 inch or less, often only 1/4″ thick. If you want to do stuff like that tea light up there, you need a “deep pour” resin that can be poured at least 2″ thick. Some resins cure so fast I don’t know how people can actually work with them. Others, like this one from Naked Fusion, can take days to fully cure. Some put out nasty fumes. Some produce considerable heat during the curing process. You get the idea. Research, research, research!
And I suppose before I wrap this up I should add the usual disclaimer. I do not get free material from manufacturers, I do not accept advertising, I am not paid by the makers or dealers of any of the products or tools I talk about here. All of the stuff you see here was purchased by myself. If I recommend a specific product it is because I personally have used it and liked it.